Little Bit of This and That

When I write these blog posts I generally try to go for a general theme, which sometimes means that cool little things get left our because they don’t follow the narrative.  Sometimes I just let them go, but I also put the pictures in a folder and sort of collect them and eventually make a post of them.  Since some of these are Lee being inventive I thought I would share them.  I always loves when he MacGyver’s stuff together.  Let me start with Jack’s AKC ID collar though.  He came with a microchip and a free registration and for $20 I enrolled him in a lifetime tracking program.  The company keeps your information on file, and if anyone contacts them they contact you, which is nice and puts a middle man between you and the person who found you dog.  I also purchased for an additional $20 this very nice collar, which has his name and ID number inscribed on it.

The collar was slightly heavy but he doesn’t seem to mind. Also dogs don’t have to be purebred to participate in the program.


Speaking of Jack, Lee figured out how to leave the barrier on the screened window up just enough so Jack could look out. He’s stealth puppy.


And he is enjoying hanging out in the sun with his Dad.

He has been on cow duty and actually his barking is doing a great job of keeping them away. This is the closest they have gotten to the RV.  You can see it down past the lights.

He’s also learned to play fetch (sot of) on the leash)

Good way to get him some safe exercise.

I also wanted to share what our water/electric/sewer setup is here gate guarding.  All setups are pretty similar, but there can be some variation.  We have a tank that holds 650 gallons of water which is filled every two weeks and the diesel for the generator is also filled every two weeks. The sewer bladder is weekly, which is a little different.  Turns out they have outlawed grey water on the ground here in Texas so the company needs to empty it more frequently.  The trailer and equipment is extremely well maintained and looks practically brand new which is nice.  The generator is also a newer one and relatively quiet.

From left: generator, water, and fuel oil. The water tank is black so it doesn’t grow algae in it.


Sewer bladder is pretty standard, but it’s a big one and being emptied weekly means no issue with full tanks.

What else?  Well, it is dusty, no way around that, and I have resigned myself to a thin layer of dust on everything.  We like the fresh air so I don’t want to stay completely sealed up and when there is a breeze dust comes with it.  One place I don’t want dust though is in the bed.  Jack has been sleeping with us, and the bed got pretty gritty, so Lee was able to wash the sheets finally.  Yes, we have enough water to do a couple loads of laundry a week as long as we keep our showers short.  Lee uses our fan to dry the sheets, and he found a new way to dry the pillow cases.  Just love this.

Pillow case is clothes pinned to the fan


Amazing right…who thinks like that?? My guy!

Speaking of Lee’s inventions, it is really bothering us that Jack can’t run around (there is no dog park anywhere close by), he created a run between the RV and our truck.  Unfortunately Jack isn’t a huge fan and we can’t leave him alone because of the coyotes, but it will still a cool idea and worth sharing.


Finally, I’ve been a little disappointed in the sunsets we have been seeing, but finally we got a couple of nice ones.  It can be beautiful out here sometimes.

We have one lovely little flower growing right by our RV


Camper Chronicles is a participant in the Amazon Services LLC Associates Program, a program designed to provide a means for sites to earn advertising fees by advertising and linking to amazon.com. We very much appreciate any purchase you make via our website links.  There is no additional cost to you and helps support our blog.  Search Amazon.com here

Or you can check out our recipe book filled with 80 real recipes we have cooked in our RV and taste tested by Lee himself. The cookbook specializes in recipes that have a limited number of ingredients, without sacrificing flavor and is organized into categories that matter to full time RVers such as Happy Hours, Travel Days, and Pot Lucks   You can preview the kindle version on  Amazon or the Apple version on Itunes.    It is available in paperback on Amazon if you prefer.


Gate Guarding in High Winds

Most days things are really mellow here at the gate, but when I woke up this morning I learned we were expecting 50 mph winds!  That’s no fun in an RV even if you aren’t working, and certainly not fun when you have to open and shut a heavy gate a hundred or more times a day.  The first thing Lee did was take the top and side walls off our our EZ Up shelter structure which definitely wouldn’t have stood up to the wind. He also laid the light stands down, which works fine in the day, but at night is going to be a problem trying to do this without light.  He also tried to find a spot where the motion sensors could be without “falsing” too much.  That was a bit of a lost cause though and we had lots of ding dongs and no trucks.  We also had lots of trucks coming in and no noises at all, so basically you have to be pretty vigilant.  That’s where having a front living room model helps us, because at least I can sit in the forward desk section (which faces the road) and sort of see.  Still miss people, no way around it, and when things are like this they just need to be patient.

Shelter without the sides or top.


Initially we laid all the lights on the ground


You can barely see the motion sensor in a box in the bottom of the sign by the “Y” in Security. This actually works really well!

Once I see the person I have to get out the front door and as anyone know who has an RV, opening the door in high wind is a pain.  You really have to hold on, because it catches like a sail and the handles in my RV aren’t that big to get a good grip. And of course the holes for the drop rods at this particular gate aren’t deep enough for the rods to really get down there, so unless you position it very carefully it starts to creep on you in the wind.  If we were in a gate that didn’t have to stay closed it wouldn’t be a big deal, but I am wrestling with the gate in the wind which can be hard to close. All in all, not fun, but we will see how it goes.  Thankfully I have been feeling better the last couple of days, so at least I am not adding stomach pains to all that but definitely not looking forward to the night.

Jack did OK in the wind, but it was hard to get him to settle enough to go to the bathroom.

As I started writing this it’s around 1pm and I am the one working because I sent Lee to get our mail.  We have a couple of choices when we are working gates and they depend on both what we are getting, and how comfortable we feel with the local post office.  Many small post offices take things general delivery for free, but not all do, and we have had mixed results.  The safest bet is to send things to a UPS store, but that costs between $2 and $5 per item when you pick them up, which can add up.  It’s safer because not all post offices will accept UPS/Fed Ex deliveries and we never know how people will send stuff. Don’t get me wrong, we love getting presents, but when people say “How can I send you something?” this time of year it’s a bit complicated. We can have them sent to our mail service and pay double shipping (best for cards), or sent to a UPS store with our names on them (very important it says both our names because we never know who will be picking it up), or general delivery to post office with our names.  An added wrinkle of the small local post offices is they often have limited hours, but all things being equal that is my preference if we have gone in and talked to them and they are fine with general delivery.

After a couple of hours I was definitely tired of fighting the wind but I am EXTREMELY grateful that the wind is blowing from the highway so it’s hitting the rear of our rig and not the side. And thankfully so far doesn’t have a ton of dust and grit in it.  That is the absolute worst, and like working in a sandstorm, but so far at least we’ve been lucky and the dirt is blowing but farther down the road.  I’ve also taken a moment to talk to some of the regulars and let them know the challenges we would face tonight.  With the motion sensors not working properly, I let them know to feel free to go ahead and honk, and also told them I would do the best I could.  No way am I sitting outside in this all night, so folks will just have to be patient.  If this was a regular gate I would just open them up and whoever I missed I would get on the next go round, but opening and shutting it every time definitely adds a wrinkle.

The wind just got worse and unfortunately it was busy.  There are lots of hunting leases on this property, and for some reason I had numerous hunters show up.  Generally they are not in our system and don’t really understand the gate etiquette like the oil workers so they always take longer to process.  I also had one truck driver stop and tell me that six miles down the road there was a fire which had spread in the same direction as us and was beyond the gate.  The fire department was on site, which was good, but with this wind I would imagine it would be very hard to contain.  I notified my supervisor and since there wasn’t anything else I could do just sort of kept an eye out.  At one point the dog wanted to go out and pee and that was pretty chaotic.  I had trucks, crazy wind, and the dog to worry about.  After he went  I put him back inside and thankfully he decided to take a nap.  He didn’t seem to mind the wind, if anything he was enjoying it, but I was not having fun standing out there with him.

The darker it got the worse the wind blew, and I was struggling not only with our RV door but also with the gate.  It kept blowing open, and although I kept shutting it I saw that the holes in the ground the metal rods went into were somewhat shallow.  The owner’s son came through and I took the opportunity to tell him I was struggling with the gate but his response was very cold.  He said “You need to keep the gate closed, I don’t care about the wind” and when I tried to mention the trouble with the gate itself he couldn’t have cared less. As much as I appreciate the situation from his perspective I have to say that his tone and the way he talked to me was definitely not OK.  I called my boss and let him know and he was really nice about it.  He gave us some suggestions for strapping lights to the gates to get through the night and made me feel a lot better about the whole thing.

It’s hard to see, but the holes that the gate go in are very shallow. The one of the right in particular slips out and just starts sliding as the wind pushes it.


Lee did a great job bungee cording the lights and it worked beautifully.

Thankfully right around the time it got dark, the wind died down a little.  It’s really nice here at night, which is why I like working the night shift, and in between trucks its is very quiet and still.  Occasionally I hear a coyote off in the distance, or the rustle of a nearby cow, but it’s crisp, and clear and beautiful and I really don’t mind staying awake. Most nights I really love but 51 degrees and wind at 20 mph is just not so fun.  So far at least the wind has been a rare occurrence and I am grateful for that.  I just have to physically work so much harder when it’s windy and of course there is some increased risk of getting hurt.

The best thing that came out of the windy day though was that Lee finally bought himself a weather station.  He has wanted one of these for 5 years now, and decided to go ahead and buy himself an early Christmas present. Since it is absolutely work related we will be able to deduct it from our taxes, but even if it wasn’t he has waited a long time to purchase it, and after the last couple of days the last thing I want is to get caught with our pants down on a windy day.   It is a very complicated machine, so I am going to go ahead and let him explain it to you.  I will say that if you have a guy in your life that is hard to buy for this may be the present for him.  Oh, and the station has a widget on this blog that now shows you our general location and the weather in our area.  That was pretty cool!

I already had a small Acurite weather set that included a wireless sensor outside, another one that I kept in the basement to keep an eye on the water lines when it got really cold, and of course inside temp. It also did humidity, but what I really wanted was an anemometer. I always wonder what speed the wind is blowing, but these are kind of pricy so I waited and waited. I finally broke down and got one when I saw that we were going to have a couple of days of really high winds. It’s the Acurite 5 in 1, model #01536.

The outside unit does temperature, wind speed and direction, barometric pressure, humidity, and rain. There’s a nice indoor display that shows current wind direction as well as the 2 previous wind directions, wind speed, and the peak wind speed for that day. The outdoor temp display includes current temp, a heat index calculation, wind chill, dew point and humidity, the high and low temp and humidity for that day, and a trend arrow telling you if the temp and humidity are rising, falling or holding. The rainfall indicator shows you how much rain you’ve had that day, week, month, or year, and how many days since the last rain.

The indoor indicators include temperature and humidity, along with a trend arrow and humidity “comfort” meter, and if you get additional wireless sensors (you can have up to 3), will display information for those as well.

There’s a forecast area that tells you the barometric pressure with a trend  arrow, and gives you a little icon with it’s best guess for the forecast.

And finally there’s a neat little ticker at the bottom that constantly shows a whole slew of data; Heat index, wind chill, dew point, “feels like” temp, daily, weekly, monthly and all time highs for temp, humidity and wind, the phase of the moon, rainfall data, and battery and wireless signal information.


Installing the unit is really simple, it’s an “all in one” and takes 4 AA batteries. It comes with a mounting pipe that has holes on the bottom and side so that it can be mounted in a variety of ways, or you can install it on any 3/4″ pipe. It could be mounted directly to the roof of your rig, but I’m not sure I want to do that yet. I might. I like the idea of just being able to go up there and pop the sensor on the mount and be done, but I’m not sure how traveling at 60 mph will affect the mounting bracket when we move. I definitely wouldn’t drive with the sensor on, though. You can also use a portable tripod mount like this one:


You can see the mounting bracket in the image below. The sensor has a mounting hole on the bottom and it just slides onto the mounting bracket or the pipe you use. There are holes in the side that allow you to put two screws through the body of the sensor into the pipe to secure it, but I chose not to use them. The pipe slides all the way up the body of the sensor, so there’s no danger of it falling off, and it’s a snug enough fit that it won’t spin on the pipe, but I will keep an eye on it to see if it gets looser over time. I don’t want to have to find storage space for the sensor attached to the pipe, and I don’t want to have to put the screws in and take them out every time we move.


The higher you can get it the better, the NWS recommends thirty feet, which is a little unrealistic for a rig. I chose to use a 5′ length of PVC pipe, attached to our rear ladder with stainless steel U-bolts, with about two feet of pipe on the ladder and the sensor at 3′ above the rig. We’re 12′ high, so that puts the sensor at 15′, which is high enough, I think. And there are no obstructions within 6′ of it, so I can get accurate wind readings.

In the picture below you can see the top of the sensor, which shows the solar panel, and the rainfall collector. There’s also a tiny little bubble level between them to help you make sure it’s level when you install it.


And in this image below, you can see the battery compartment, the vane, and where the pipe slides in.


Here it is mounted to our ladder.


For those interested in how it works, here’s a picture showing the interior. I particularly like the solar powered aspirating fan that keeps the insides from overheating in the sun and keeps it dry in high humidity. I’m curious to see how long that fan holds up, but it can be replaced by me if it goes bad. I also like the fact that the vane is on bearings. There’s also a debris screen in the rain collector, although that would need to be cleaned if it were under trees for any length of time.


In addition to the indoor display, you can get software that will upload all of the data to Weather Underground, and that will allow you to look at the data easily in charts and graphs. Acurite offers a device called the Access, which allows you to integrate the sensor with Alexa, and allows you to have all the data without going through Weather Underground, but it’s a little on the pricey side.

And finally, there’s an app for phones and tablets that allow you to see your data form anywhere, and also has a nice feature for setting alerts so you can notified if sensors hit a certain threshold for temp, wind or humidity. Here are a few shots from the app:


Camper Chronicles is a participant in the Amazon Services LLC Associates Program, a program designed to provide a means for sites to earn advertising fees by advertising and linking to amazon.com. We very much appreciate any purchase you make via our website links.  There is no additional cost to you and helps support our blog.  Search Amazon.com here

Or you can check out our recipe book filled with 80 real recipes we have cooked in our RV and taste tested by Lee himself. The cookbook specializes in recipes that have a limited number of ingredients, without sacrificing flavor and is organized into categories that matter to full time RVers such as Happy Hours, Travel Days, and Pot Lucks   You can preview the kindle version on  Amazon or the Apple version on Itunes.    It is available in paperback on Amazon if you prefer.

Down on the Border

Although this is our third season gate guarding, this is by far the southernmost point we have been.  Initially I didn’t mind being this far south, because the weather is better and I was told we were less than three miles away from a border patrol station.  My thought process (and what was insinuated) was we would be pretty safe because of the proximity.  I will say that we do feel safe, but I should also mention there has been a ton of activity.  We see border patrol vehicles several times a day and one stopped and an officer told me that directly across from us was a common immigrant pickup spot.  This morning Lee had five border patrol vehicles come in his gate because they were chasing illegal immigrants on the ranch.

The illegals pickup spot is at that gate

Oddly, I am not nervous, although I do find it interesting that even three years ago most of these extreme south gate guard positions were armed ones.  The landscape appears to have changed though and we were told no guns were allowed on our post.  It’s not just border patrol because this evening one FBI agent and two DEA agents came to search the ranch for a suspect.  Again they had difficulty because the ranch was so big, even though they knew the company the gentleman worked for and his approximate location.  Thankfully our role in these situations is to simply let people in.  And truly it sounds way more scary than it is, although I have requested some more light for our RV area.  We were only given two relatively small light stands and I would feel better with a little more light on the backside of the RV. So all together we have seen Border Patrol, Homeland Security, DEA, and a helicopter of some sort hovering over the property.  Let’s just say there is lots of presence.

Our boss came and added a couple of light stands. He;s a really good guy

Aside from that things have been going well.  We discovered we couldn’t get any TV at all here but Lee did some research and now we are using Hulu. It’s $40 a month and so far at least the streaming is working great.  I can watch football, which was my major concern, and also see lots of other programming they have in their archives.  It’s a nice alternative with an unlimited plan and since there is no contract we can start and stop it at any time.  I’m also impressed by how solid the signal is even though our cell signal isn’t always that strong.  They seemed to have solved many of the issue with freezing pictures, etc.

Jack’s also doing well and definitely settling in.  He is sleeping with Lee now and waking up at 4am and for the last two days has hung out with Lee outside.  Lee keeps him on a lead and has his cage outside, and aside from Jack getting bored he seems to be doing OK.

Bored puppy


Chew a little


Take a little nap

Lee tries to keep him occupied with chew toys and lots of walks and at least he is with one of us almost all of the time.  He has also learned how far he can go on his lead and in the evenings he zooms around a bit to get some exercise.  The herd of cows has been getting closer and closer since we moved in and Jack likes to go outside and bark at them.  It’s effective and they readily scamper off, which cracks me up up because he is so small.

Lee and Jack taking a walk


Chew Toys and dirty face


Hanging in the chair.  He’s a bit camera shy.

Jack aside, Lee’s shelter is working awesome and the heater is great because it does get pretty cold once the sun goes down.  It hasn’t been too unpleasant except for one evening when it rained buckets.  That was definitely not a fun night.  I’ve adjusted to evening shift with relative ease and since Lee blacked out our windows in the bedroom I am sleeping well.

The shelter


The propane buddy works great and we can also use an electric heater. Lee built a Ipad stand and sits outside and watches TV shows and movies.


Rainy Day


And of course the water pooled right where we had to open the gate. We pulled out our rubber boots and it was fine

The only bad thing is I started having some stomach complications after the rainy night.  I tried some over the counter meds but wasn’t feeling better so on the fourth day I went to an urgent care.  This is only the second time I have gone to an urgent care since we have been on the road.  The first time in the Outer Banks and that was a really good experience.  This time not so great.  There was no wait which was a good thing, but after a cursory exam my choices were to try over the counter meds and wait 24 hours or go to another facility and get more tests.  My deductible is paid up for the year but I decided not to go the test route and instead opted to take the over the counter meds and see what happened.  It seems to help some, and I get why the nurse practitioner was being cautious but I also think the treatment plan would have been different if I didn’t have insurance. That really continues to bug me and I am just really glad nothing serious has happened to us on the road.

Other than that, things are going fine and I am glad we should be getting paid soon.   I’m not sure how much I will have to write about in the near future, so don’t be surprised if these posts slow down a bit.  I am getting tantalizing close to finishing the book,  I completed the final edit, but Lee wants to take a crack at it so we are making one more pass.  It’s amazing how every single time I find new things.  Definitely NOT my favorite part of writing.  My goal is to hopefully get it out before the end of the year so I will be pushing to get that done.  That’s all for now and I’ll leave you with the absolute cutest picture of Jack.  Yep I know lots of Jack but seriously how can you not love this!

I adore this picture of Jack. He’s a super tough gate guard dog now!


Camper Chronicles is a participant in the Amazon Services LLC Associates Program, a program designed to provide a means for sites to earn advertising fees by advertising and linking to amazon.com. We very much appreciate any purchase you make via our website links.  There is no additional cost to you and helps support our blog.  Search Amazon.com here

Or you can check out our recipe book filled with 80 real recipes we have cooked in our RV and taste tested by Lee himself. The cookbook specializes in recipes that have a limited number of ingredients, without sacrificing flavor and is organized into categories that matter to full time RVers such as Happy Hours, Travel Days, and Pot Lucks   You can preview the kindle version on  Amazon or the Apple version on Itunes.    It is available in paperback on Amazon if you prefer.

Jack Gets Acclimated…Sort Of

It always takes a while to get acclimated to a new gate, and with Jack it’s been much more challenging.  Not that he is not worth it, but the poor guy has no idea what is going on, and this is a VERY different place than where he came from.  For us we quickly learned that this is a high profile gate, because this ranch is owned by one of the largest land owners in Texas. Consequently when they say they want the gate shut between every vehicle, they mean that, and of course we are complying.  Our first gate was like this so we have some experience, but it is a ton more work when you have to get up and physically open and shut the gate every time.  That’s the gig though, and we certainly weren’t in a position to be picky.

On the plus side the small area right in front of our RV is paved (which helps with the dust) and everyone is incredibly well behaved.  Since high level folks from all the companies are in and out of here, folks are being really good about following the rules.  I generally don’t have any problems at night, but Lee has run into some challenging folks during the day at other gates, but so far not here.  Another reason for this might be that for the first time we have to take pictures of the vehicles.  We use an iPad to log them in and out and we take a front and rear view shot of the vehicles when they come in and go out.  Doesn’t add too much time to the process, but at night the picture quality is not great.  And I was really glad when our supervisor said that getting vehicles off the road was the most important thing.  That way when they stack up, we can just wave them through and catch them on the way out.  That practice keeps everyone safer.

While we were trying to sort all that out, Jack wasn’t doing so great.  We are lucky to have a nice long sandy patch of road to walk him on, but he wants to go into the grass which has stickers and heavens knows what else.  The first day we have two huge Caracao birds in trees just looking at him, and we knew we would need to keep a close eye.  Plus, when he gets the stickers in his paws, he doesn’t seem exactly sure what to do with them, so we are spending lots of time cutting them out of his hair.  Soooo glad we didn’t pay to have him groomed, because that really would have been a waste.  Despite lots of sandy places to go we couldn’t get him to poop that first day.  The truck noise was really freaking him out and he kept getting distracted when we tried to take him out.  He didn’t have any accidents thankfully, but we spent lots of time trying to get him to go to the bathroom, which made our day a little harder.

The second full day though Lee decided to attack the problem.  First he put up our popup tent in the hopes that Jack would feel more comfortable with a place to stay inside as the trucks went by.  We also tried numerous places where we could put the lead rope, and finally I found the perfect spot where he couldn’t get in the road, but could wander around a bit near the rig.

Lee putting up the tent. We bought the sides while in Oregon and they really help with the wind at night and setting sun during the day


Lee even put this little fan up that Greg had given us! Fancy!! We also had a table to charge the iPad, a desk lamp, and a heater. It’s like a little room now.


Lee taking the stickers out of Jack’s foot. Thankfully he’s really patient when we do it.


The lead allows him to get on the stairs, go in the little room, and go behind the rig a little.


He can even get on one of the chairs

These changes, along with Jack getting used to the road sounds seemed to help and he finally pooped.  Since then he has been going frequently although not on a regular schedule.  Part of the problem is his sleep pattern is interrupted. He really likes to be with us, and isn’t taking well to being left alone in the rig while we are outside.  So, he is sleeping with Lee from 9:30pm until 4am and then taking a walk and then coming back to sleep with me until noon.  I know that’s too long to be in bed, but he prefers that to being alone.  He did spend a little bit of time just hanging out alone in the rig today, so hopefully over time we can work on that.

Our biggest concern is that he doesn’t really have time to be a puppy so we started doing a couple of things to help with that.  We are taking him for lots of extra walks and in the evening, when it’s slow we do let him off leash for just a little bit.  Lee stands at one end of the road and I at the other and we call him and he runs back and forth. We are keeping a close eye because of course the we don’t want him to take off, but since it is for a short period of time so far it’s OK.

The puppy can run!! Update: unfortunately he got a little courageous and wouldn’t run just to us, so no more zoomies while we are here, unfortunately. 

He also has discovered that at night there are moths flying around the lights and goes crazy on leash jumping and catching them.  I got a little worried because he was chomping so many but looked it up and moths appear to be OK.  It makes him really happy so I am letting him do it for a little while at least, again when it is slow at night.  Actually things have started out slow at this gate and I am super grateful.  Don’t know what this would have looked like with a steady stream of trucks, so appreciate the time to get us all situated. Now that we have gotten things set up, we are largely following his lead.  If he wants out on the lead or inside with people we try to let him have his way. Like I said not sure what that looks like when it gets busier but its the least we can do for the little guy. I will say all the drivers think he’s pretty cute and as Mikki mentioned they do go much slower when they see him.  He’s adjusting as are we and I am sure in no time he will be a spoiled, experienced gate dog.

My little ranch dog with the straw in his mouth 🙂


Camper Chronicles is a participant in the Amazon Services LLC Associates Program, a program designed to provide a means for sites to earn advertising fees by advertising and linking to amazon.com. We very much appreciate any purchase you make via our website links.  There is no additional cost to you and helps support our blog.  Search Amazon.com here

Or you can check out our recipe book filled with 80 real recipes we have cooked in our RV and taste tested by Lee himself. The cookbook specializes in recipes that have a limited number of ingredients, without sacrificing flavor and is organized into categories that matter to full time RVers such as Happy Hours, Travel Days, and Pot Lucks   You can preview the kindle version on  Amazon or the Apple version on Itunes.    It is available in paperback on Amazon if you prefer.


Jack Arrives at His First Gate

This was a weird year for us in finding a gate guarding job, but in all fairness that may have been due to when we came.  In the past we did Beets, Trees, or Amazon in November and December and this is the first time we came down in November and tried to get a gate.  What we didn’t know when we made that choice was that gates are very slow in November because of the holidays and hunting season.  Many of these ranches double (or triple) as oil fields, cattle ranches, and deer hunting areas.  In order to give their clients a pleasant experience, many don’t schedule heavy truck traffic during hunting season. It’s also a common time that the workers want off as well, and between all of those factors not many new gates open.

Of course there are existing gates and they can become available to those of us waiting at any time, but unfortunately the few we were offered did not allow pets.  I knew having Jack might be a bit of a handicap, but since I know many people who stay busy gate guarding and have pets I didn’t think it would be that big of a factor.  Unfortunately the openings were either gates or shacks and the shacks were an issue for us as well.  The shacks are twelve hours and since it is more desirable for couples to work together, that’s how people are often scheduled.  We knew we couldn’t leave Jack alone for 12 hours a day, so we wanted opposite shifts, and it was a while before that became available.

We also talked to several companies about pipeline jobs which are new to us and pretty hot this year.  Initially we were told they had pipeline jobs at $300 a day where one person worked out of their rig and the other worked from the car, but eventually we learned these weren’t very common.  For $150 a day lots of people are working 12 hour shifts (dawn to dusk) from their car and if you have two vehicles that could be $300 a day.  Unfortunately we don’t have two vehicles (although we did talk about renting a second vehicle at $750 a month), but again Jack was an issue.  Twelve hours is just too long to leave a dog caged and since he is not fully trained, we wouldn’t have any other choice.  Plus I really didn’t like the idea of sitting in a vehicle for twelve hours with no fridge, a port-a-john, and in many cases no internet.

Finally, we accepted a W-2 shack position that we could work opposite twelve hour shifts ($12.50 an hour with eight hours of paid OT a week, and four days on then four days off), but at the last minute Lee said he really didn’t want to do it.  He probably could have handled the hours, and we would pay for our own RV park, but the rate was controlled at $350, but the uniform was a bit of a killer.  Steel toed shoes and company provided polos were no issue, but we had to wear khakis. I actually have several pair that I brought when we went on the road, but Lee doesn’t have any.  We could have bought them of course, but he was very concerned about laundering them.  No way would they be wrinkle free using our Splendide which meant using our very small travel iron and dorm sized ironing board. If you knew Lee you would understand that he just doesn’t wear wrinkled clothes, and the hassle of keeping those pants wrinkle free living in our RV really turned him off. He had other “gut feeling” issues about it as well.

Thankfully when I called an apologized and asked if they could put us on their waiting list for a 24 hour gate where we could work out of our rig they had a recent opening.  We immediately accepted the position and since the gate started the next day, we packed up, said goodbye to our friends, and drove 3 hours down to the gate which is north of Laredo.  In previous years I probably would have had concerns about working so close to the border, but with the increased border presence I wasn’t concerned.  Plus we are 3 miles from a border patrol station and located in a pretty safe place.

Jack had no idea that we were about to leave his friend Hobie and the only place he has known since we got him.  It’s been a blessing being in one place while he got settled in, but we knew he was going to have a crazy day and we hoped he would be OK with it.

Lee played ball with Jack and Hobie before we left.  They both had a lot of fun

We found time to play a little before we left and then got into the car.  The ride in the truck is much rougher when we are towing and the roads in San Antonio are in pretty bad shape from construction.  He did OK, no throwing up thankfully, but we were unable to get him to go to the bathroom when we stopped at a truck stop.  So far we have never been able to get him to go, since he seems overwhelmed by smells, but thankfully he has a good bladder and so far not an issue.  I was more worried when we finally made it to the general area of the gate because we had a 20 minute wait on the supervisor to show us the way and still couldn’t get him to go.

He usually lays on the floor behind my seat but it was pretty rough so he curled up next to us.

Are we there yet??

Then we arrived at the gate and as always, it was a flurry of activity.  You are trying to set up, they often have a second trailer and are hooking you up to water and a generator, and there is always some “training” as well.  I didn’t want to leave him in the car and the RV was still a mess so ended up walking him on a leash.  It wasn’t the best choice, and if I had it to do all over again, I probably would have left him in the truck longer.  The gate is very nice, with a wide spot and very dog friendly.  We are very close to the road, and realized he would need to stay on a short lead to ensure he didn’t get in the way.  At this point, Jack was overwhelmed by smells and sights and the occasional semi-truck going through was not helping.  He did fine with the smaller vehicles, but the big trucks really freaked him out.

Settling into our spot. Luckily Lee didn’t need my help backing up because I had Jack.

Thankfully our supervisor was understanding and gave us time to put out the slides and open up enough I could put Jack in his crate.  Then we spent an hour going over paperwork and training, which was actually pretty great because often in the past we have just been thrown on a gate.  This one has an iPad and I really like the interface as it is much simpler than the iPad we worked on with another company.  The one downside to starting a new gate with an iPad was the extra time it takes to get people entered that first time (subsequent visits they are easy to pull up) and we knew tomorrow would be a long day.

I’m a gate guarding dog!

After the supervisor left, we ate a quick dinner and then tried to get Jack to go to the bathroom.  Initially he was having none of it, but eventually we found a place he would go.  That’s when we learned that this part of Texas has little burrs, and tons of them.  Jack’s paws were covered with them by the time he finally went and I spent another 30 minutes cutting them out.  Keeping him on the dirt or pavement definitely helps, but we he wants to go in the grass, which is full of them.  At this point we were all exhausted and Lee had a 6am start the next day.  We weren’t sure exactly how we were going to manage Jack, but I knew I had to try and stay up so I could start night shift the next night.

Don’t get me wrong, we are both thrilled to finally be working, but first days at gates are always stressful and worrying about Jack didn’t help.  Partly we weren’t sure what to do, partly this was his first experience out in the world.  We are still dealing with normal puppy stuff which is hard enough in a sticks and bricks, but super challenging when you are working and moving around.  Hopefully he settles in pretty soon, and we do as well!  On the plus side I bought a light up rug on clearance at Camping World a few months ago and it is working great.  I hated that I couldn’t see in the darkness under the rig (rattlesnakes!) and this does a great job of lighting that area up.


Camper Chronicles is a participant in the Amazon Services LLC Associates Program, a program designed to provide a means for sites to earn advertising fees by advertising and linking to amazon.com. We very much appreciate any purchase you make via our website links.  There is no additional cost to you and helps support our blog.  Search Amazon.com here

Or you can check out our recipe book filled with 80 real recipes we have cooked in our RV and taste tested by Lee himself. The cookbook specializes in recipes that have a limited number of ingredients, without sacrificing flavor and is organized into categories that matter to full time RVers such as Happy Hours, Travel Days, and Pot Lucks   You can preview the kindle version on  Amazon or the Apple version on Itunes.    It is available in paperback on Amazon if you prefer.

We Try Grooming Jack

In between Lee working on the rig, we  decided to try grooming Jack.  One of our readers mentioned he did it himself and as long as you didn’t want it to look perfect it worked pretty well.  I actually like the slightly scruffy look, so that wasn’t a concern for me, but I was worried about using the clippers.  I have never in my life used clippers for anything and wasn’t even sure how they worked exactly.  Thankfully, Lee jumped in to help and we both watched a really good You-Tube video.  The dog in the video even looks like Jack, which gave me more confidence.

For once we decided to not over-complicate things and decided to just give it a try.  Lee pulled out our very handy table and mimicking what we have seen groomers do we put him on the table. I’ll be honest at this point we would have been in real trouble if he kicked up a fuss, but aside from a little shaking he did just fine. I held his head up…not sure why but that’s what they do at the groomers.  Honestly it didn’t seem that necessary.  Lee ran the clippers down his body going the same as the flow of the hair and it just started coming off.  The hardest part was figuring out which of the 4 clipper guards to use.  We ended up randomly selecting 3 but really I think we could have gone a little shorter.

Close up view

The body was pretty easy. although Lee had a bit of a tougher time around the legs.  Since he’s a puppy and pretty bony we went easy there.  Once Lee completed one side, we switched so Lee (who is left handed) could do the other side. Then he did the top of the head and the butt under the tail.  We left the ears and tail alone and later I trimmed up the face with blunt scissors that came with the grooming kit.

We had more fun than Jack, but he hung in there, Pro tip: have a bag ready for the loose hair. We didn’t really think that through.

The hardest part was the stomach and this is where Jack got a little squirmy.  In the video they suggested holding him up like he was walking on two legs but he didn’t like that.  Instead we laid him on his side and then flipped him and did the other part.  With the belly you can go against the way the hair flows which makes it much easier in places.  After we were all done we let him run around a bit and then Lee gave him a bath.  I have been giving him a bath once a week, but Lee really wanted to scrub him down.  Jack again hung in there, but you could tell when he was all wet he was pretty disgruntled.

Wet puppy! I don’t own a blow dryer so we just let him air dry.

Once he was dry I let him run around and of course he immediately rolled in the grass.  Still I think it turned out pretty good, and he wasn’t traumatized or anything.  I am not saying we will never take Jack to a groomer again, not crazy about trimming the nails myself for example, but as a “keep the shaggy down” cut I think this will work pretty good! Judge for yourself.

Jack to the left and Hobie to the right.


Camper Chronicles is a participant in the Amazon Services LLC Associates Program, a program designed to provide a means for sites to earn advertising fees by advertising and linking to amazon.com. We very much appreciate any purchase you make via our website links.  There is no additional cost to you and helps support our blog.  Search Amazon.com here

Or you can check out our recipe book filled with 80 real recipes we have cooked in our RV and taste tested by Lee himself. The cookbook specializes in recipes that have a limited number of ingredients, without sacrificing flavor and is organized into categories that matter to full time RVers such as Happy Hours, Travel Days, and Pot Lucks   You can preview the kindle version on  Amazon or the Apple version on Itunes.    It is available in paperback on Amazon if you prefer.


Some Work Under The Rig – Part 3 – Wherein Things Are A Little Of Everything, Pus A Bonus Mystery!

And finally by Mr. Lee.  Hey you guys wanted him to write more! – Trace

For those just joining the saga, go here first, then here, then come back. We’ll wait.

All caught up?

Once I got the fresh tank fixed and tested, I wanted to replace the valve with a cable valve, so it could be opened without having to crawl under the rig, and I also wanted to relocate the outlet, so the water could be redirected instead of just gushing out onto the ground directly below the rig. To start with, I’m not sure if the valve is threaded on or if it’s a spin weld, and I didn’t want to ruin the tank trying find out, so I thought I could just buy a cable valve in the same size from the same company, and then remove the four bolts that hold the fitting on either side of the valve, take out the valve and use the new valve between the original fittings. Sounds logical, huh?

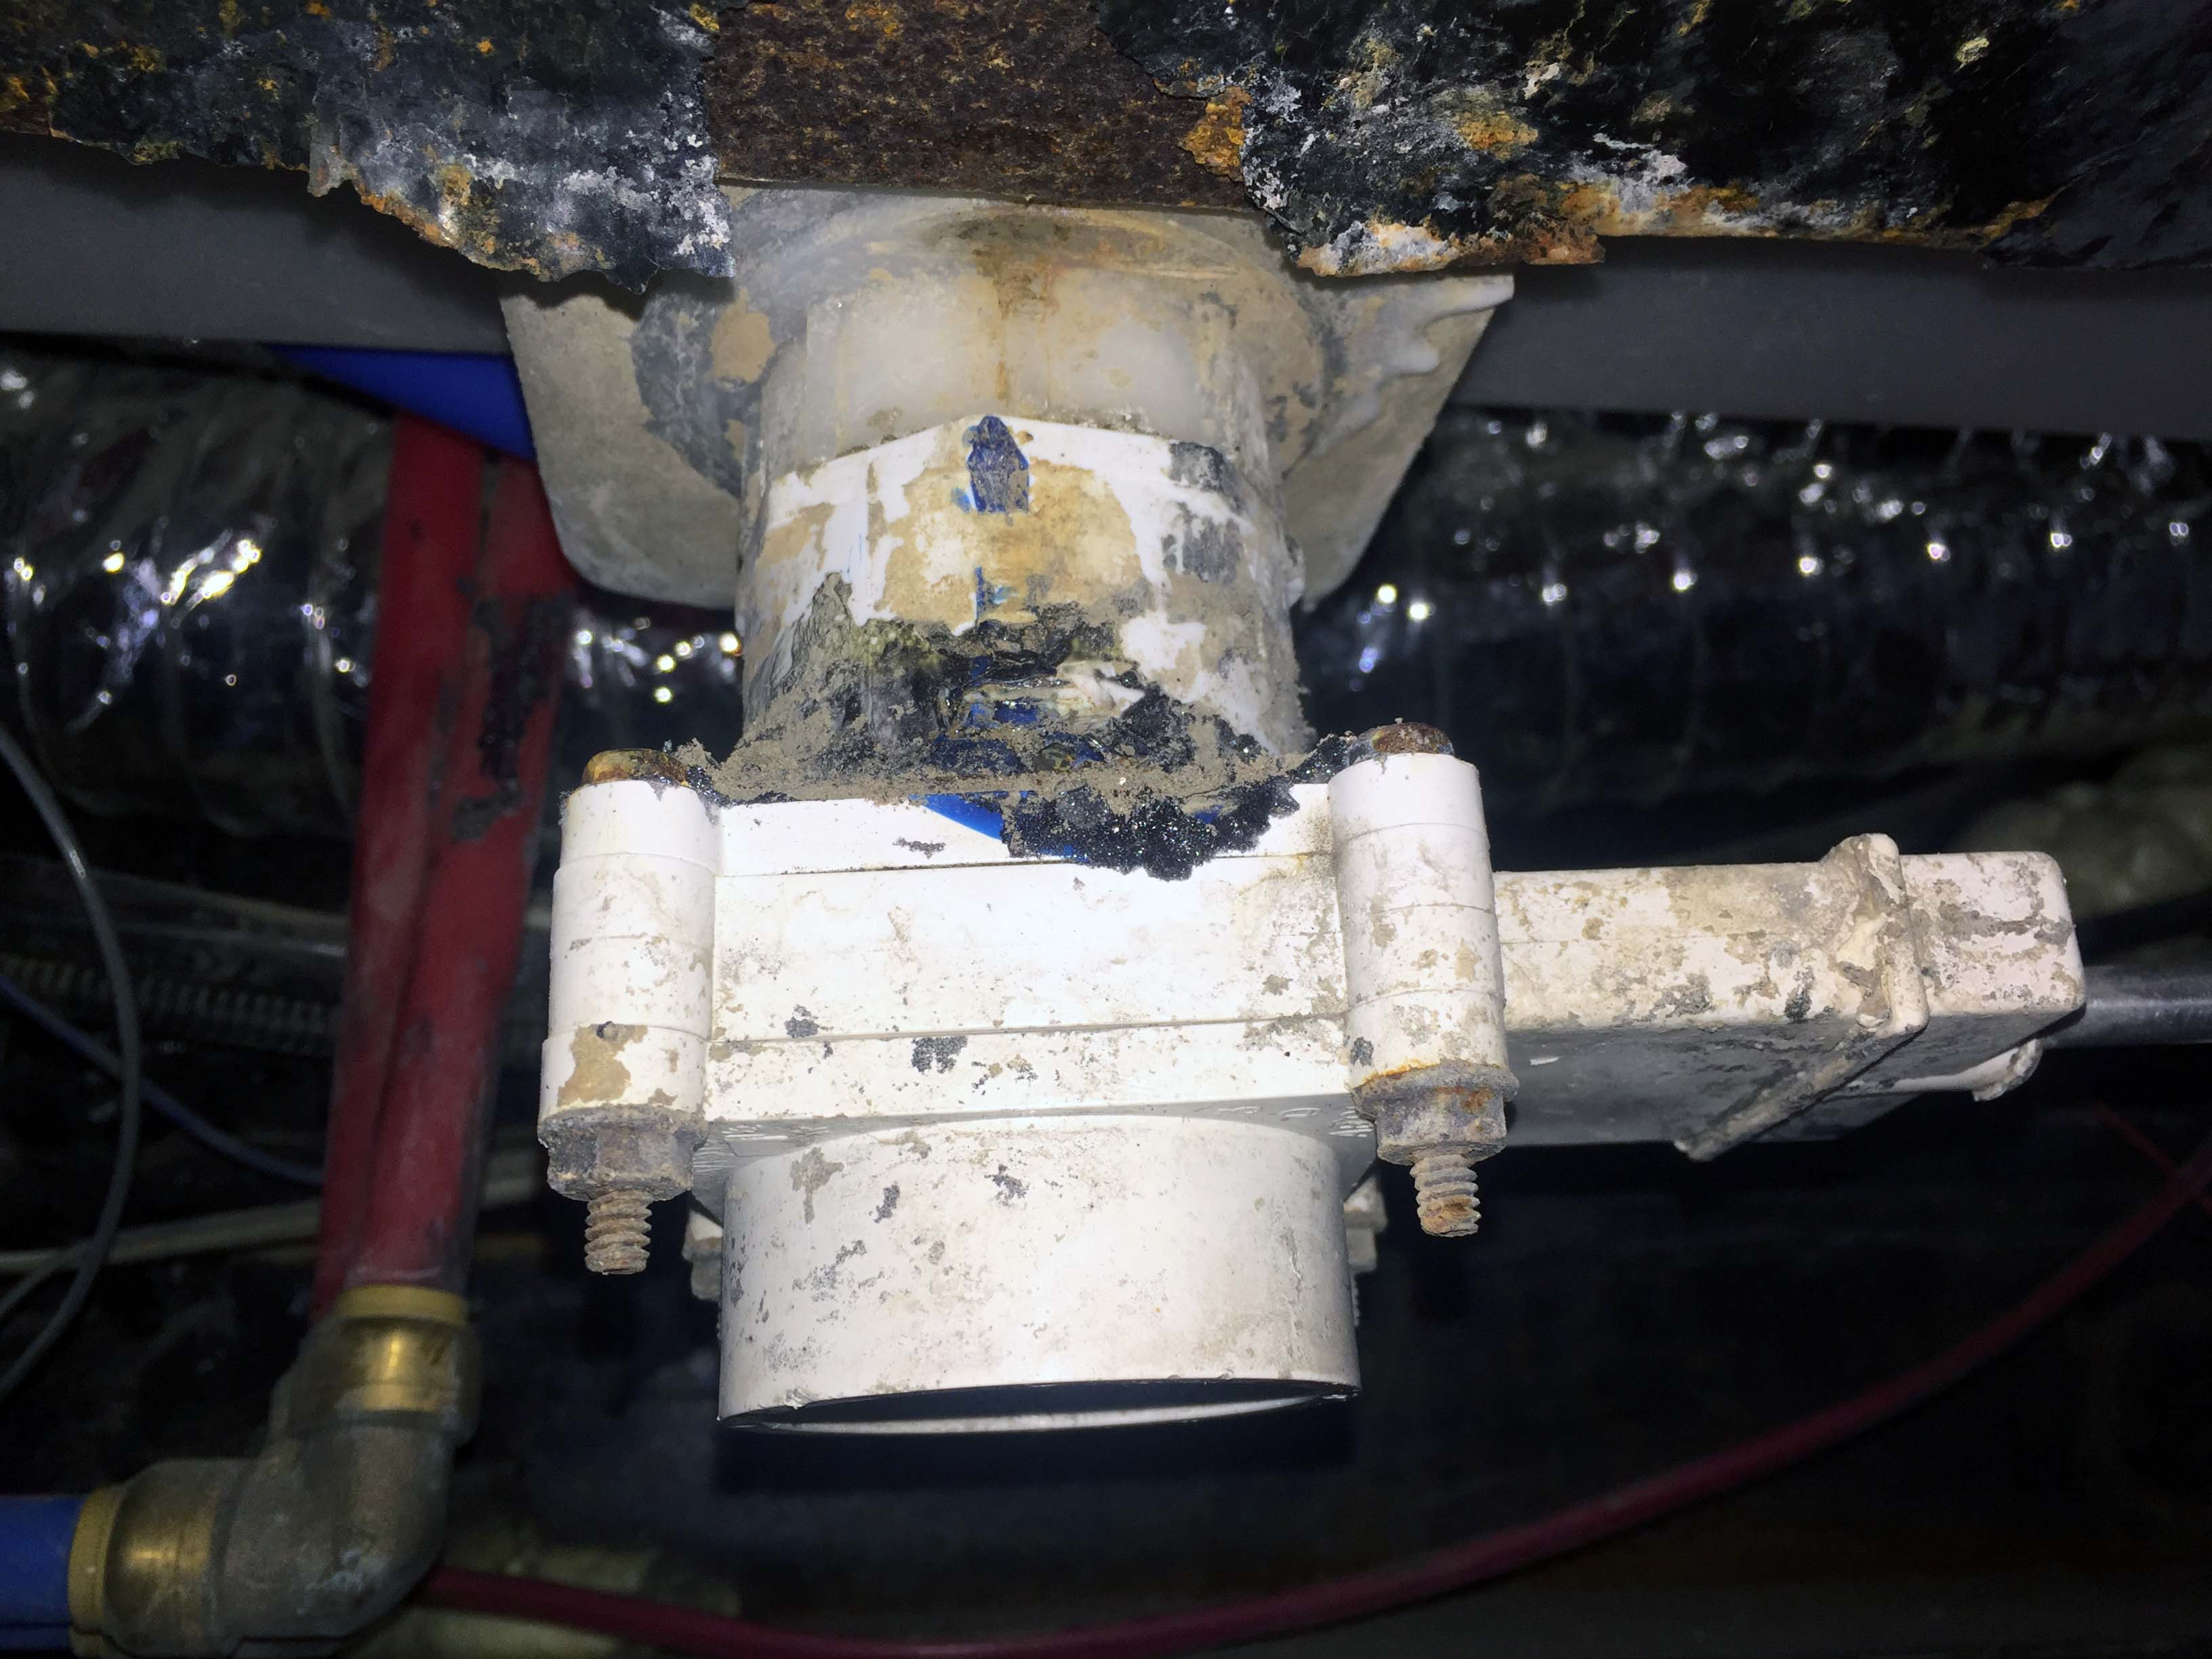
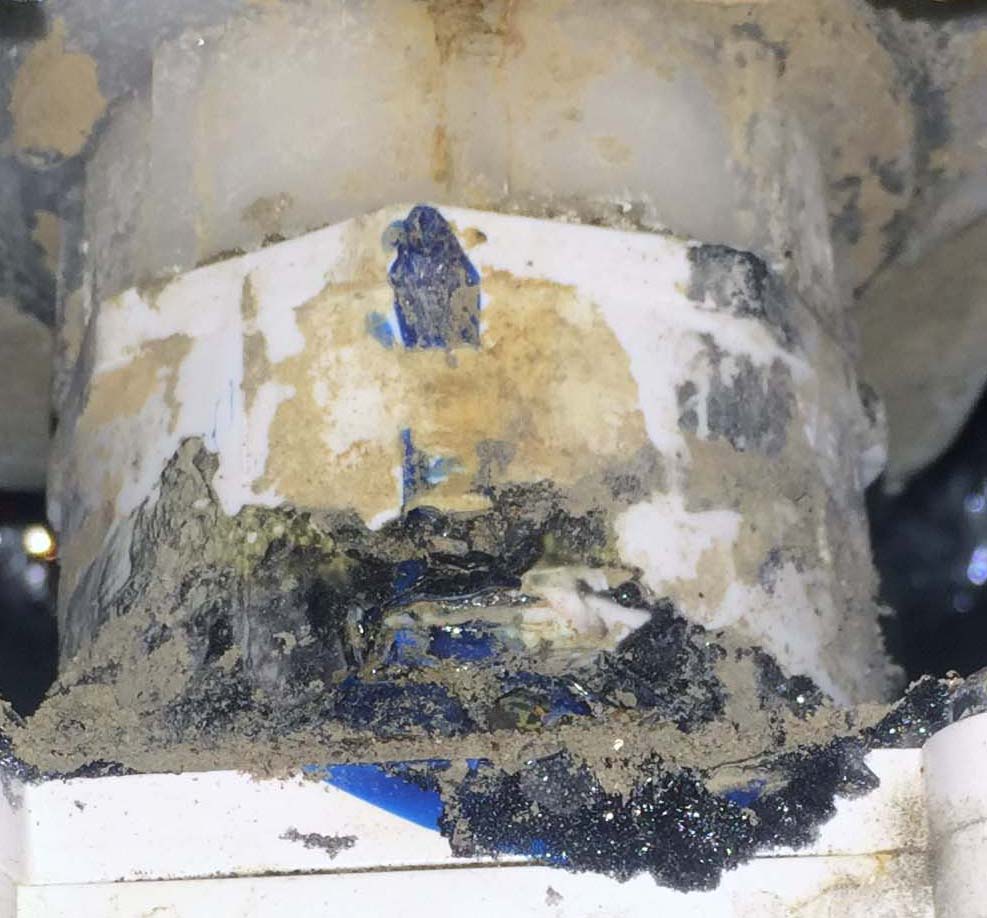
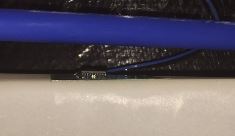
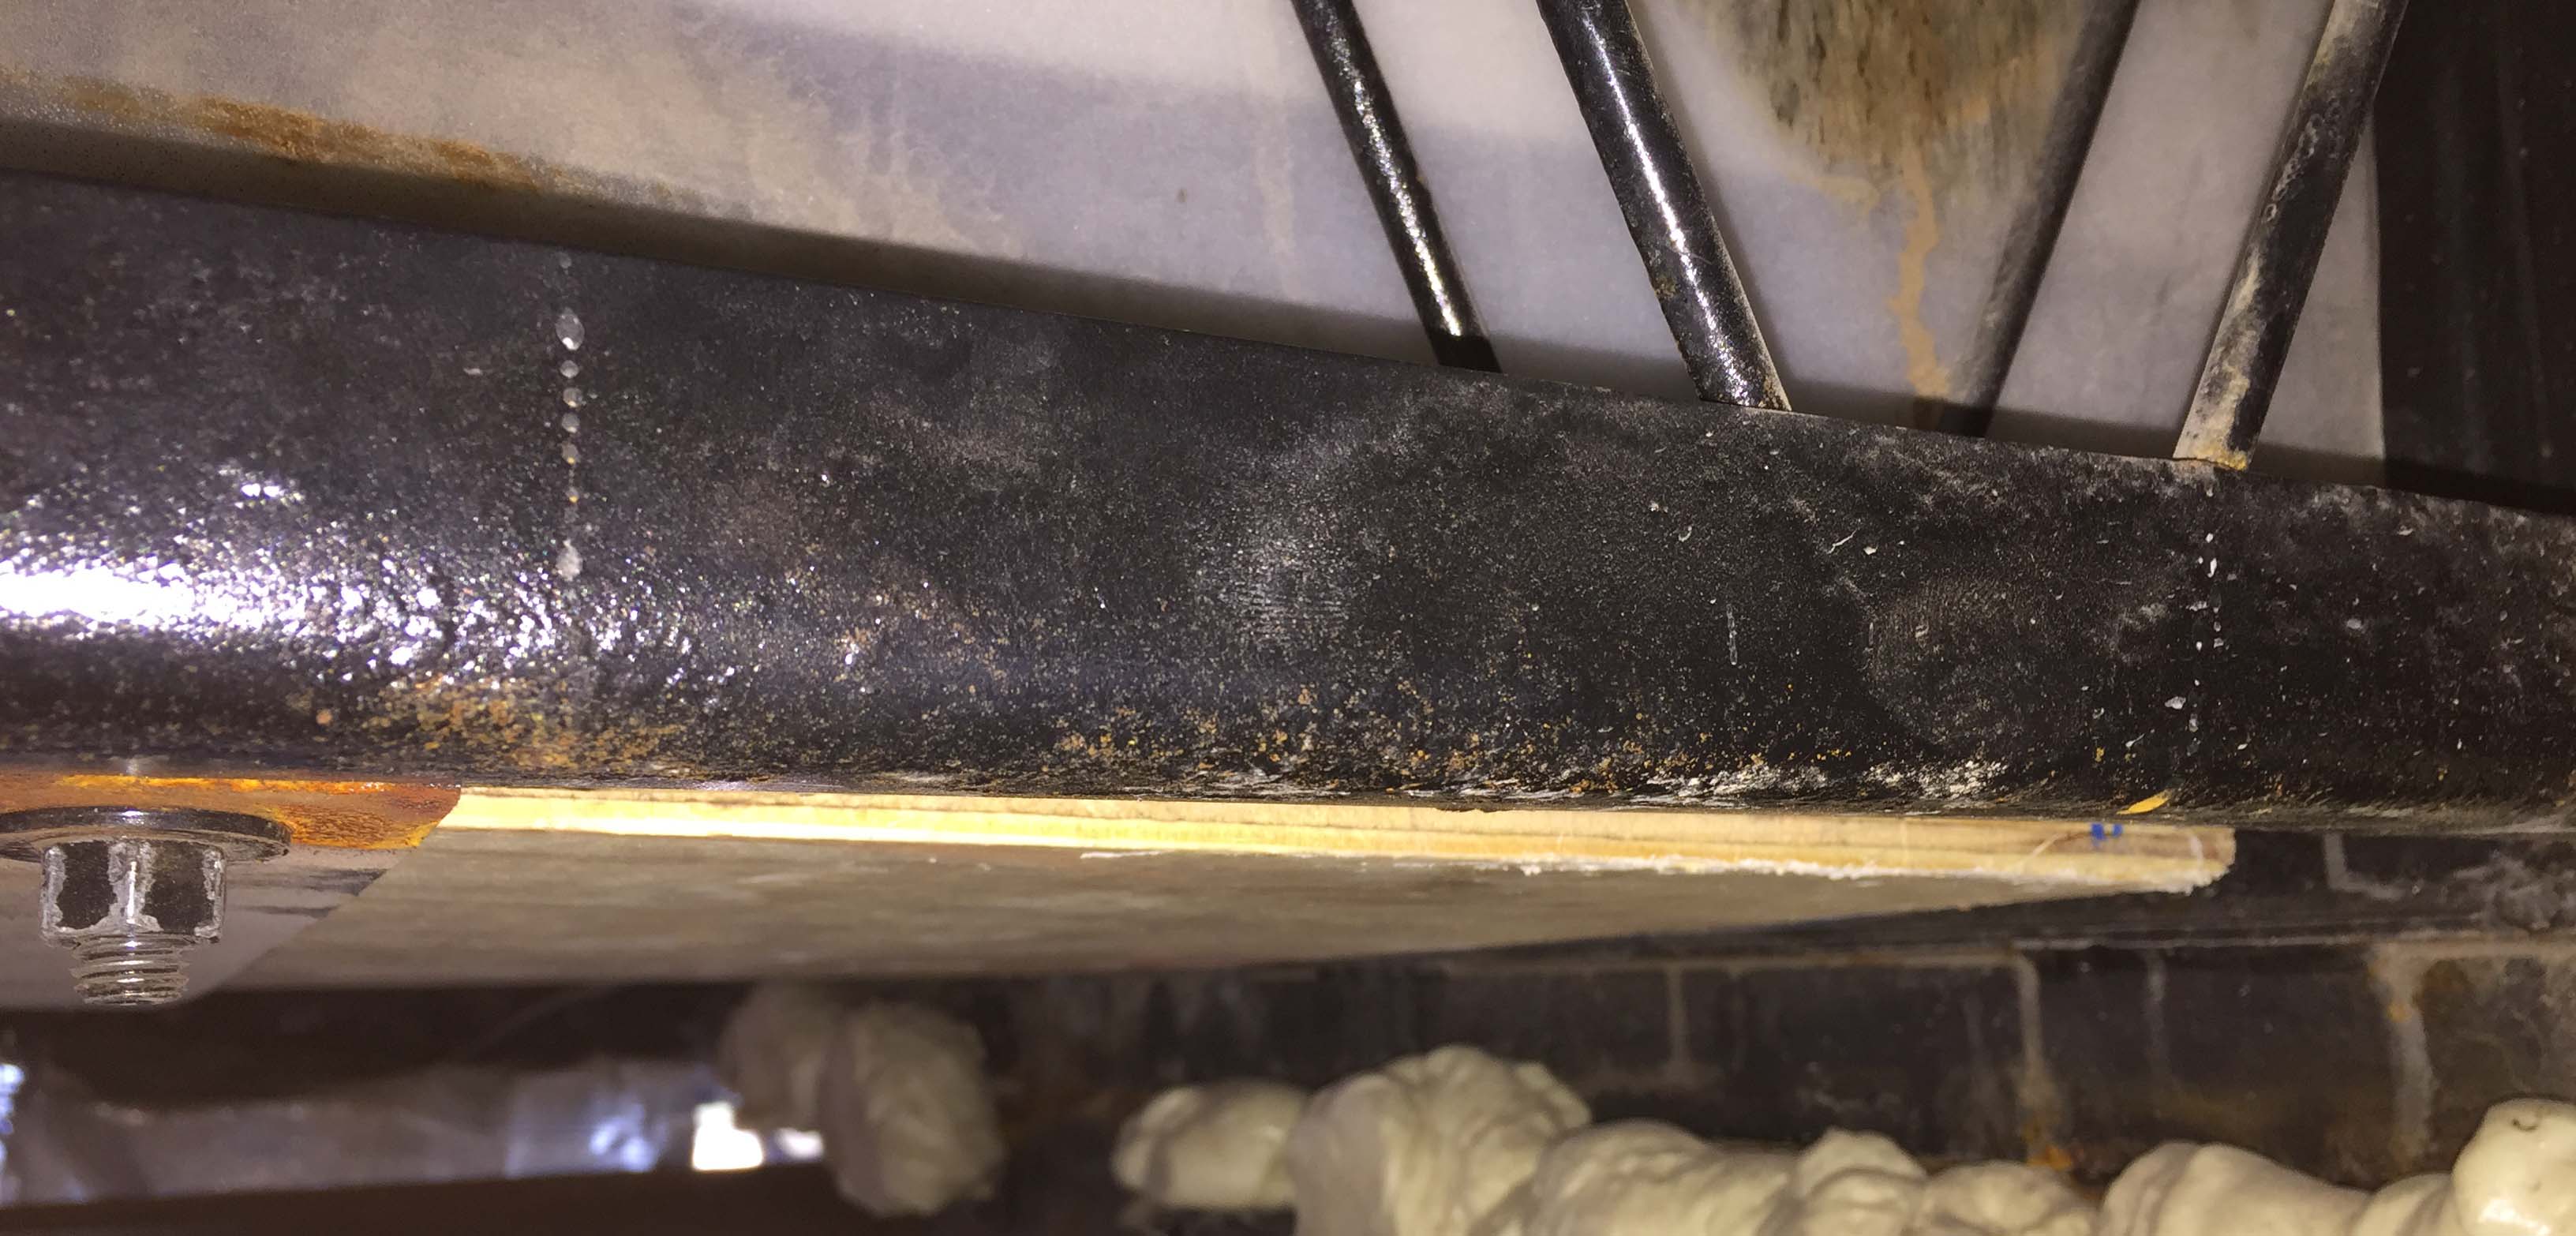
As you can see, at the top where it is attached to the fresh tank, it looks like it’s designed to be turned on with a wrench, because it’s 6 sided, but there’s also a fair amount of dried blue gunk around it, which leads me to believe it’s put on with PVC solvent cement.

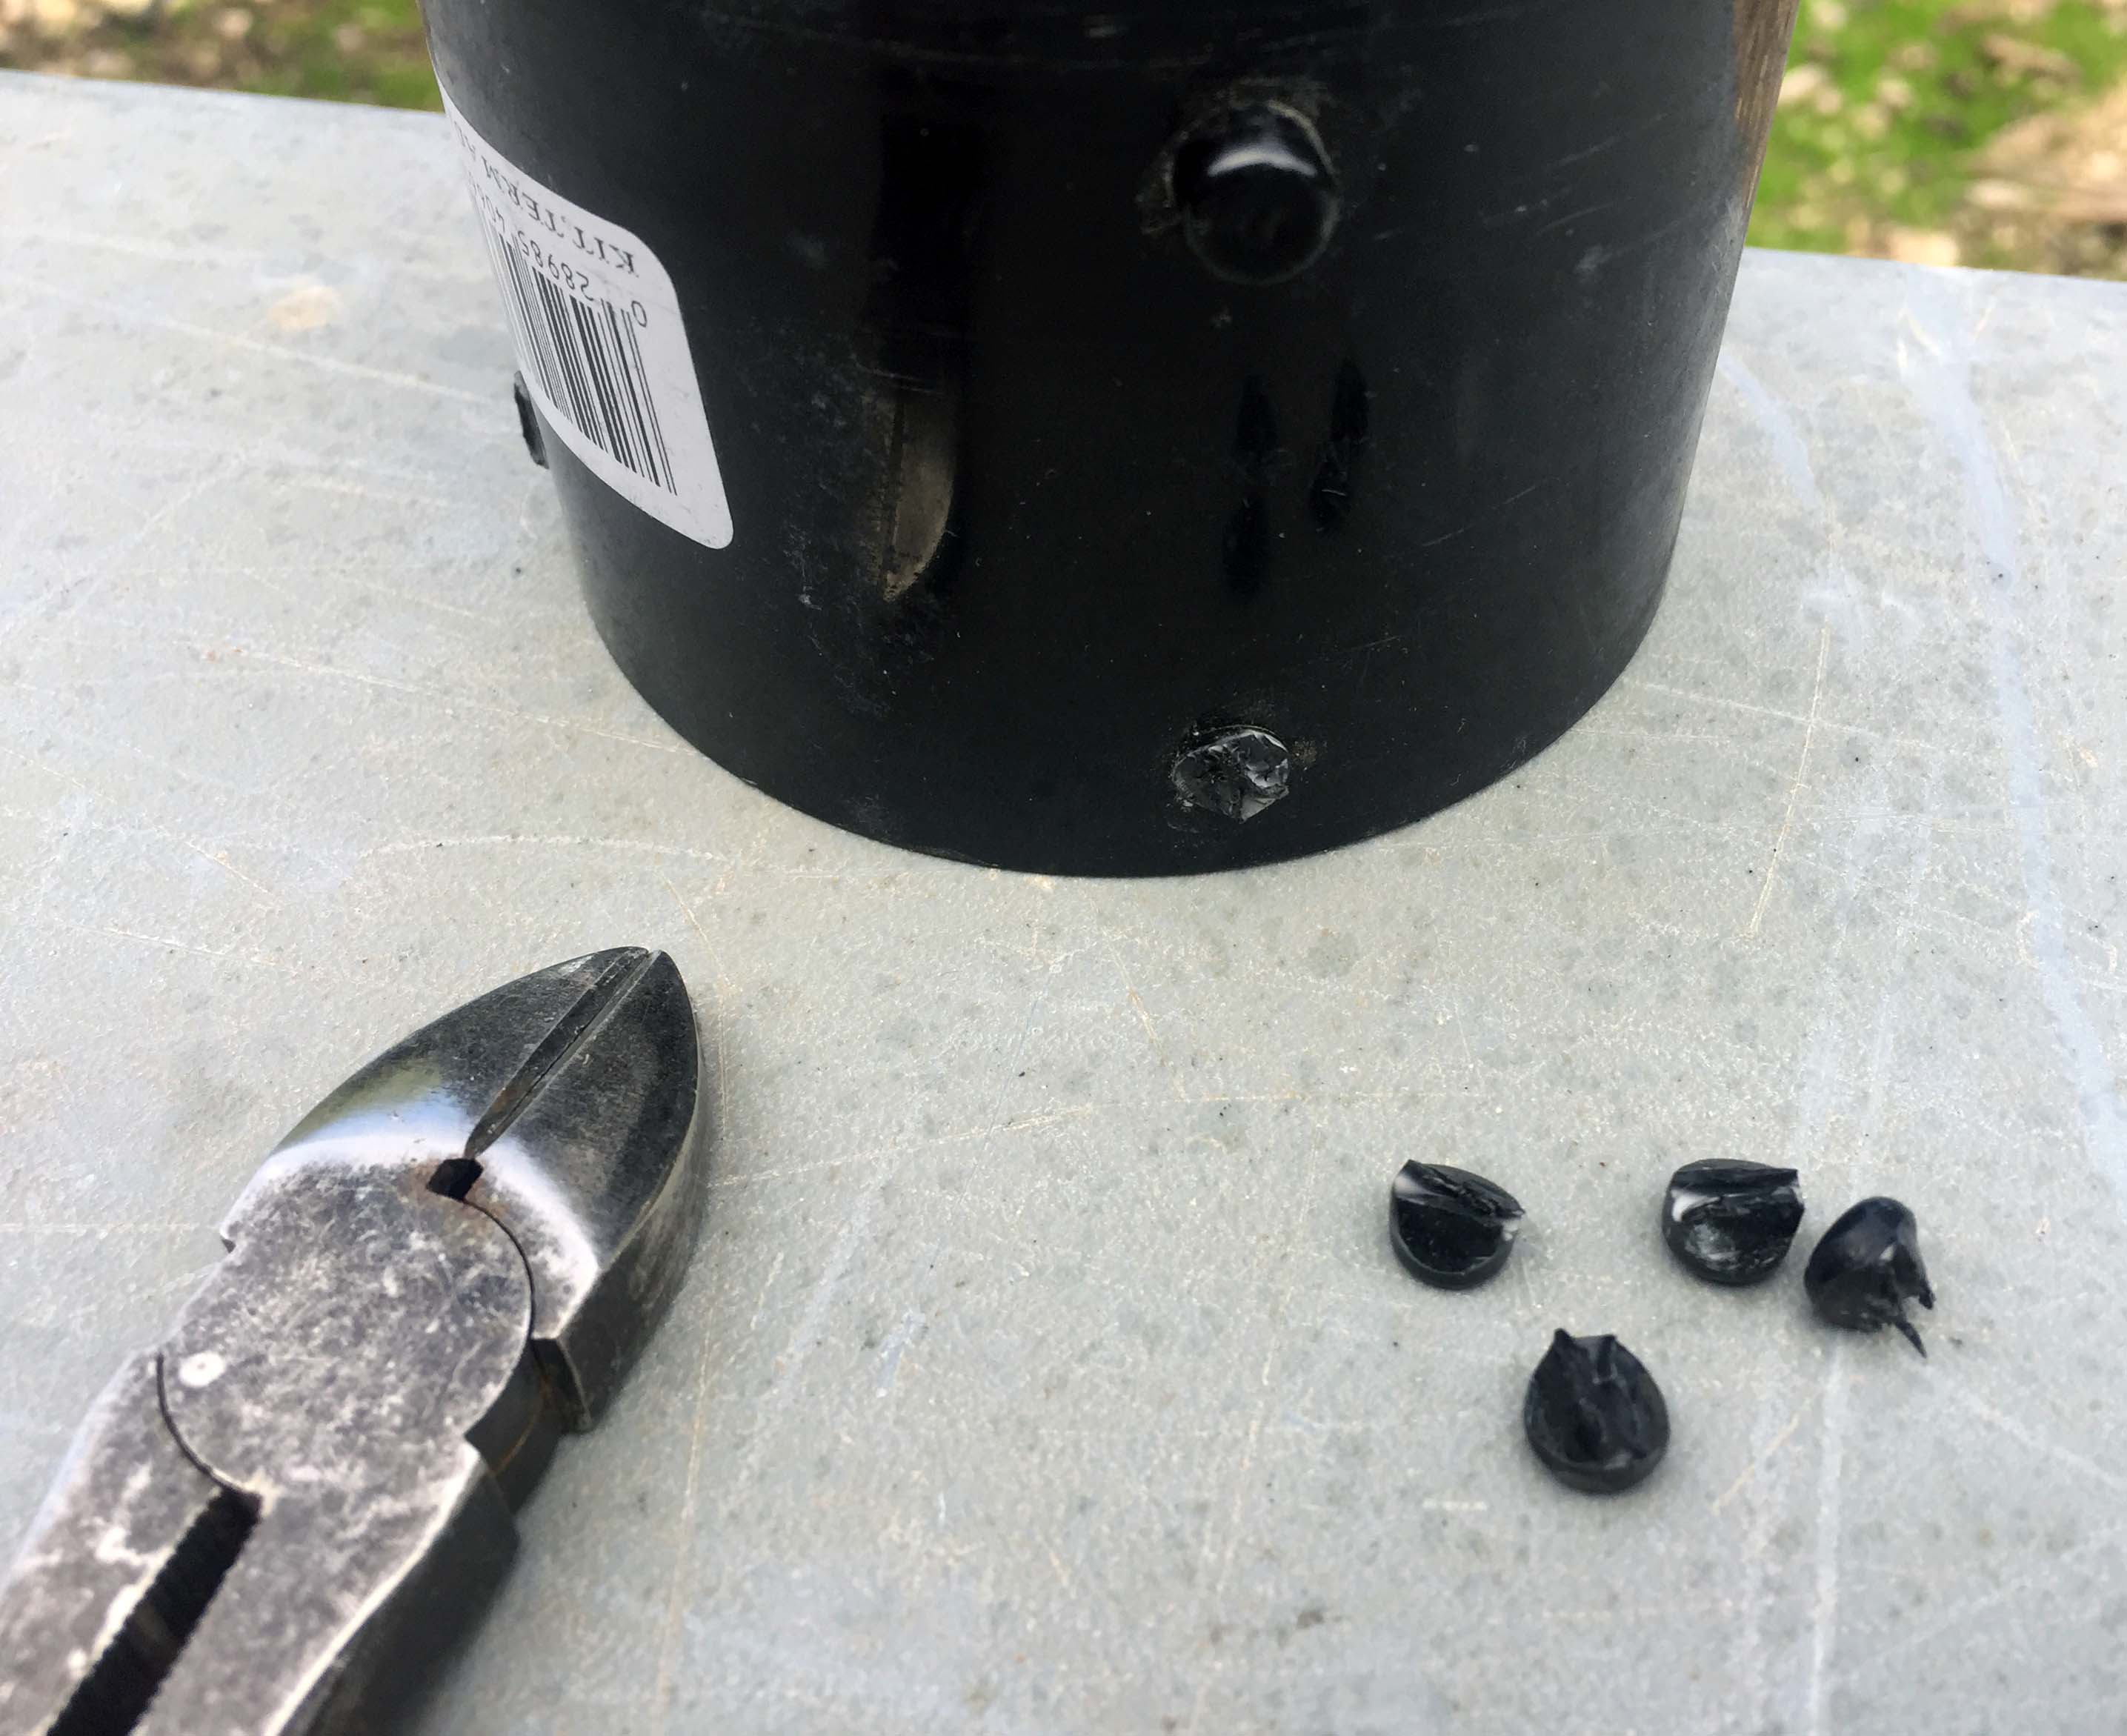
Once I got all the expanding foam and gunk off the old one, I couldn’t see any markings of any kind. I tried using my scope camera and my phone to get a look at the other side, but since it was so close to the tank, I couldn’t see anything at all. So I just sort of moved my fingertips around like a person reading Braille, and sure enough, I could feel the little raised plastic telling me all the relevant markings were there. If I ever meet the genius that installed that thing facing up, I’m going to give him a big hug over the top of his head with a folding chair. I still couldn’t see the markings, and I can’t read Braille, and even if I could it wasn’t written in Braille, so I had to remove the bolts and take down the valve just to get the information. Hey, remember in the last post where I filled up the tank to flatten it out. Yeah, all that water had to come out before I removed the valve. So I got a sewer hose and put it just below the outlet and hung it with some tiny bungee cords and pulled the valve handle. The alignment was off a little, so I got drenched. Remember, this is why I am doing this in the first place! Once the water was finally drained, I got to work taking off the bolts that hold the valve to the fittings. Of course those aren’t stainless, and being under the rig and completely unprotected, they were very rusted. The first one came out OK, but the other three all broke when I tried to remove them. Luckily, once they were broken they just fell right out. With the lower fitting and the valve free (the upper fitting still attached to the tank) I was able to get a good look at the thing, to see who made it and model # and all that.

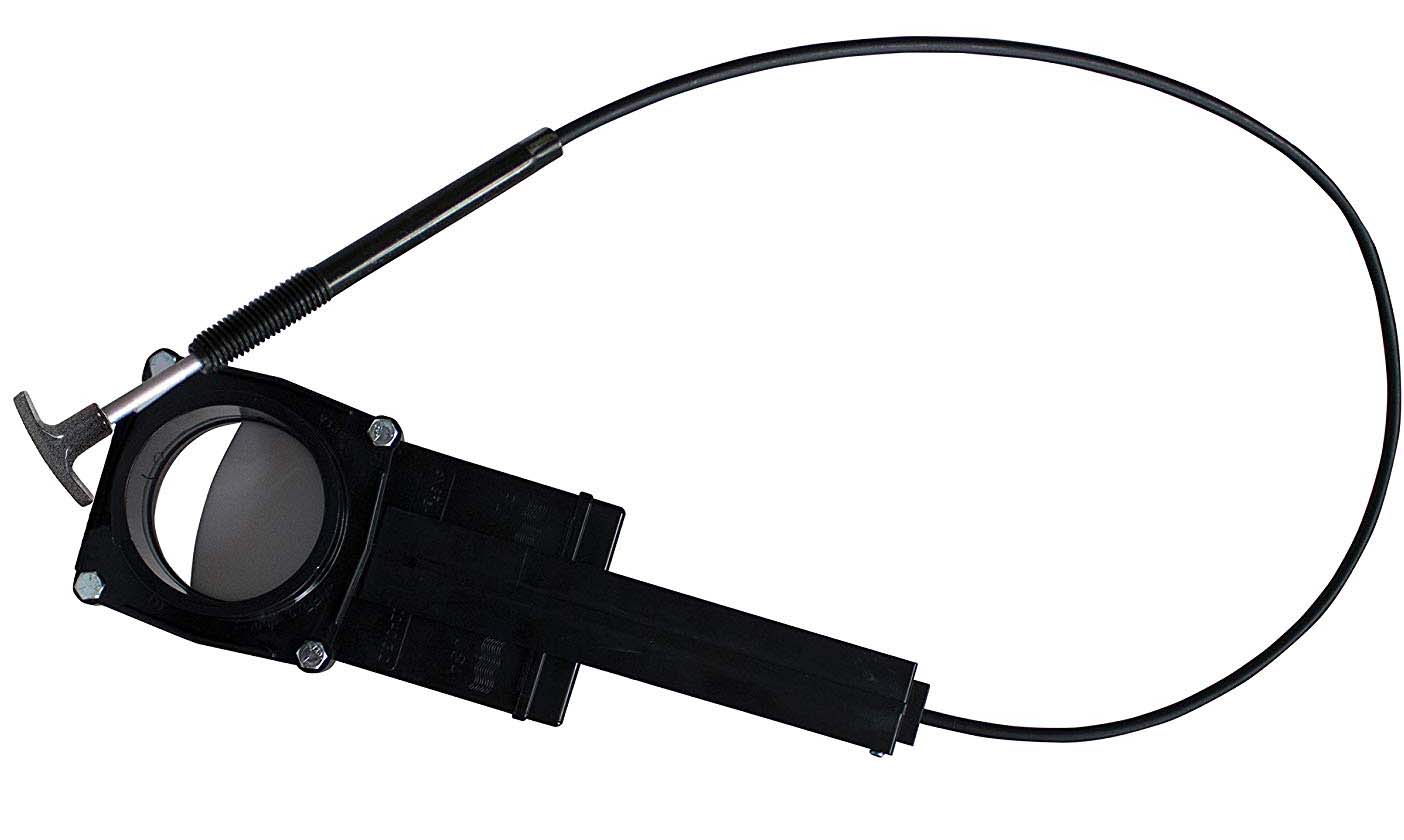
I poke around on the internet and found nothing at all using any of those numbers, so I decided to just call LaSalle Bristol and see if they could me out. I was hoping I could just get one of these cable actuated valves, and really hoping that the form factor was the same and the bolt holes would line up, then I could just bolt the new valve between the old fittings.

After spending the rest of my life on the phone, I finally got someone who said, yes, the form factor was the same on all of their valves, and they were completely interchangeable. Something just didn’t feel right, but I figured if I bought one and it didn’t fit, then I could just return it. I went to three different RV parts stores in the area, and nobody had one in stock. Since I wasn’t completely sure how long we would be where we were, I didn’t want to order one. I did have enough sense to take the old valve with me, and I took a look at the Valterra version, but the holes were a few mm off, so not useful. In the end I decided that I could just put the original valve back on for now, because it just bolts on, and it’s accessible. I did have to get some replacement bolts and nuts since the original bolts were broken. I happened to take those along too, so I was able to match them. They turned out to be 5mm, and I was lucky enough that they had just enough in the little drawer that were the right size and length. After an entire day of driving around San Antonio I was ready to call it a day. I will have to see about getting a cable actuated one later. This is not hyperbole.  When Lee gets his teeth into something he becomes a bit obsessed.  Those of you who know him will think that is a vast understatement! -Trace

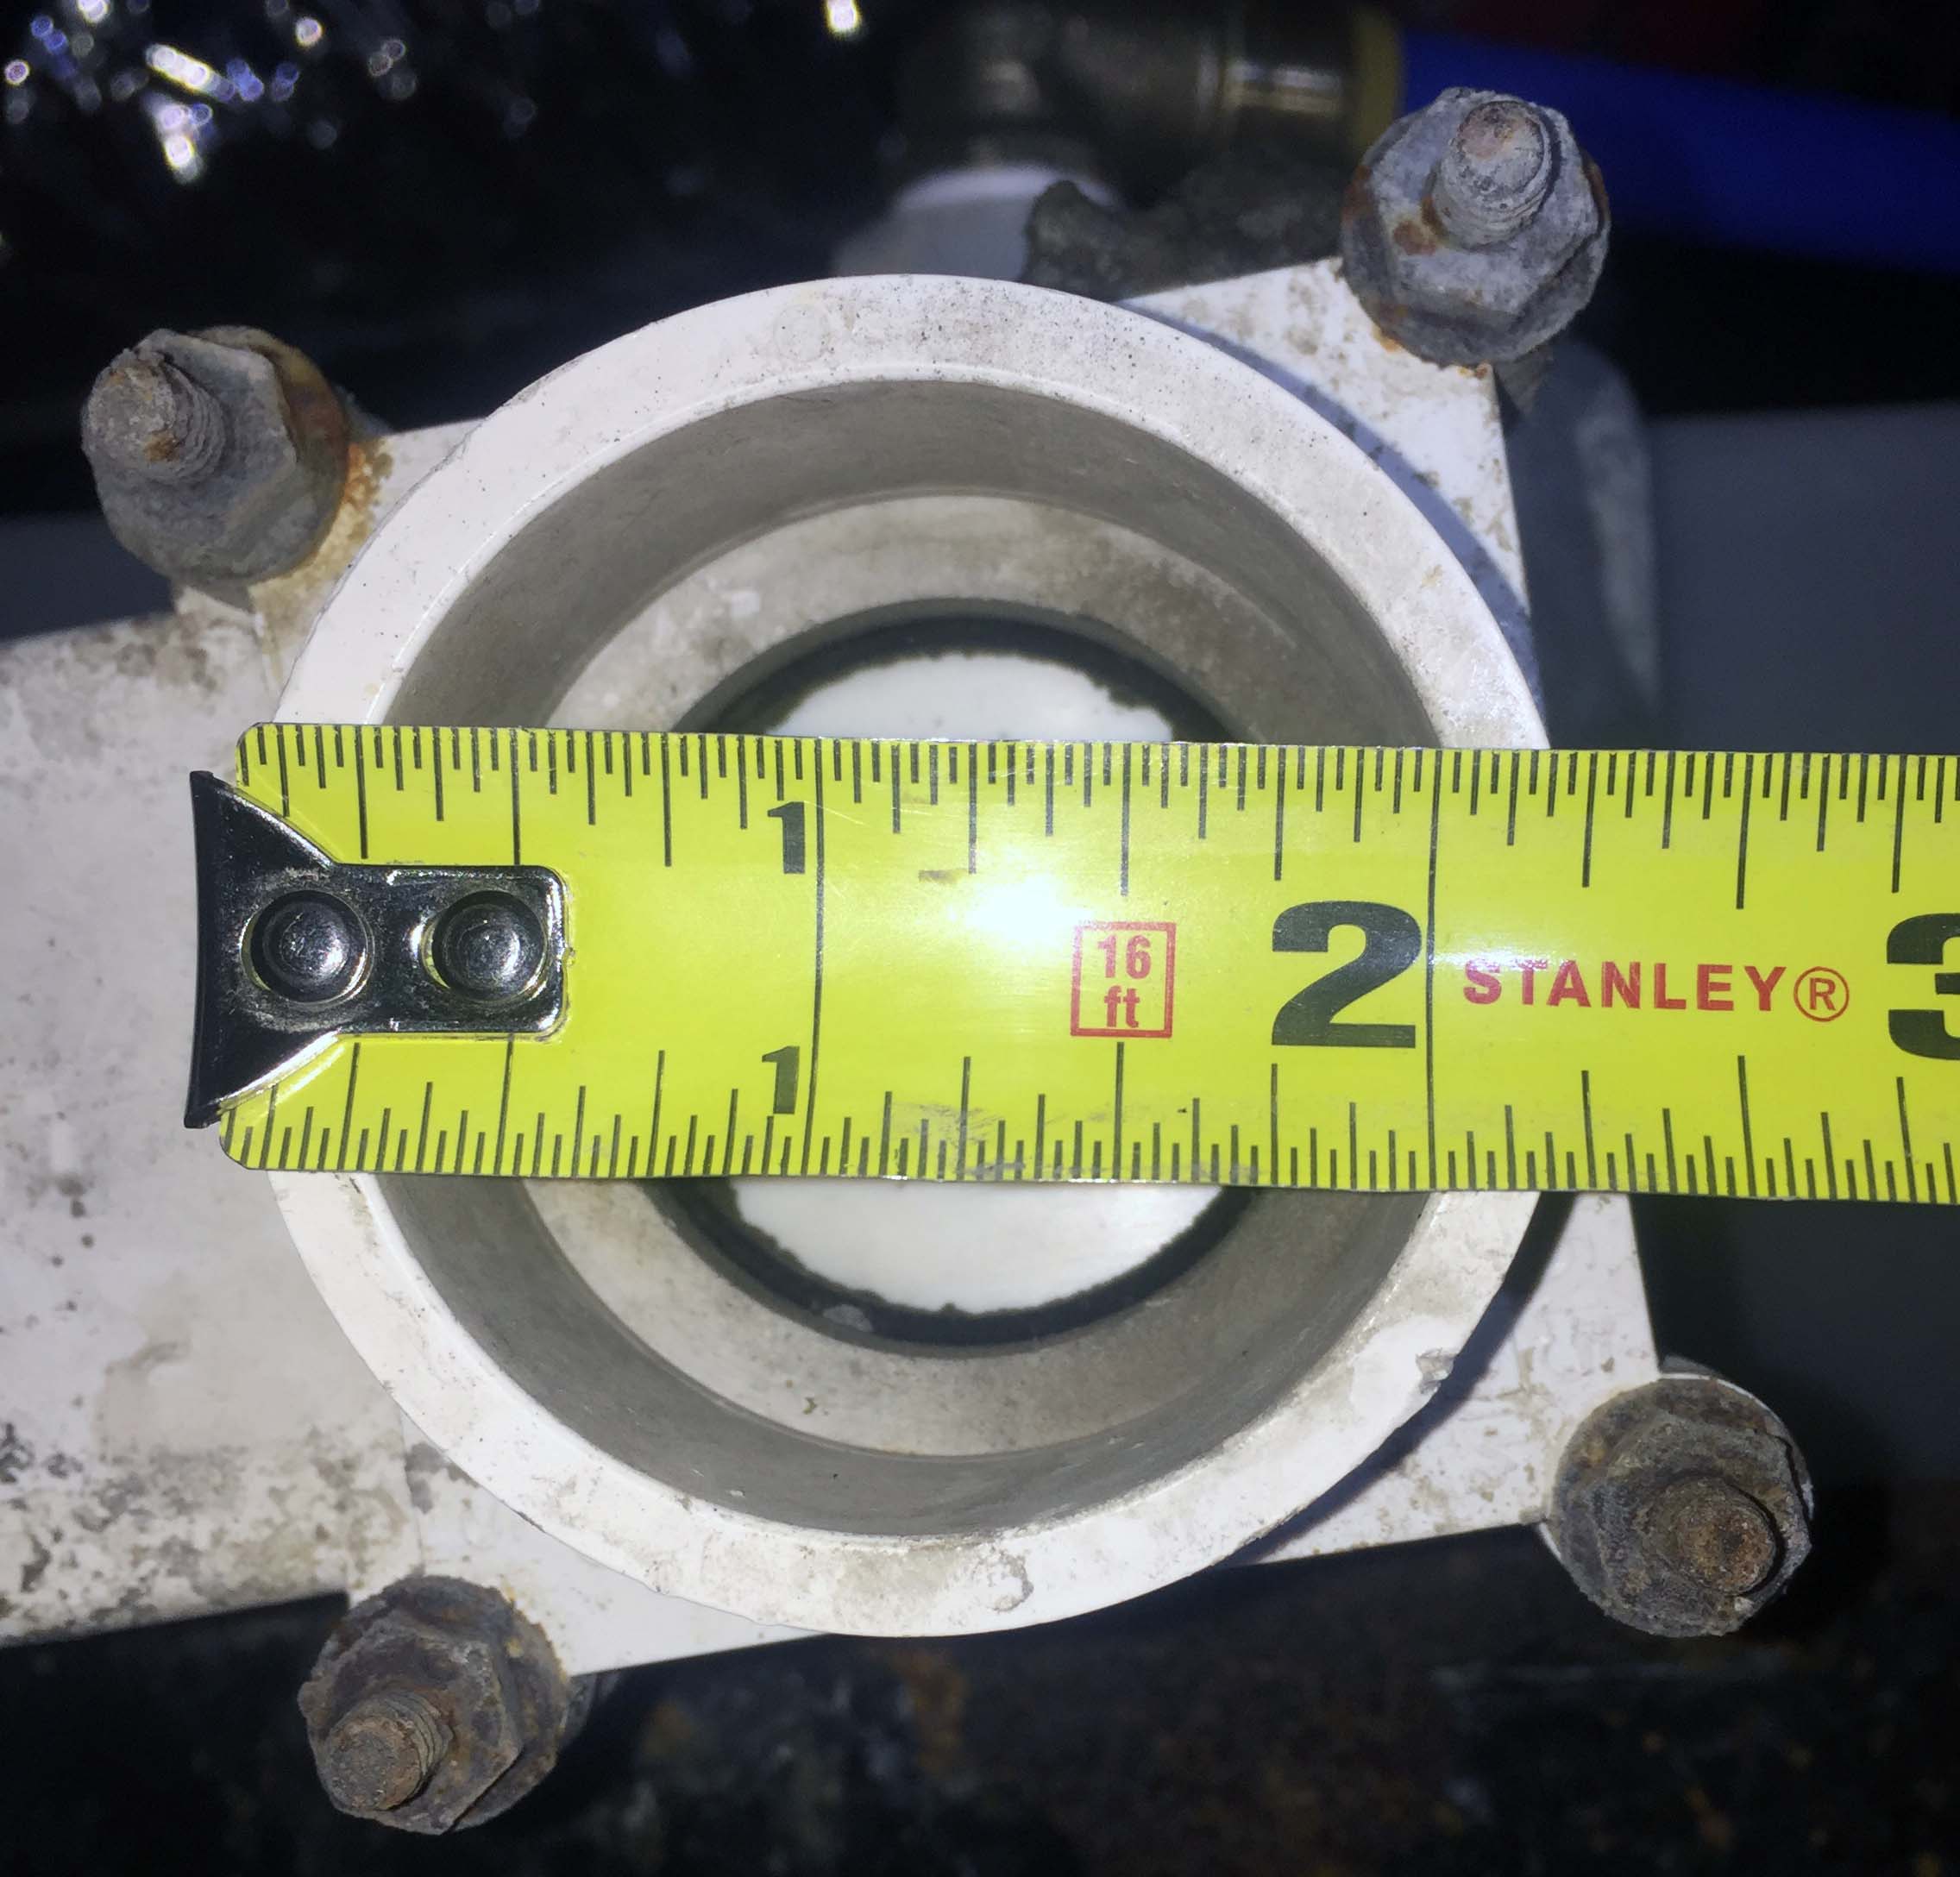
The next day I reinstalled the valve and started the process of assembling the new drain extension that would move the water from directly over my face to a more sensible location. When I had taken everything apart I measured the fittings and was unable to find any PVC anywhere that fit with the inside diameter or the outside diameter of the outlet.


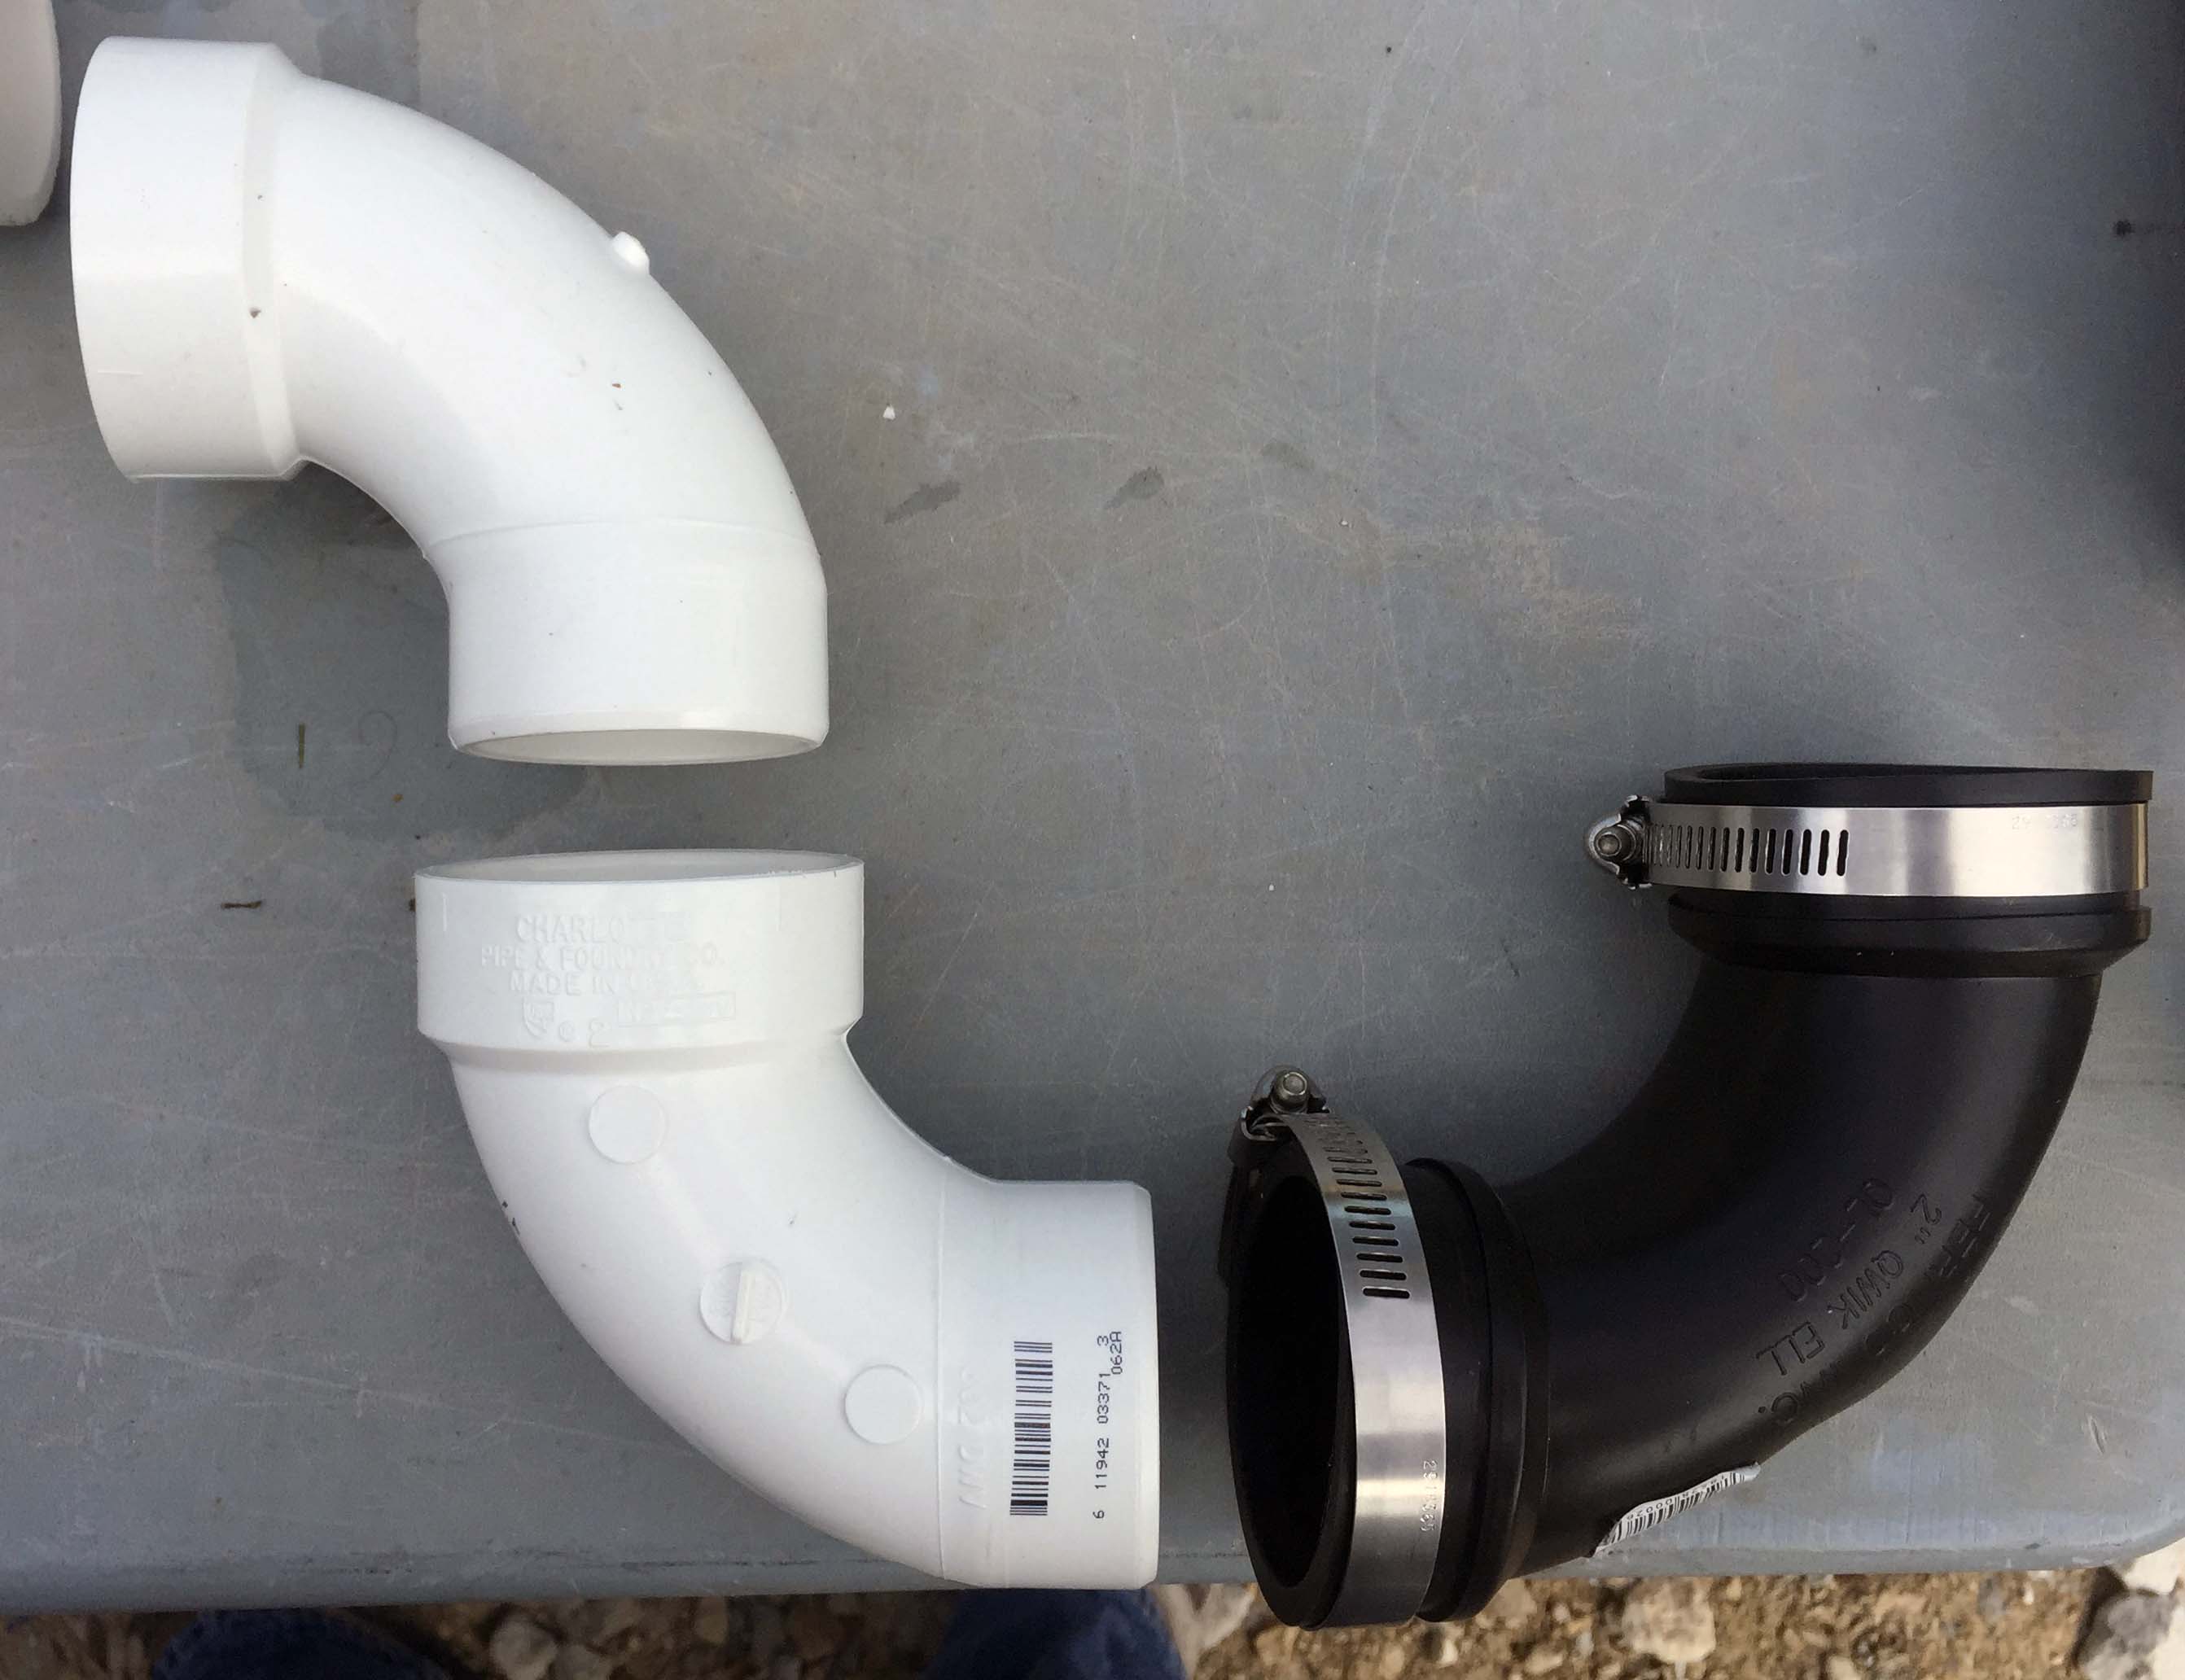
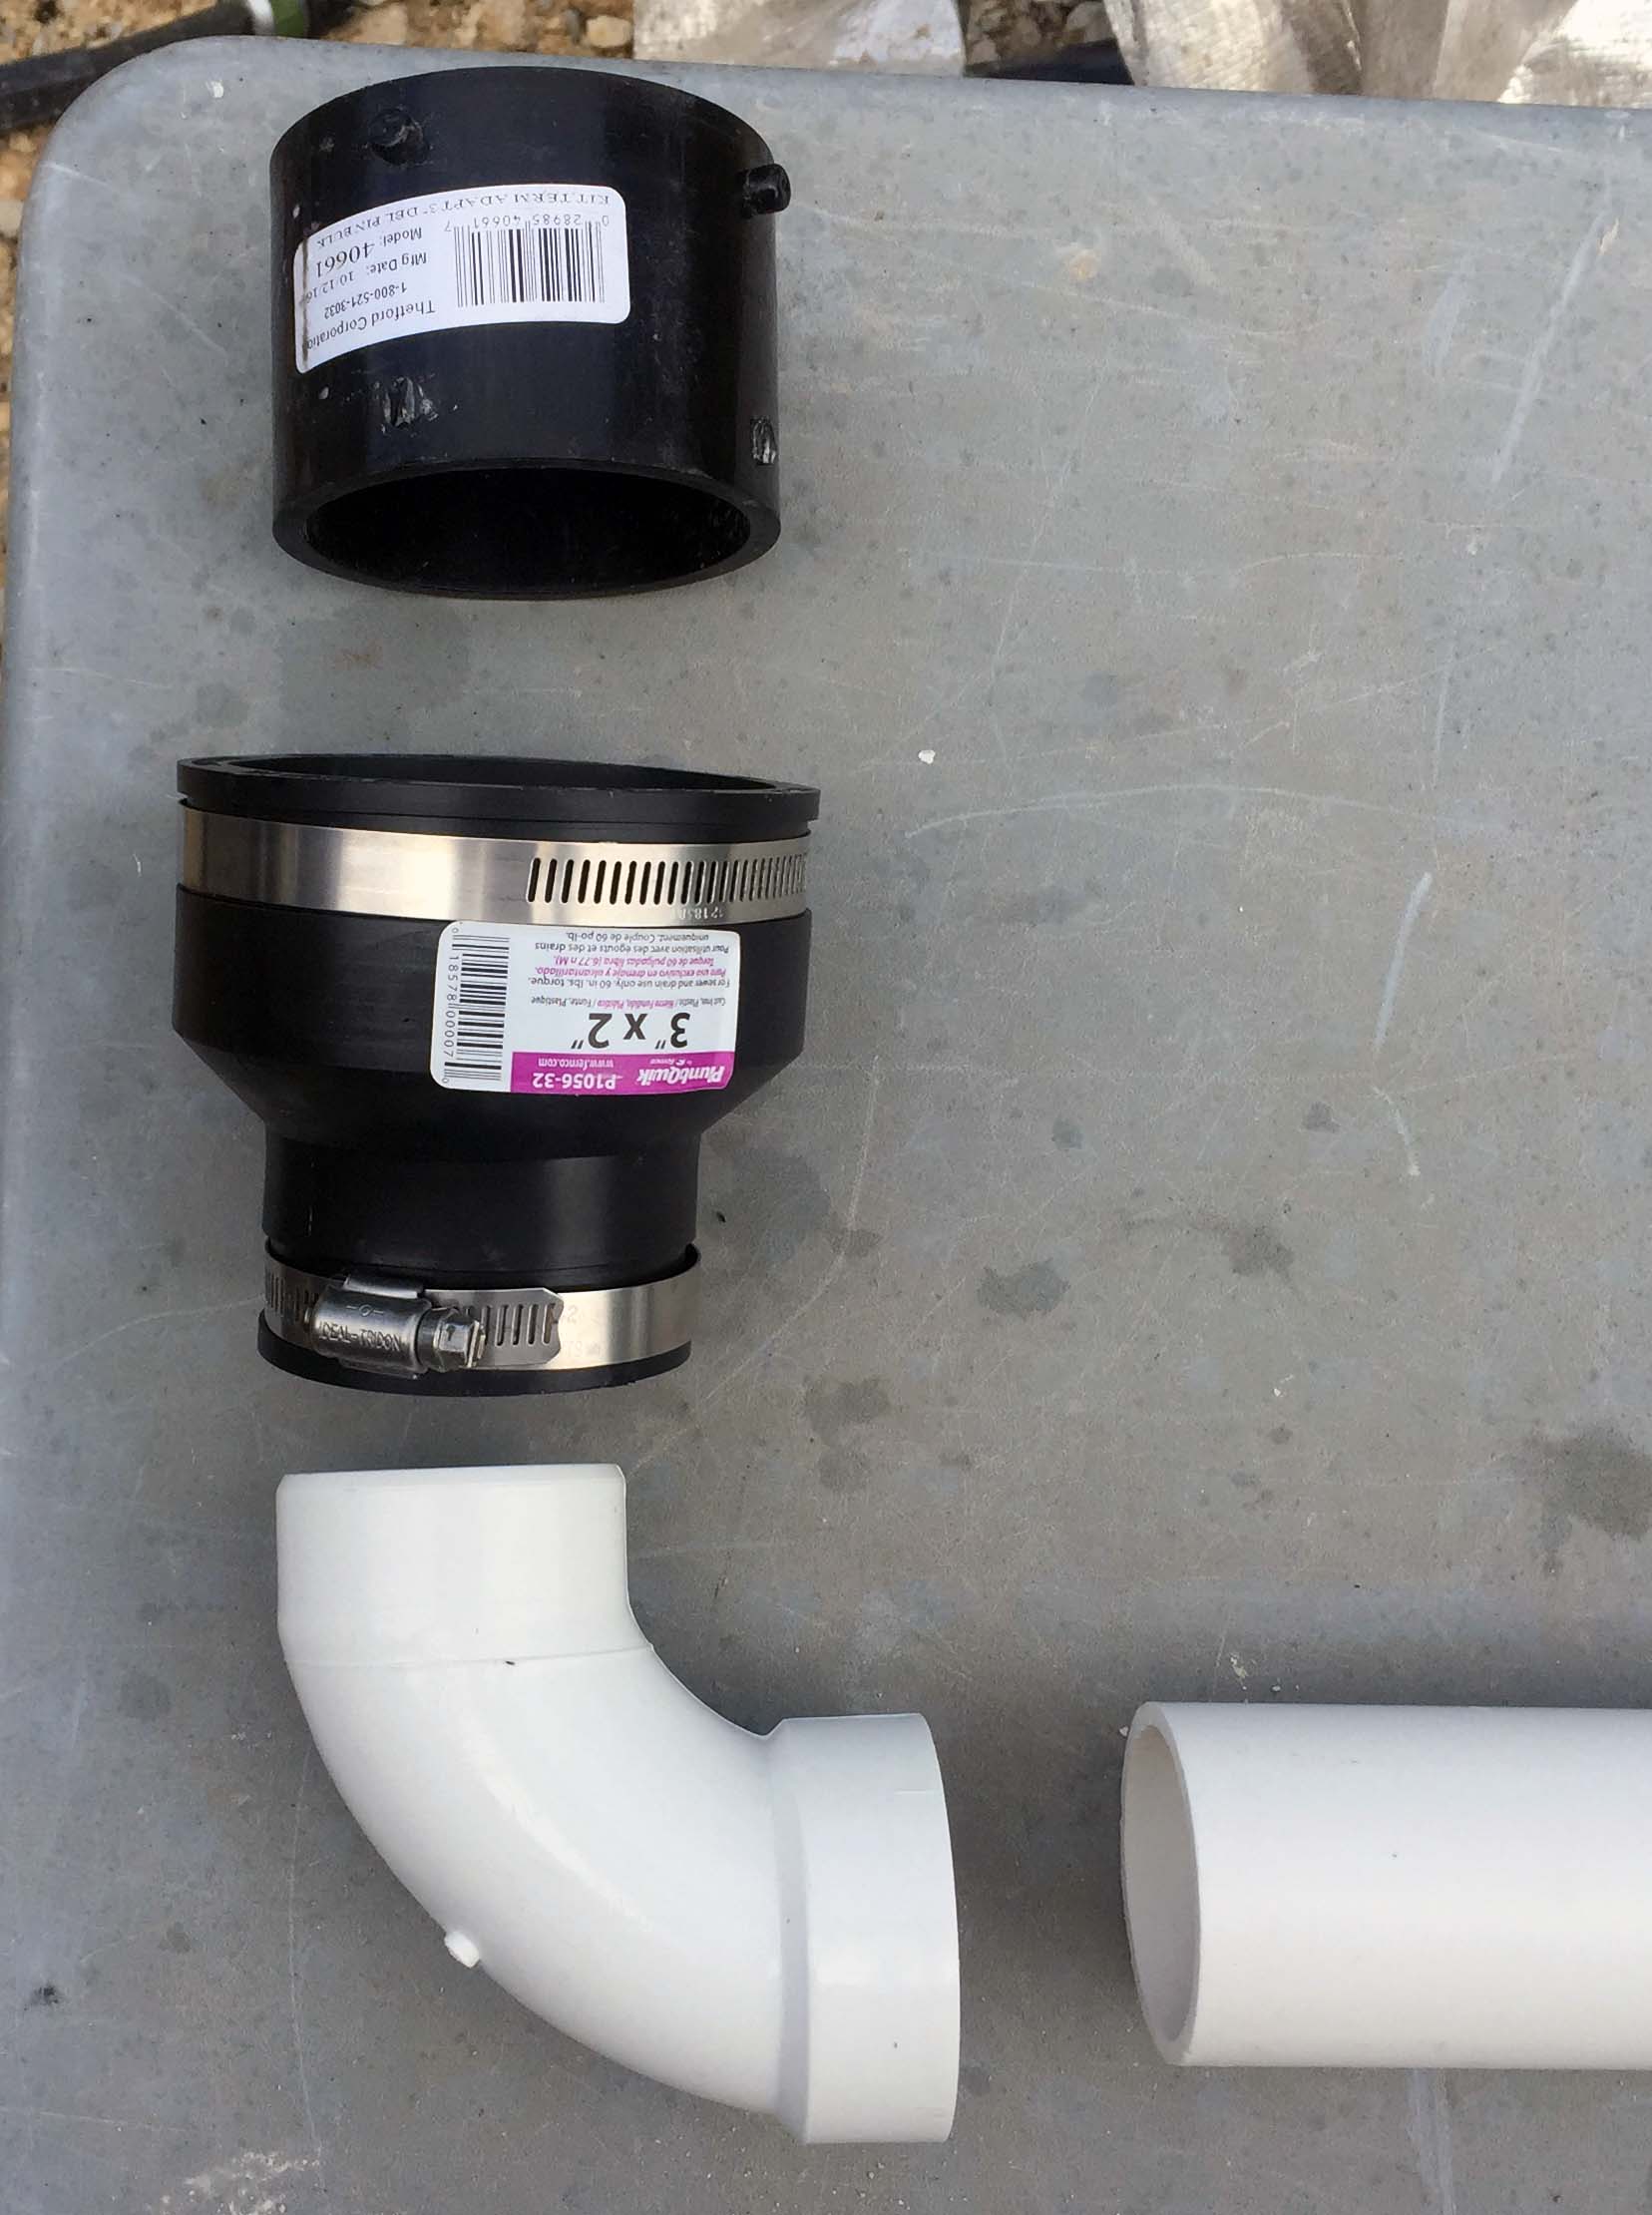
After wandering up and down the aisles of Home Depot I finally found something that would work, and here are all the parts laid out ready to be installed.


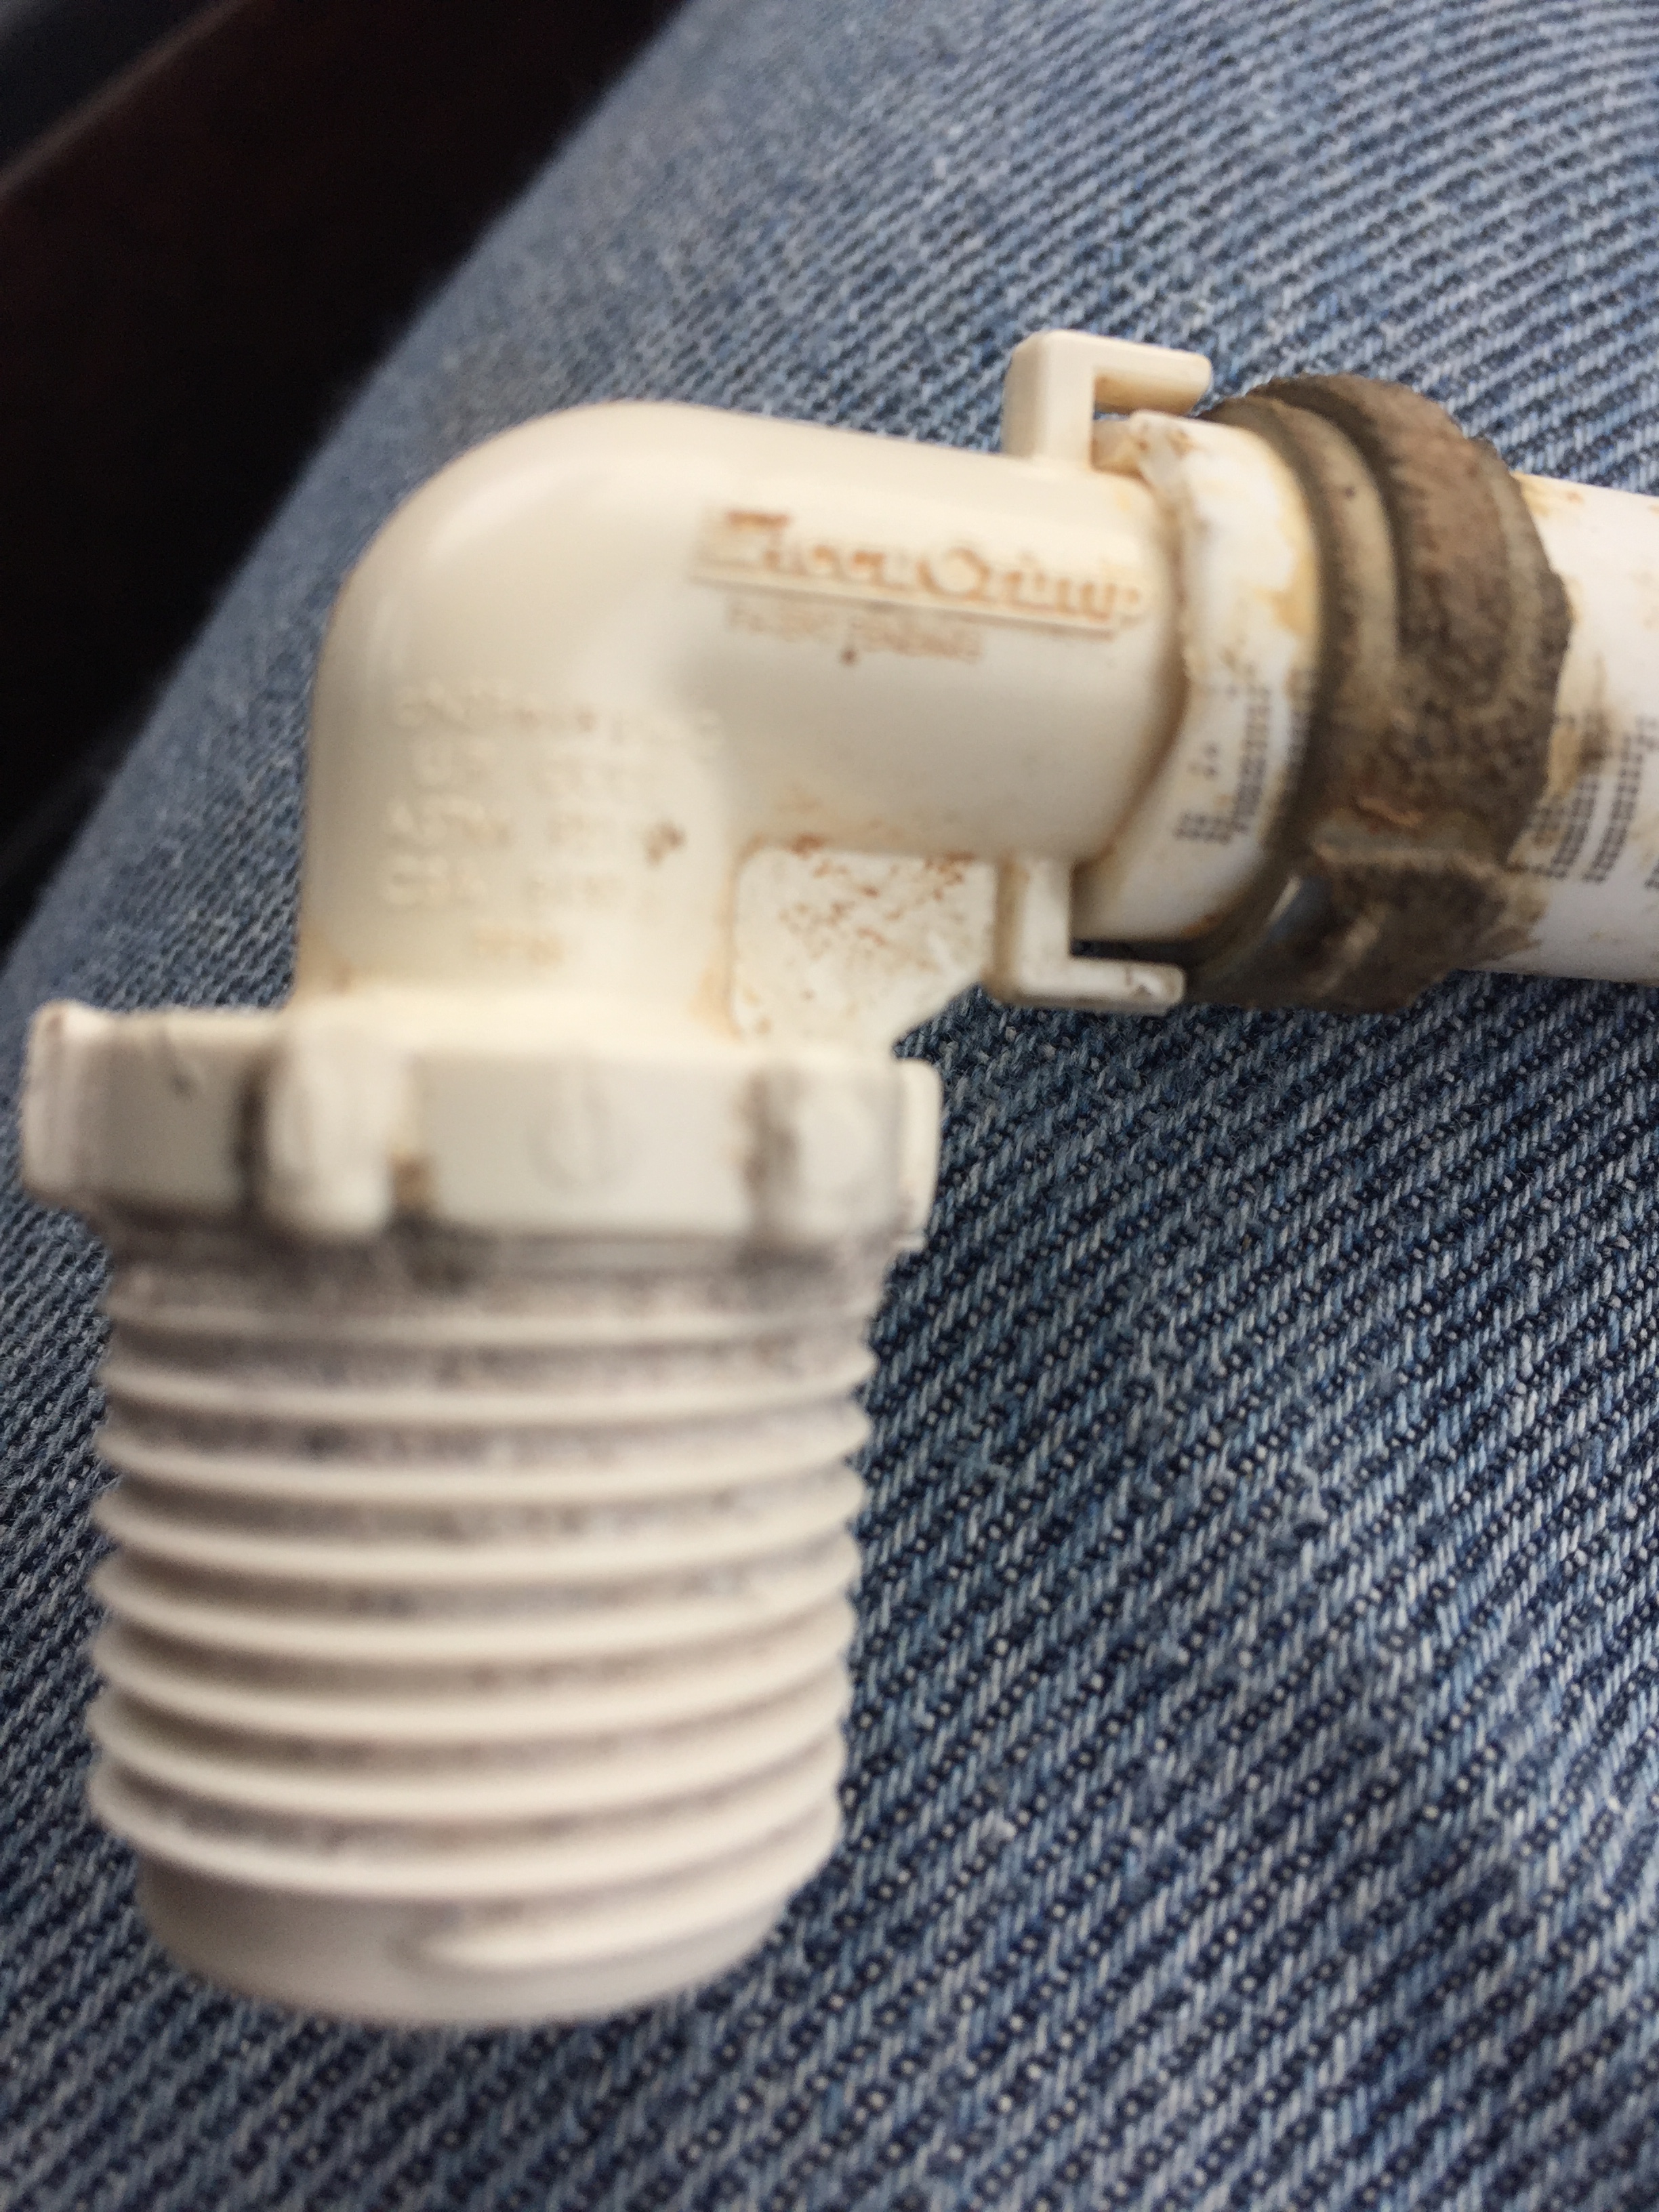
To start with, a 2″ rubber elbow that would allow me to attach to the fitting, and would have the added bonus of a little flexibility. Then a couple of other elbows that would allow me to rotate the whole thing to move it from near the center of the rig more to the outside, and back up to the level of the valve so it wasn’t hanging too low.


From there, around 5 or 6 feet of PVC pipe to get to the back of the rig where the sewer outlet is. Then I needed to be able to attach a standard sewer hose, so I found a 2″ to 3″ boot that would do the trick. When I could find nothing at all that had the bayonet fittings of a standard sewer hose, I got a male-to-male adaptor and used wire cutters to lop off one set of the bayonet lugs. Once that was in the boot and the boot tightened down, it acts as a standard waste connection for a standard sewer hose. I gotta say here this is why non-mechanical people glaze over during these explanations.  If you don’t understand boot, bayonet, etc these sentences make no sense.  – Trace

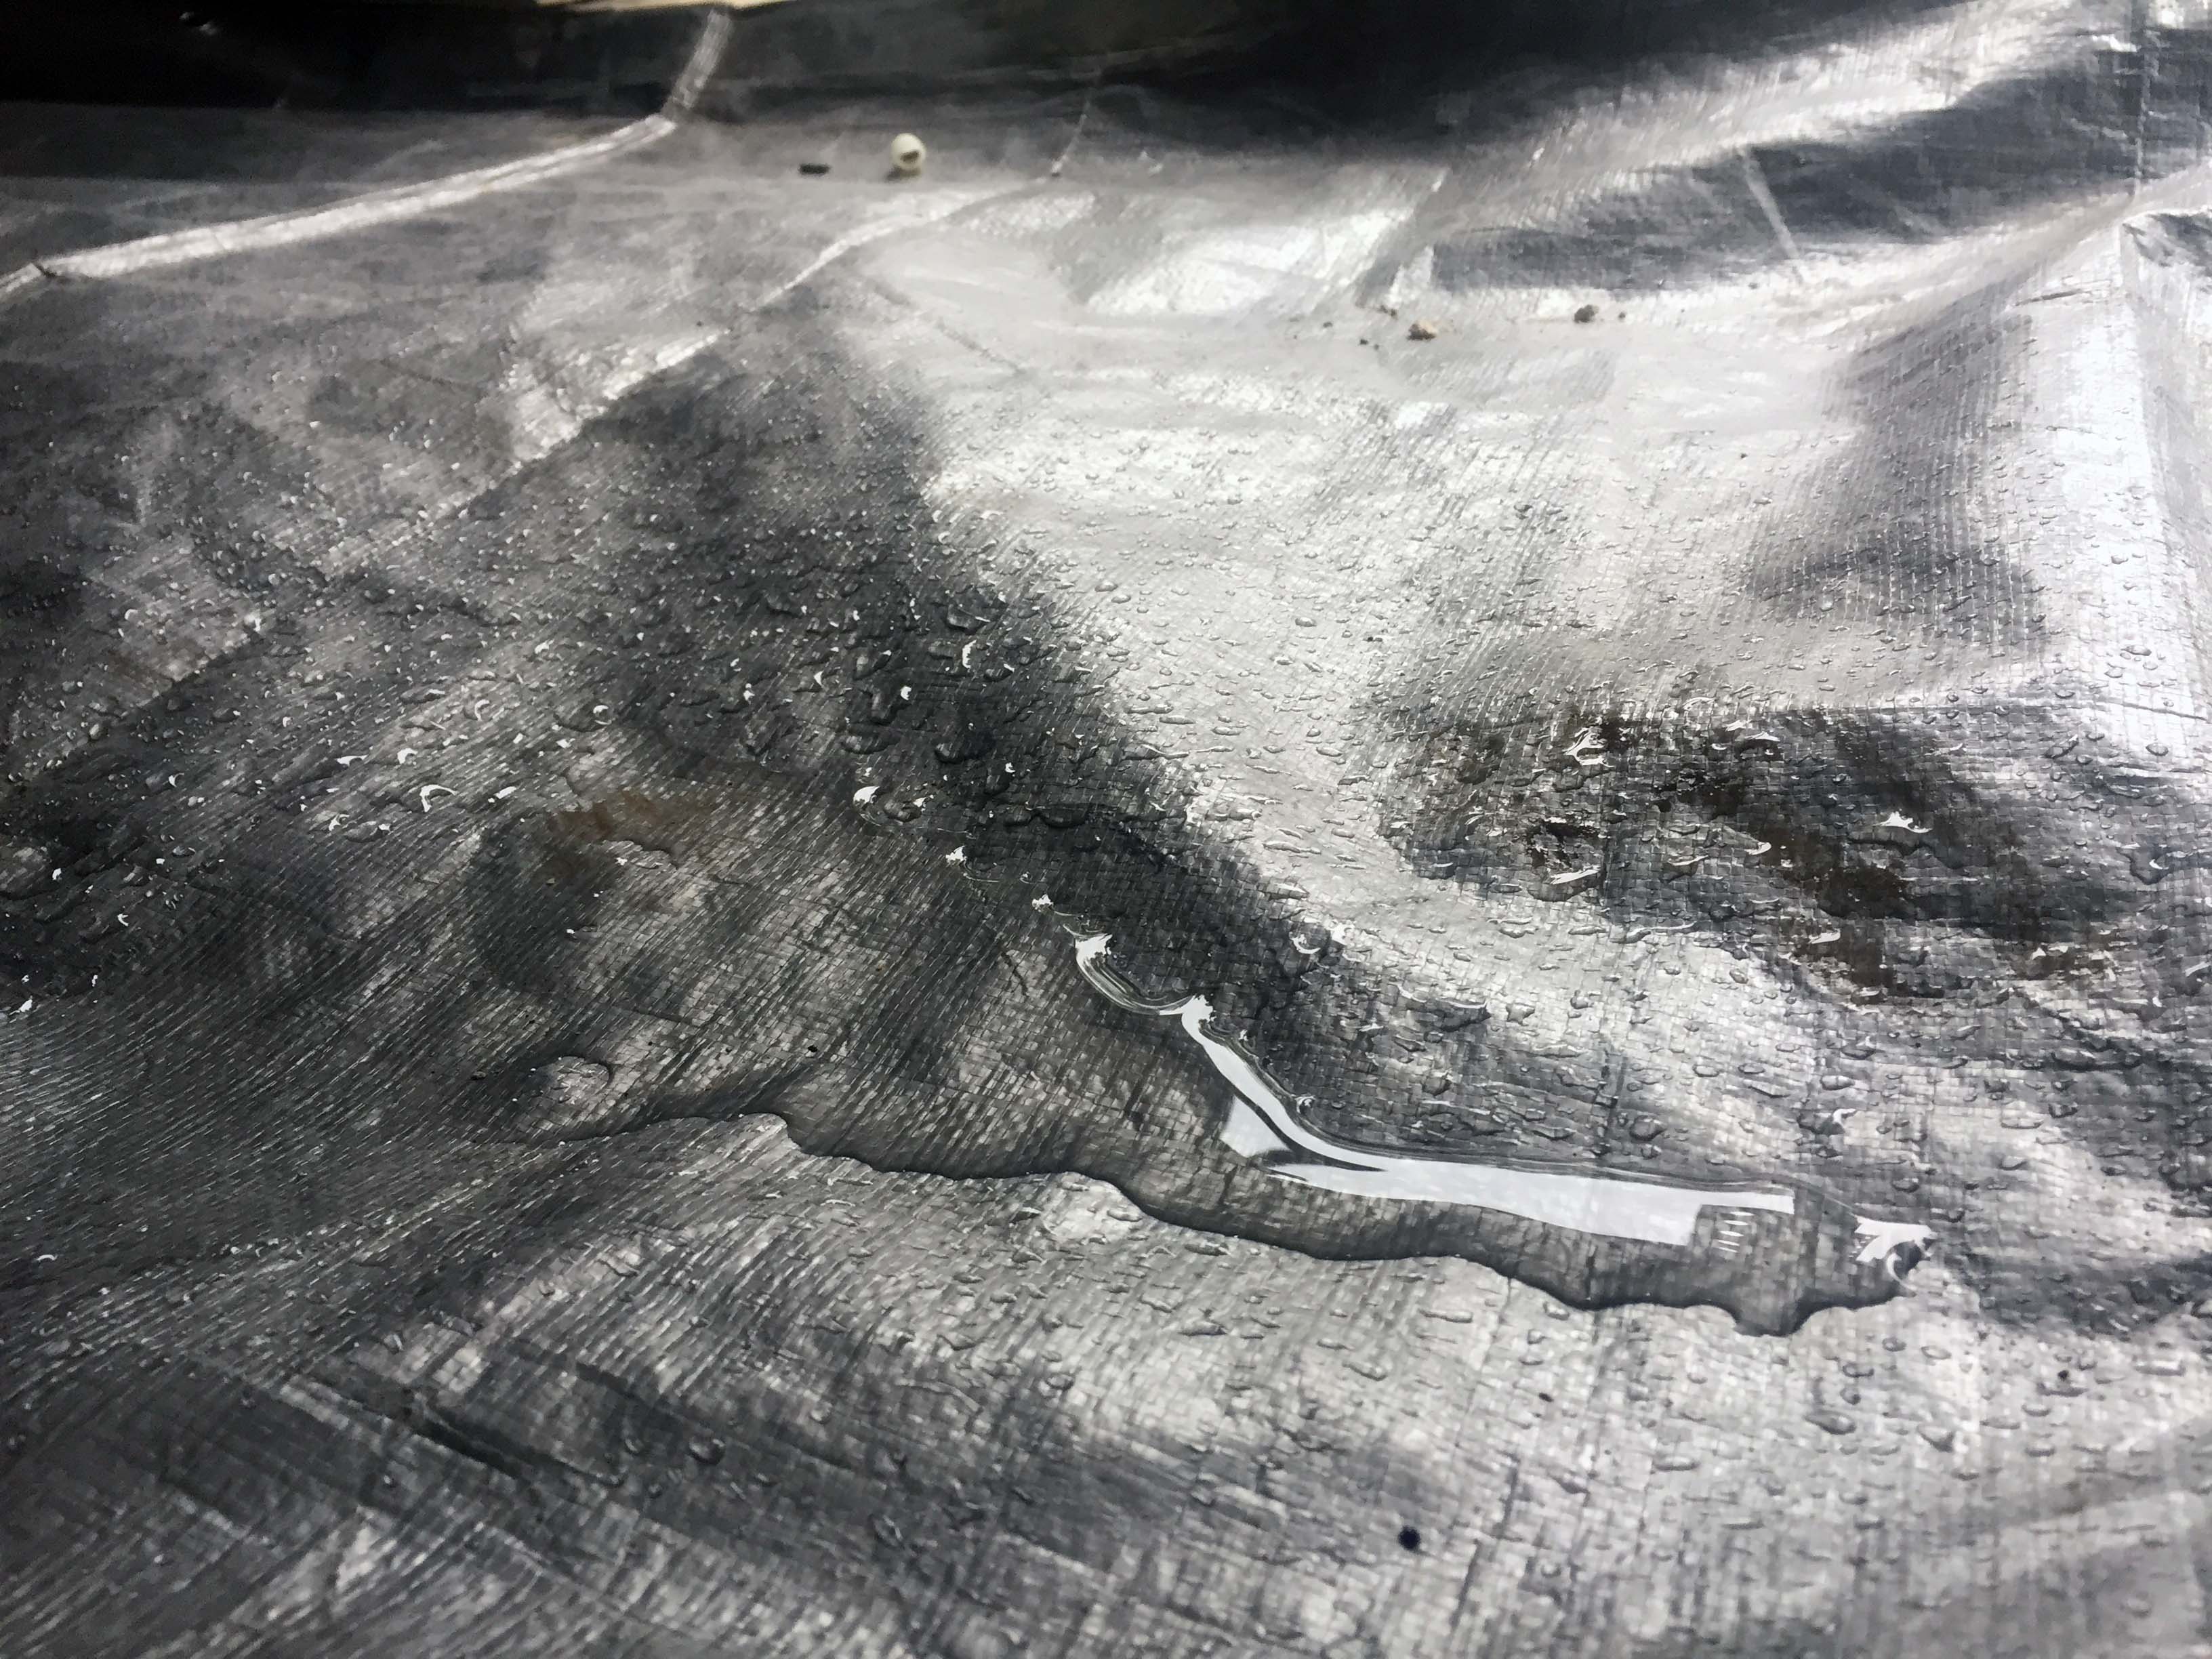
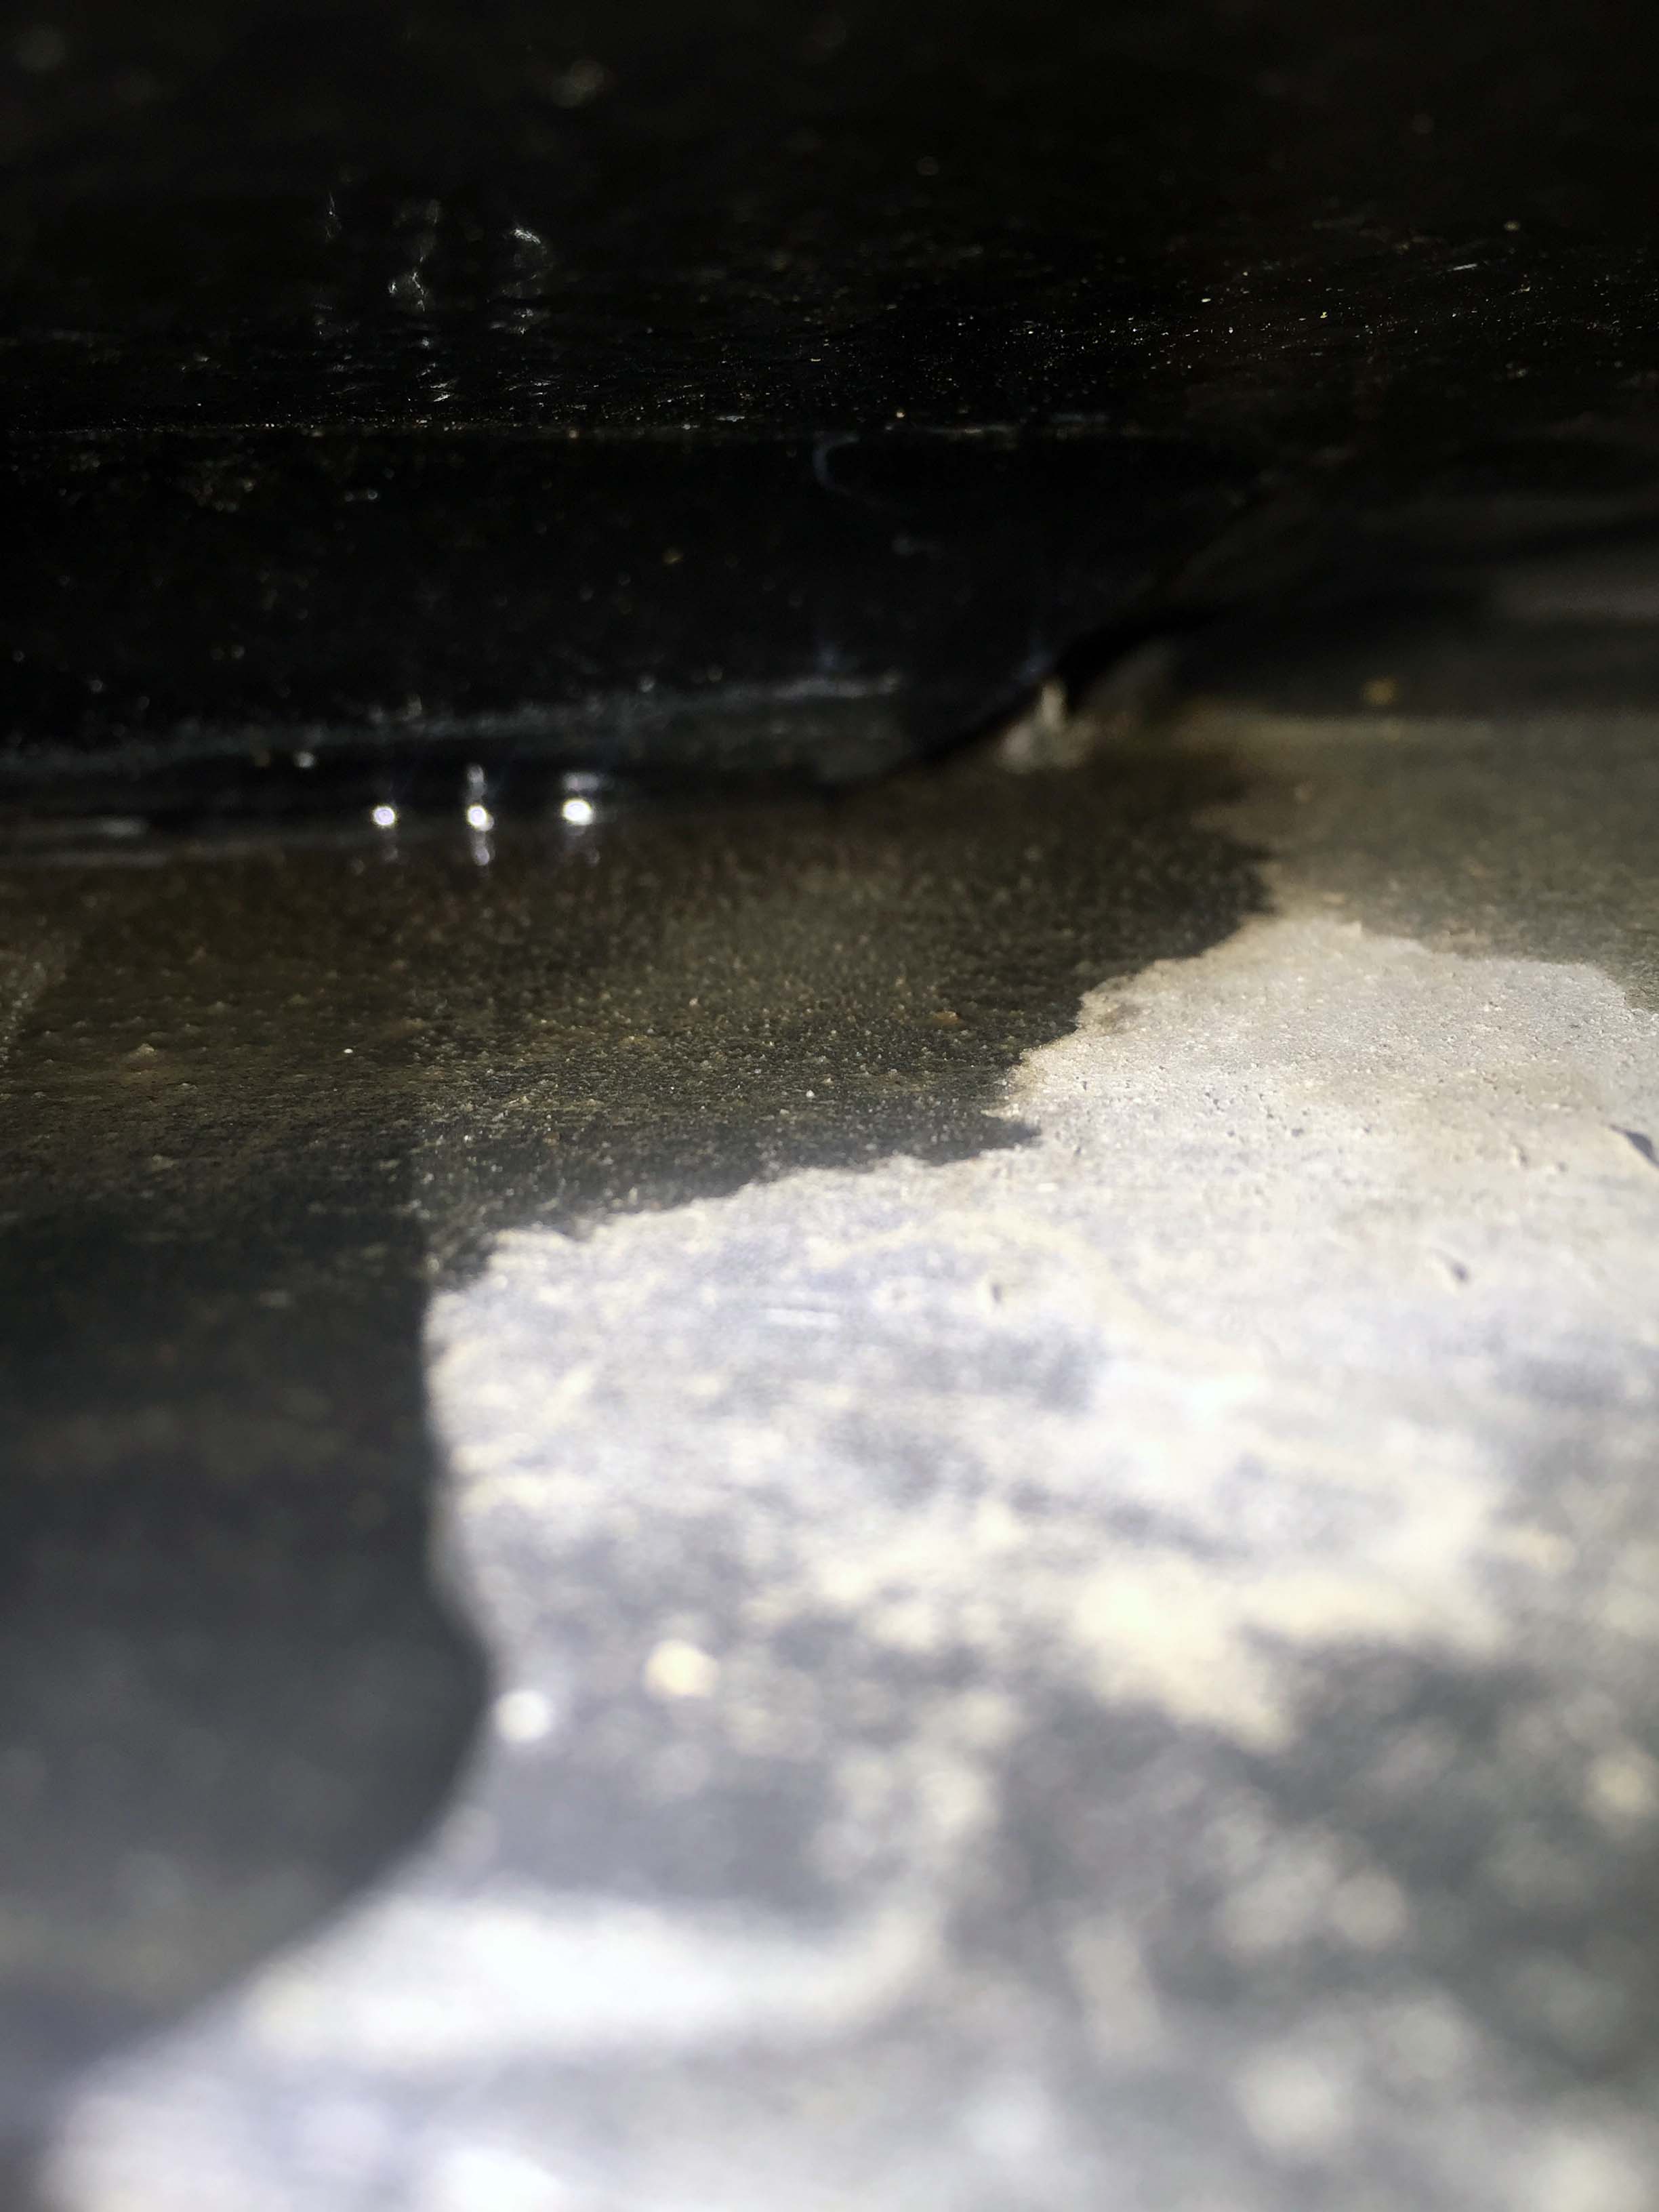
Before I could put this new extension in, I needed to put on the new belly pan, so I got started on that. This was first thing in the morning, and as soon as I got under the rig to start taking measurements, I noticed a little puddle of water on the tarp, just below the middle of the black tank. Uh oh. It hadn’t rained, and it wasn’t dew. Double uh oh.


My colorful language got me a look of reproach from Jack, who had been supervising from a comfy chair.

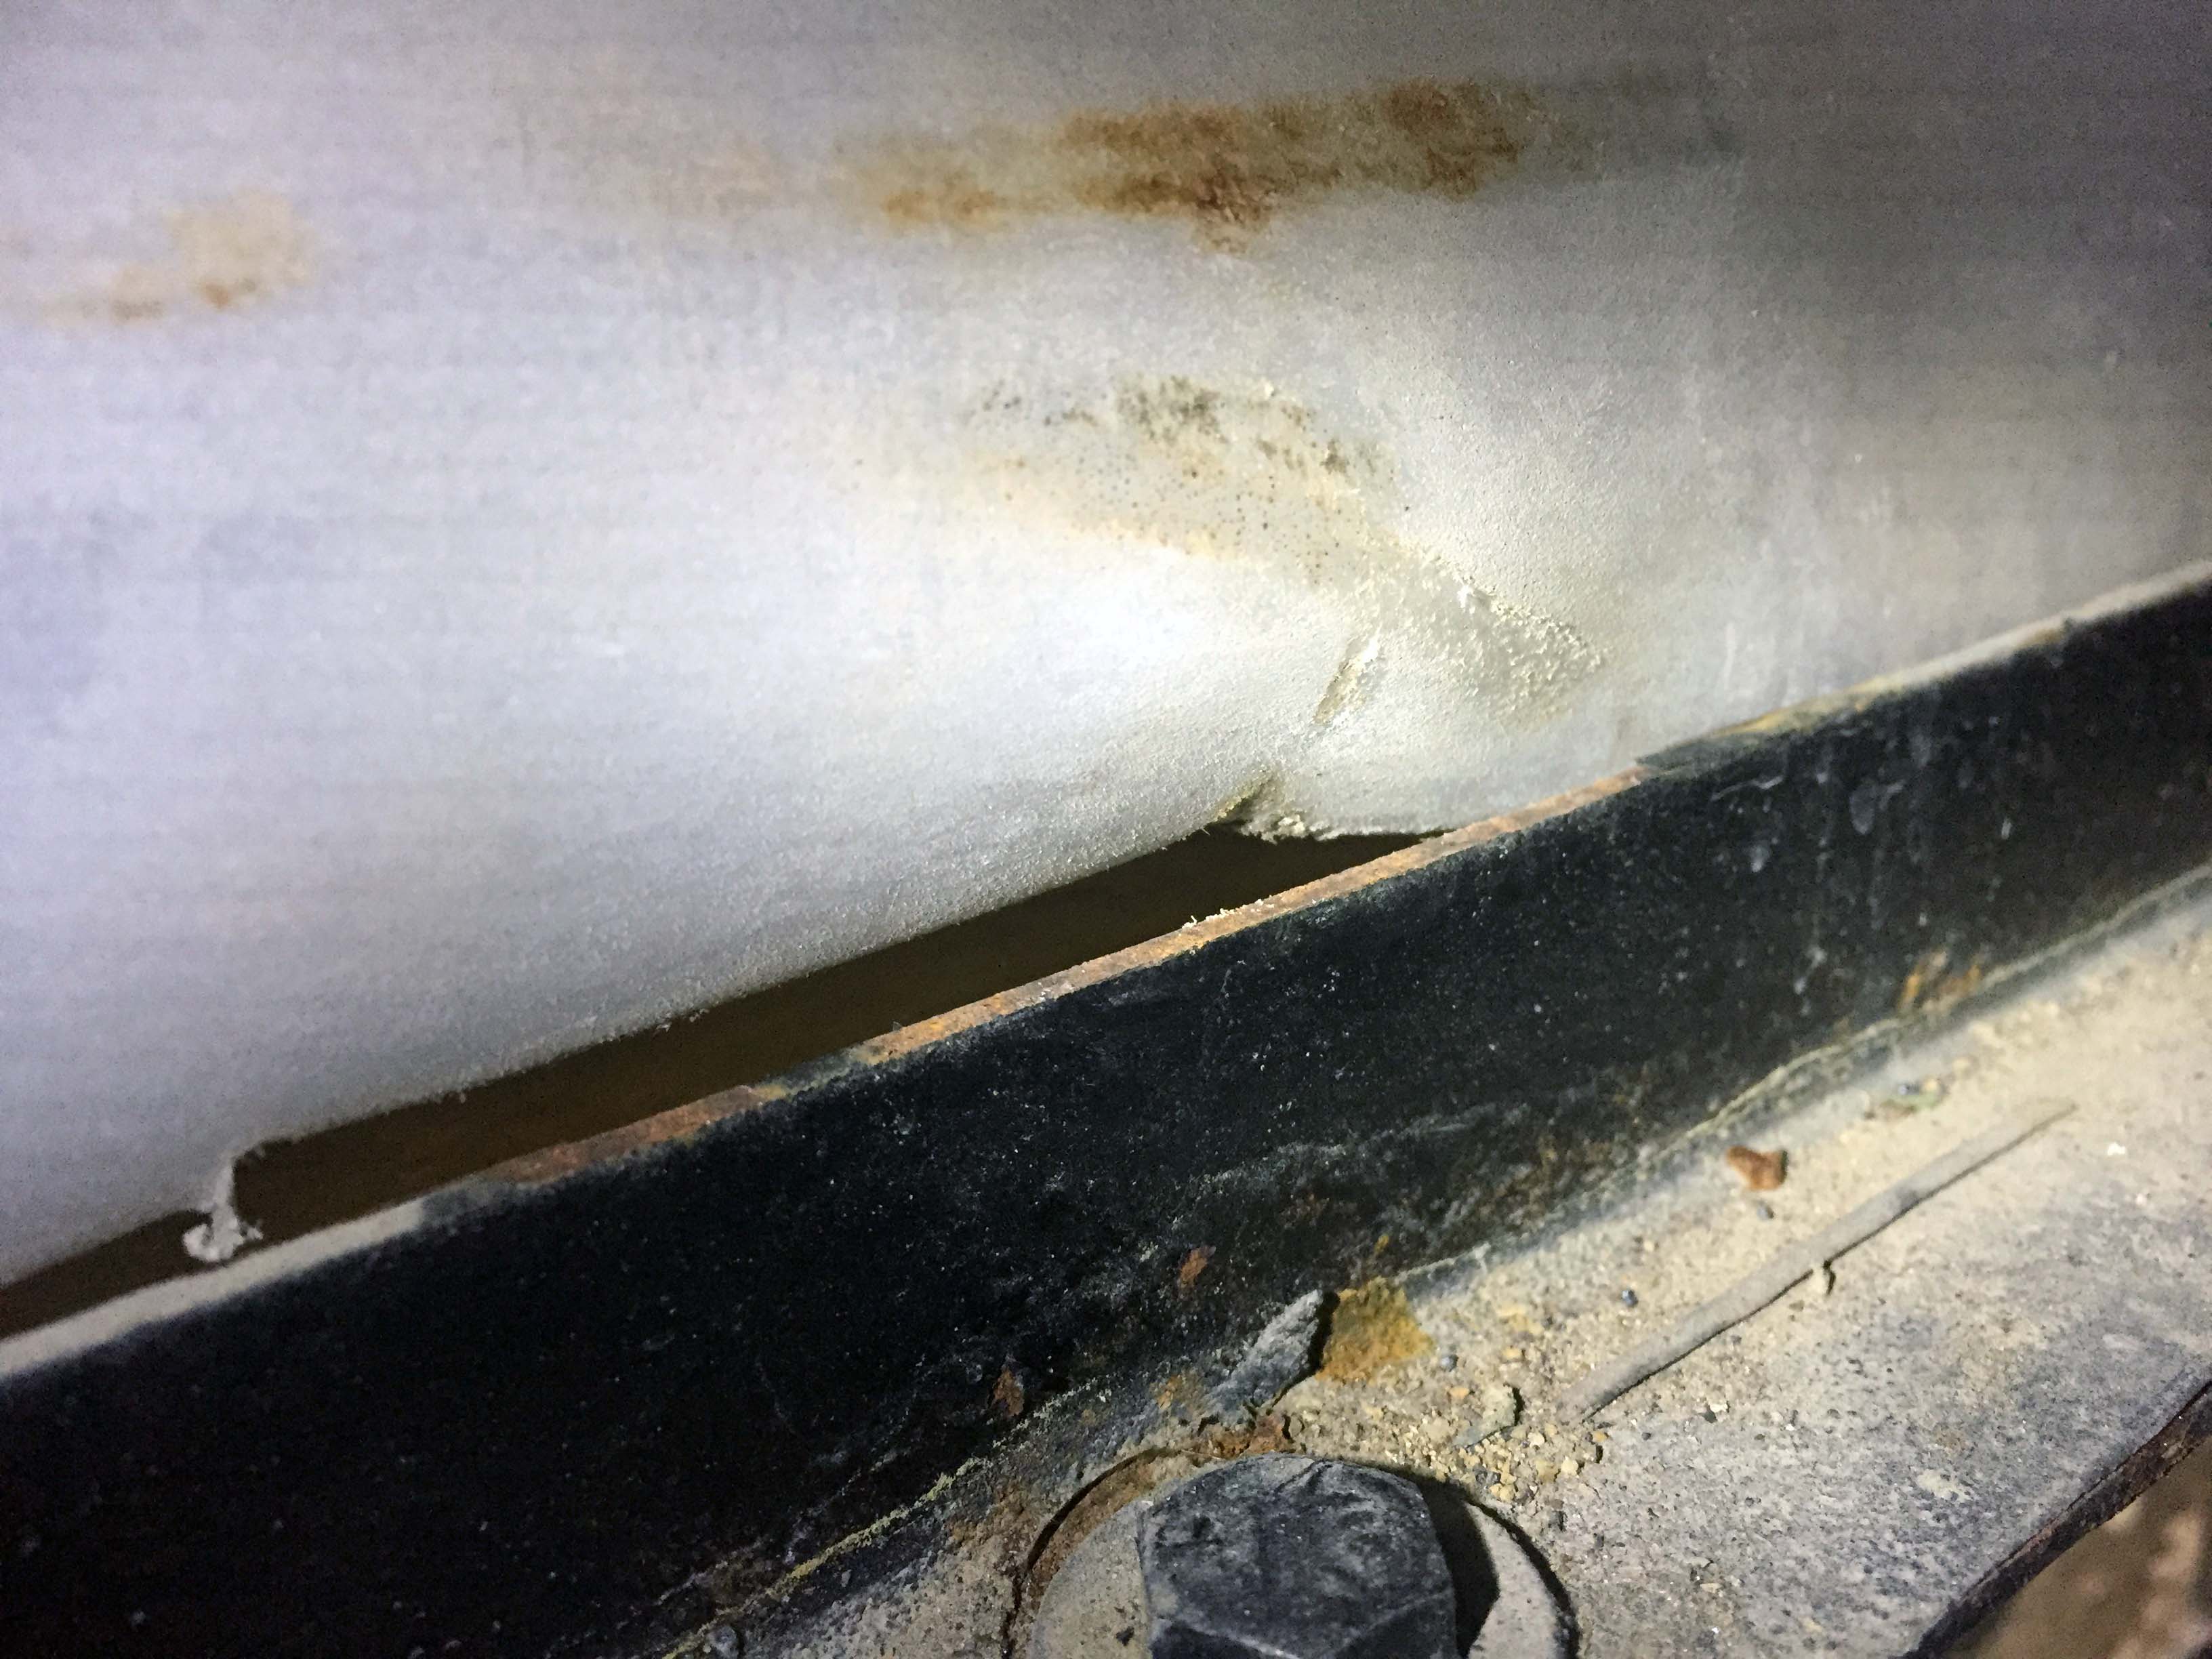
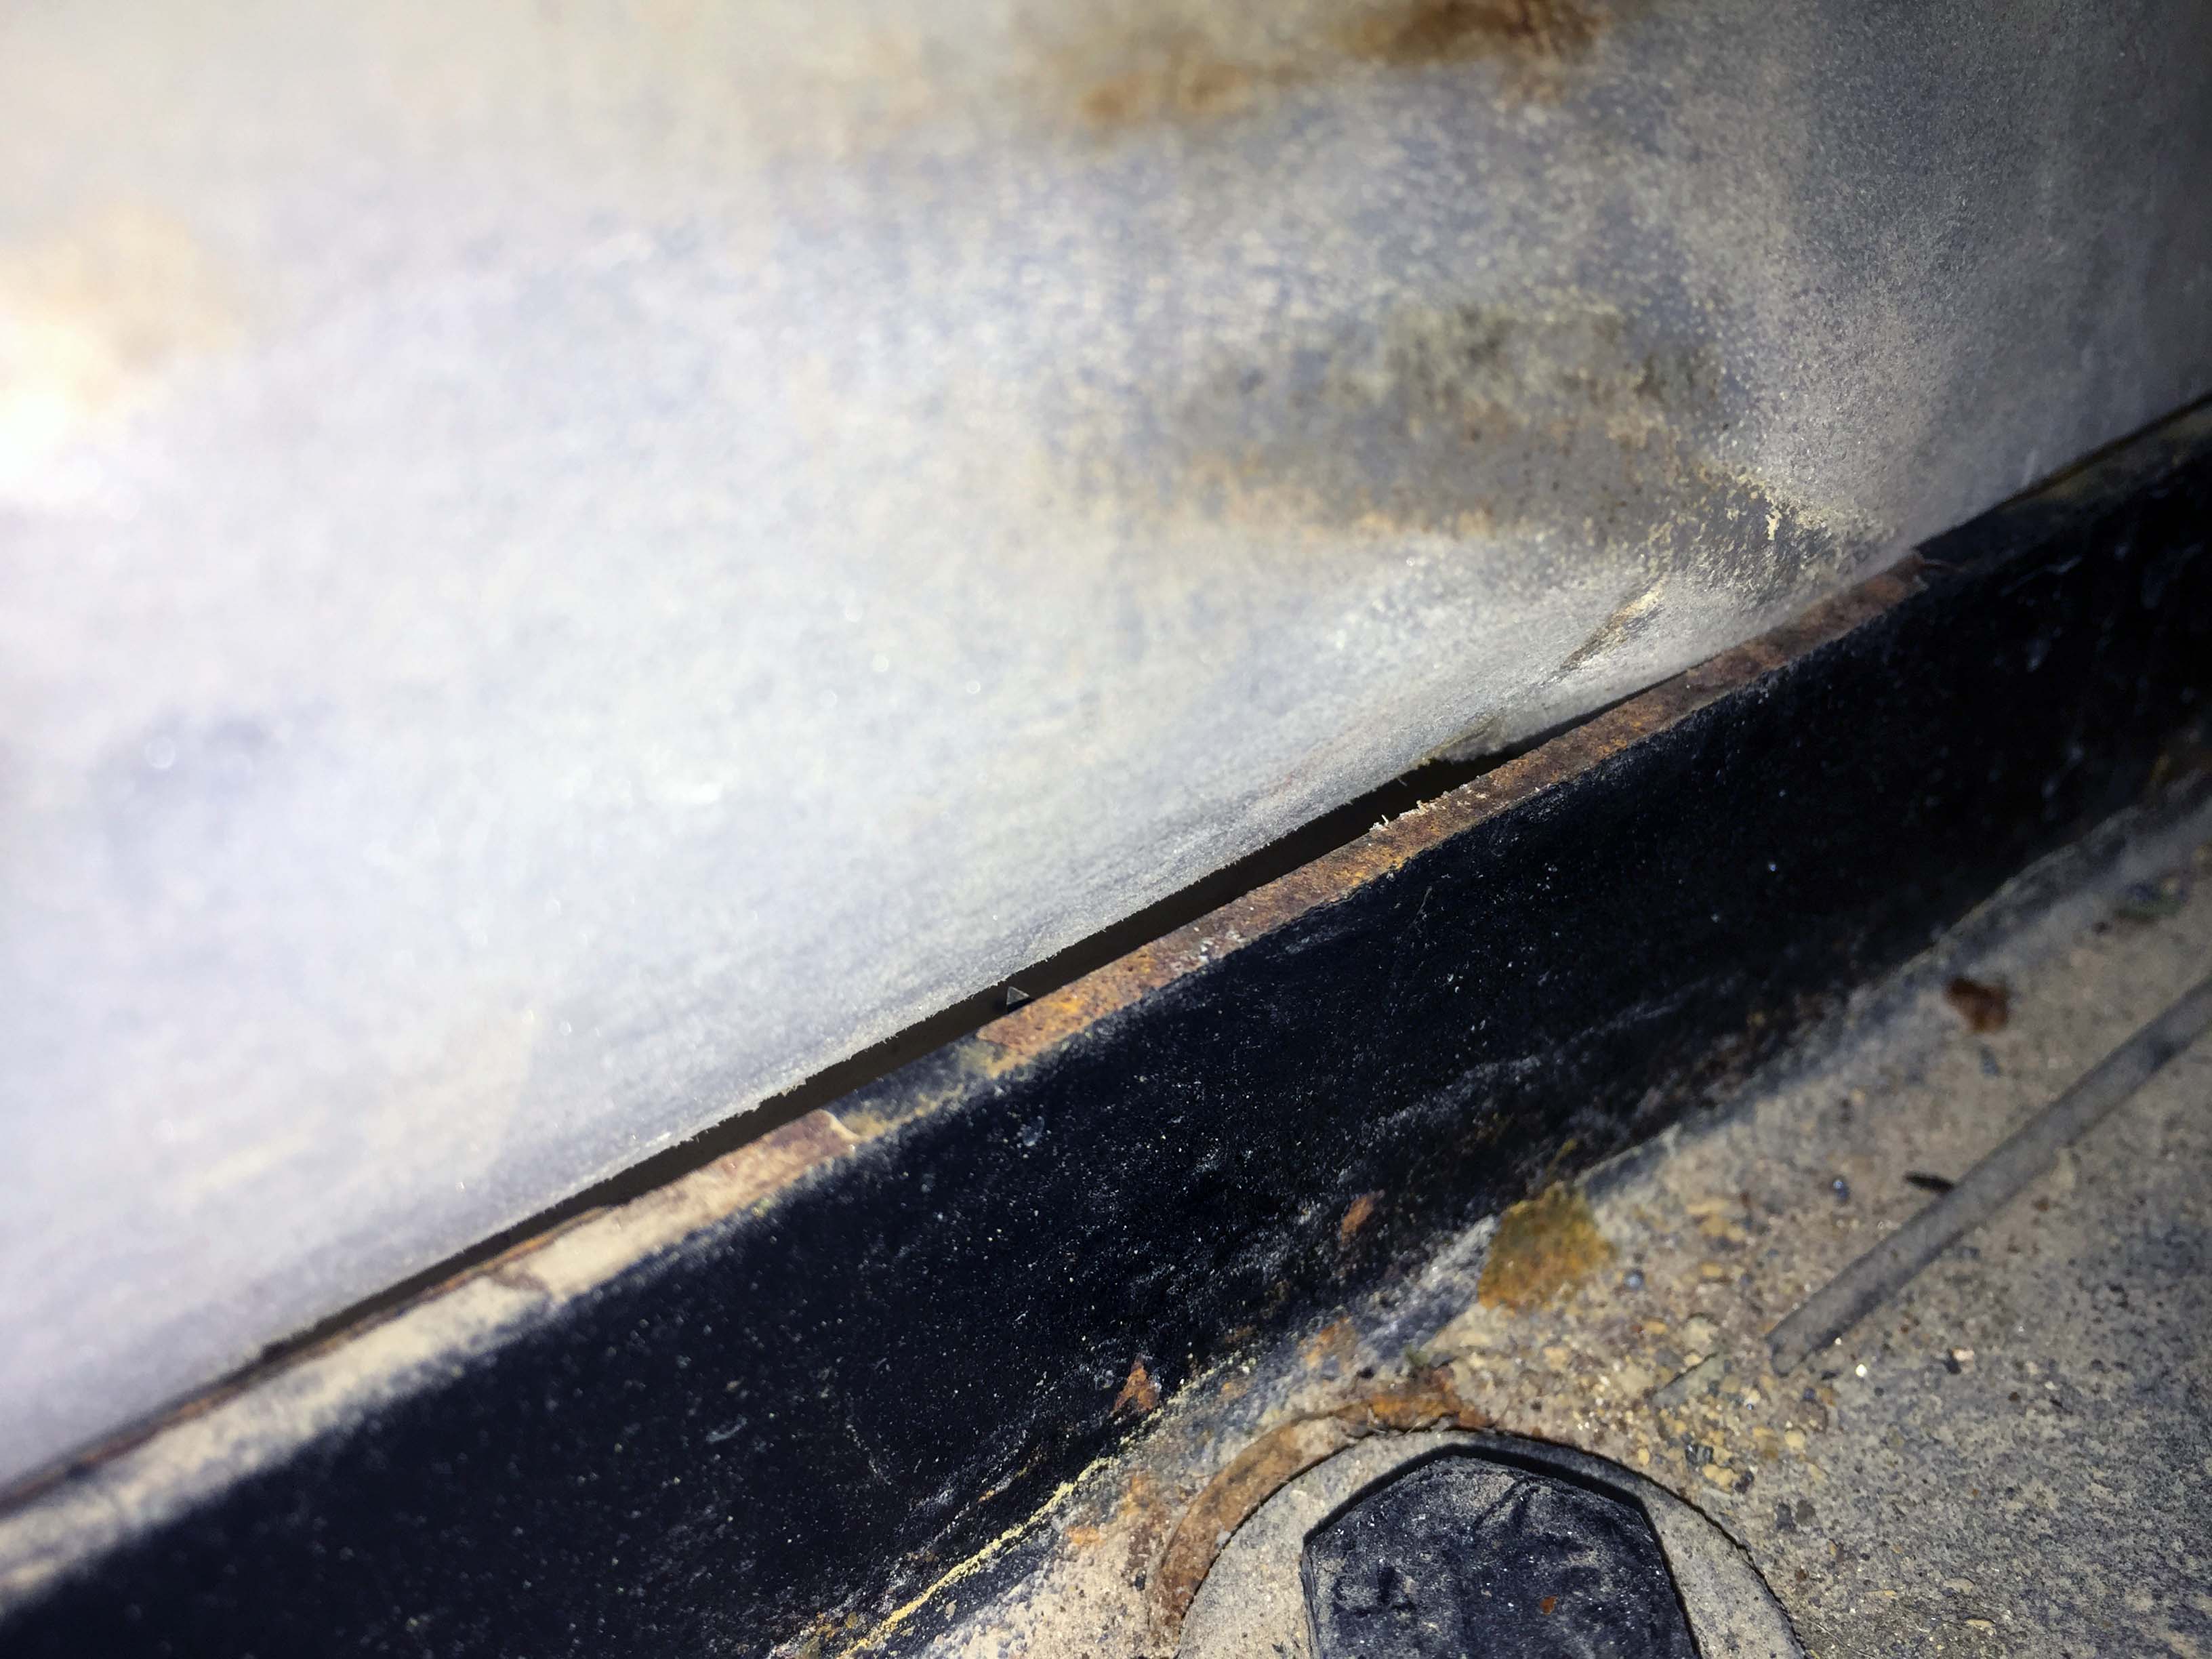
I looked at it very closely, and gave it a sniff. Not black water, or gray. So that’s good. It’s location wasn’t necessarily a clue to it’s origin, because water will always go downhill. So I started looking for it’s origin. The spatters and tiny drops around the puddle told me it wasn’t pooling there from elsewhere on the tarp, so it was dripping from directly above. It also couldn’t be a bad leak, because it was such a small amount of water. And it wasn’t black or gray, so it had to be fresh. Directly above it I saw where it was dripping from.


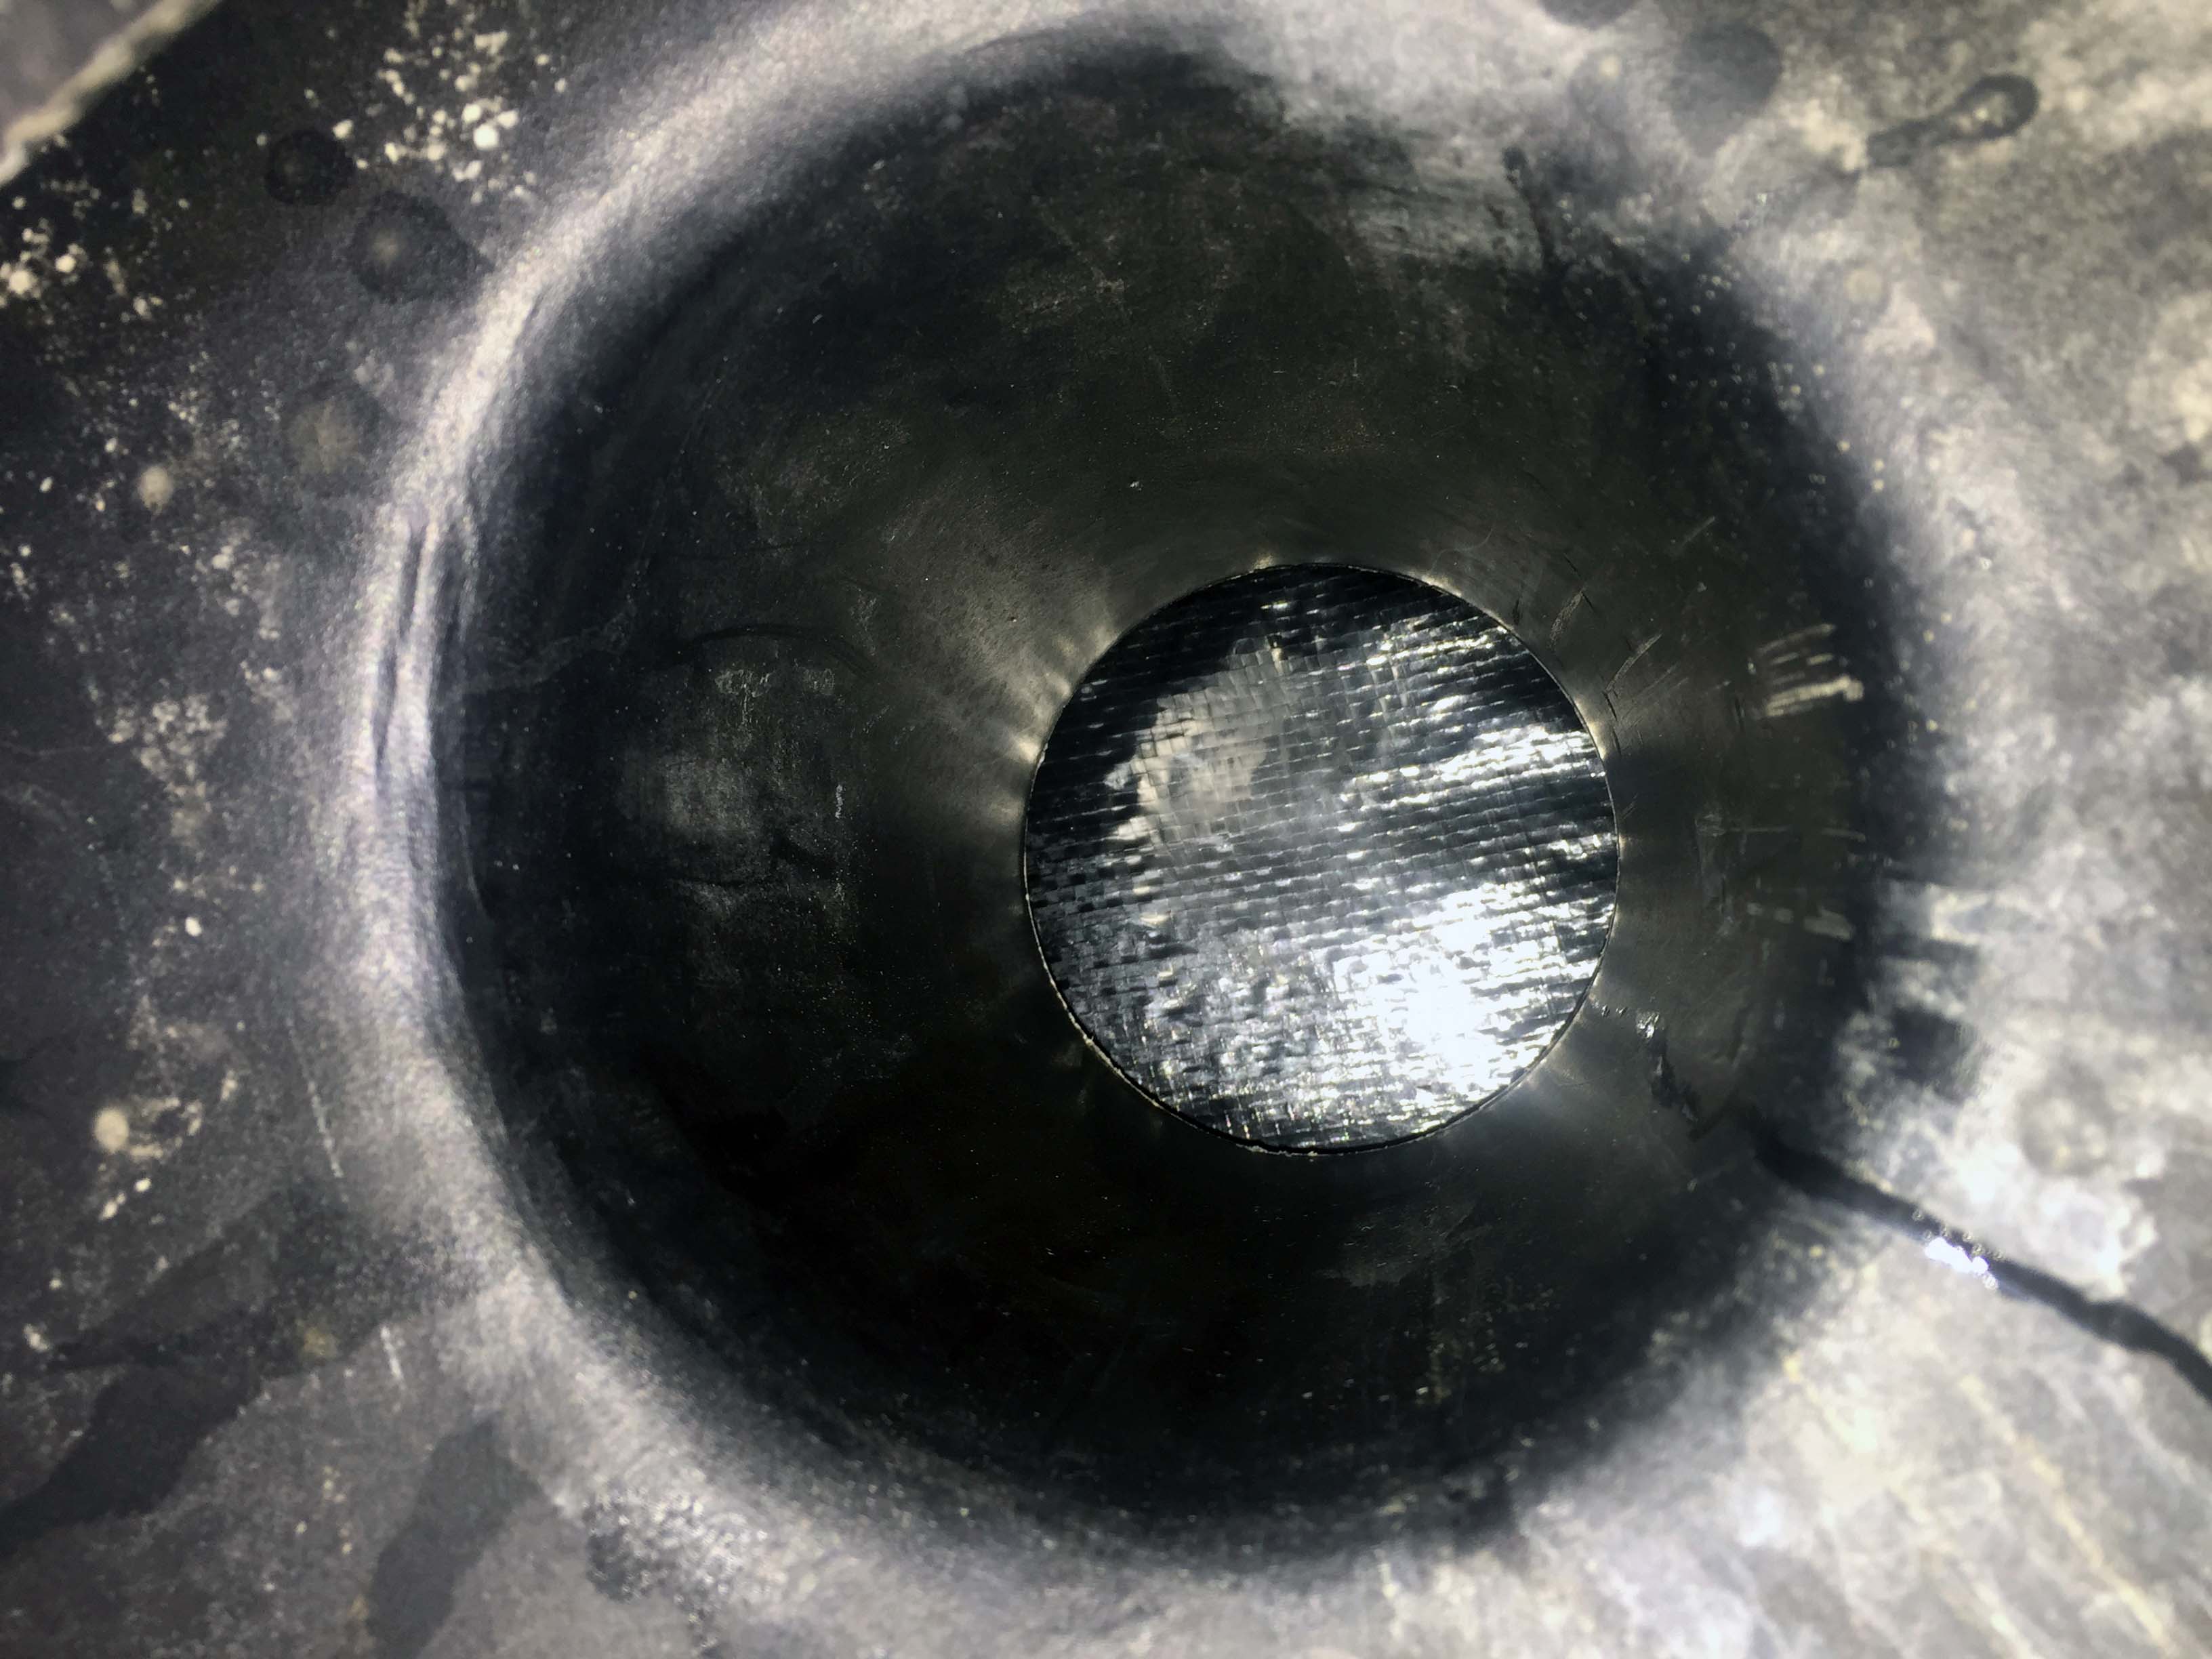
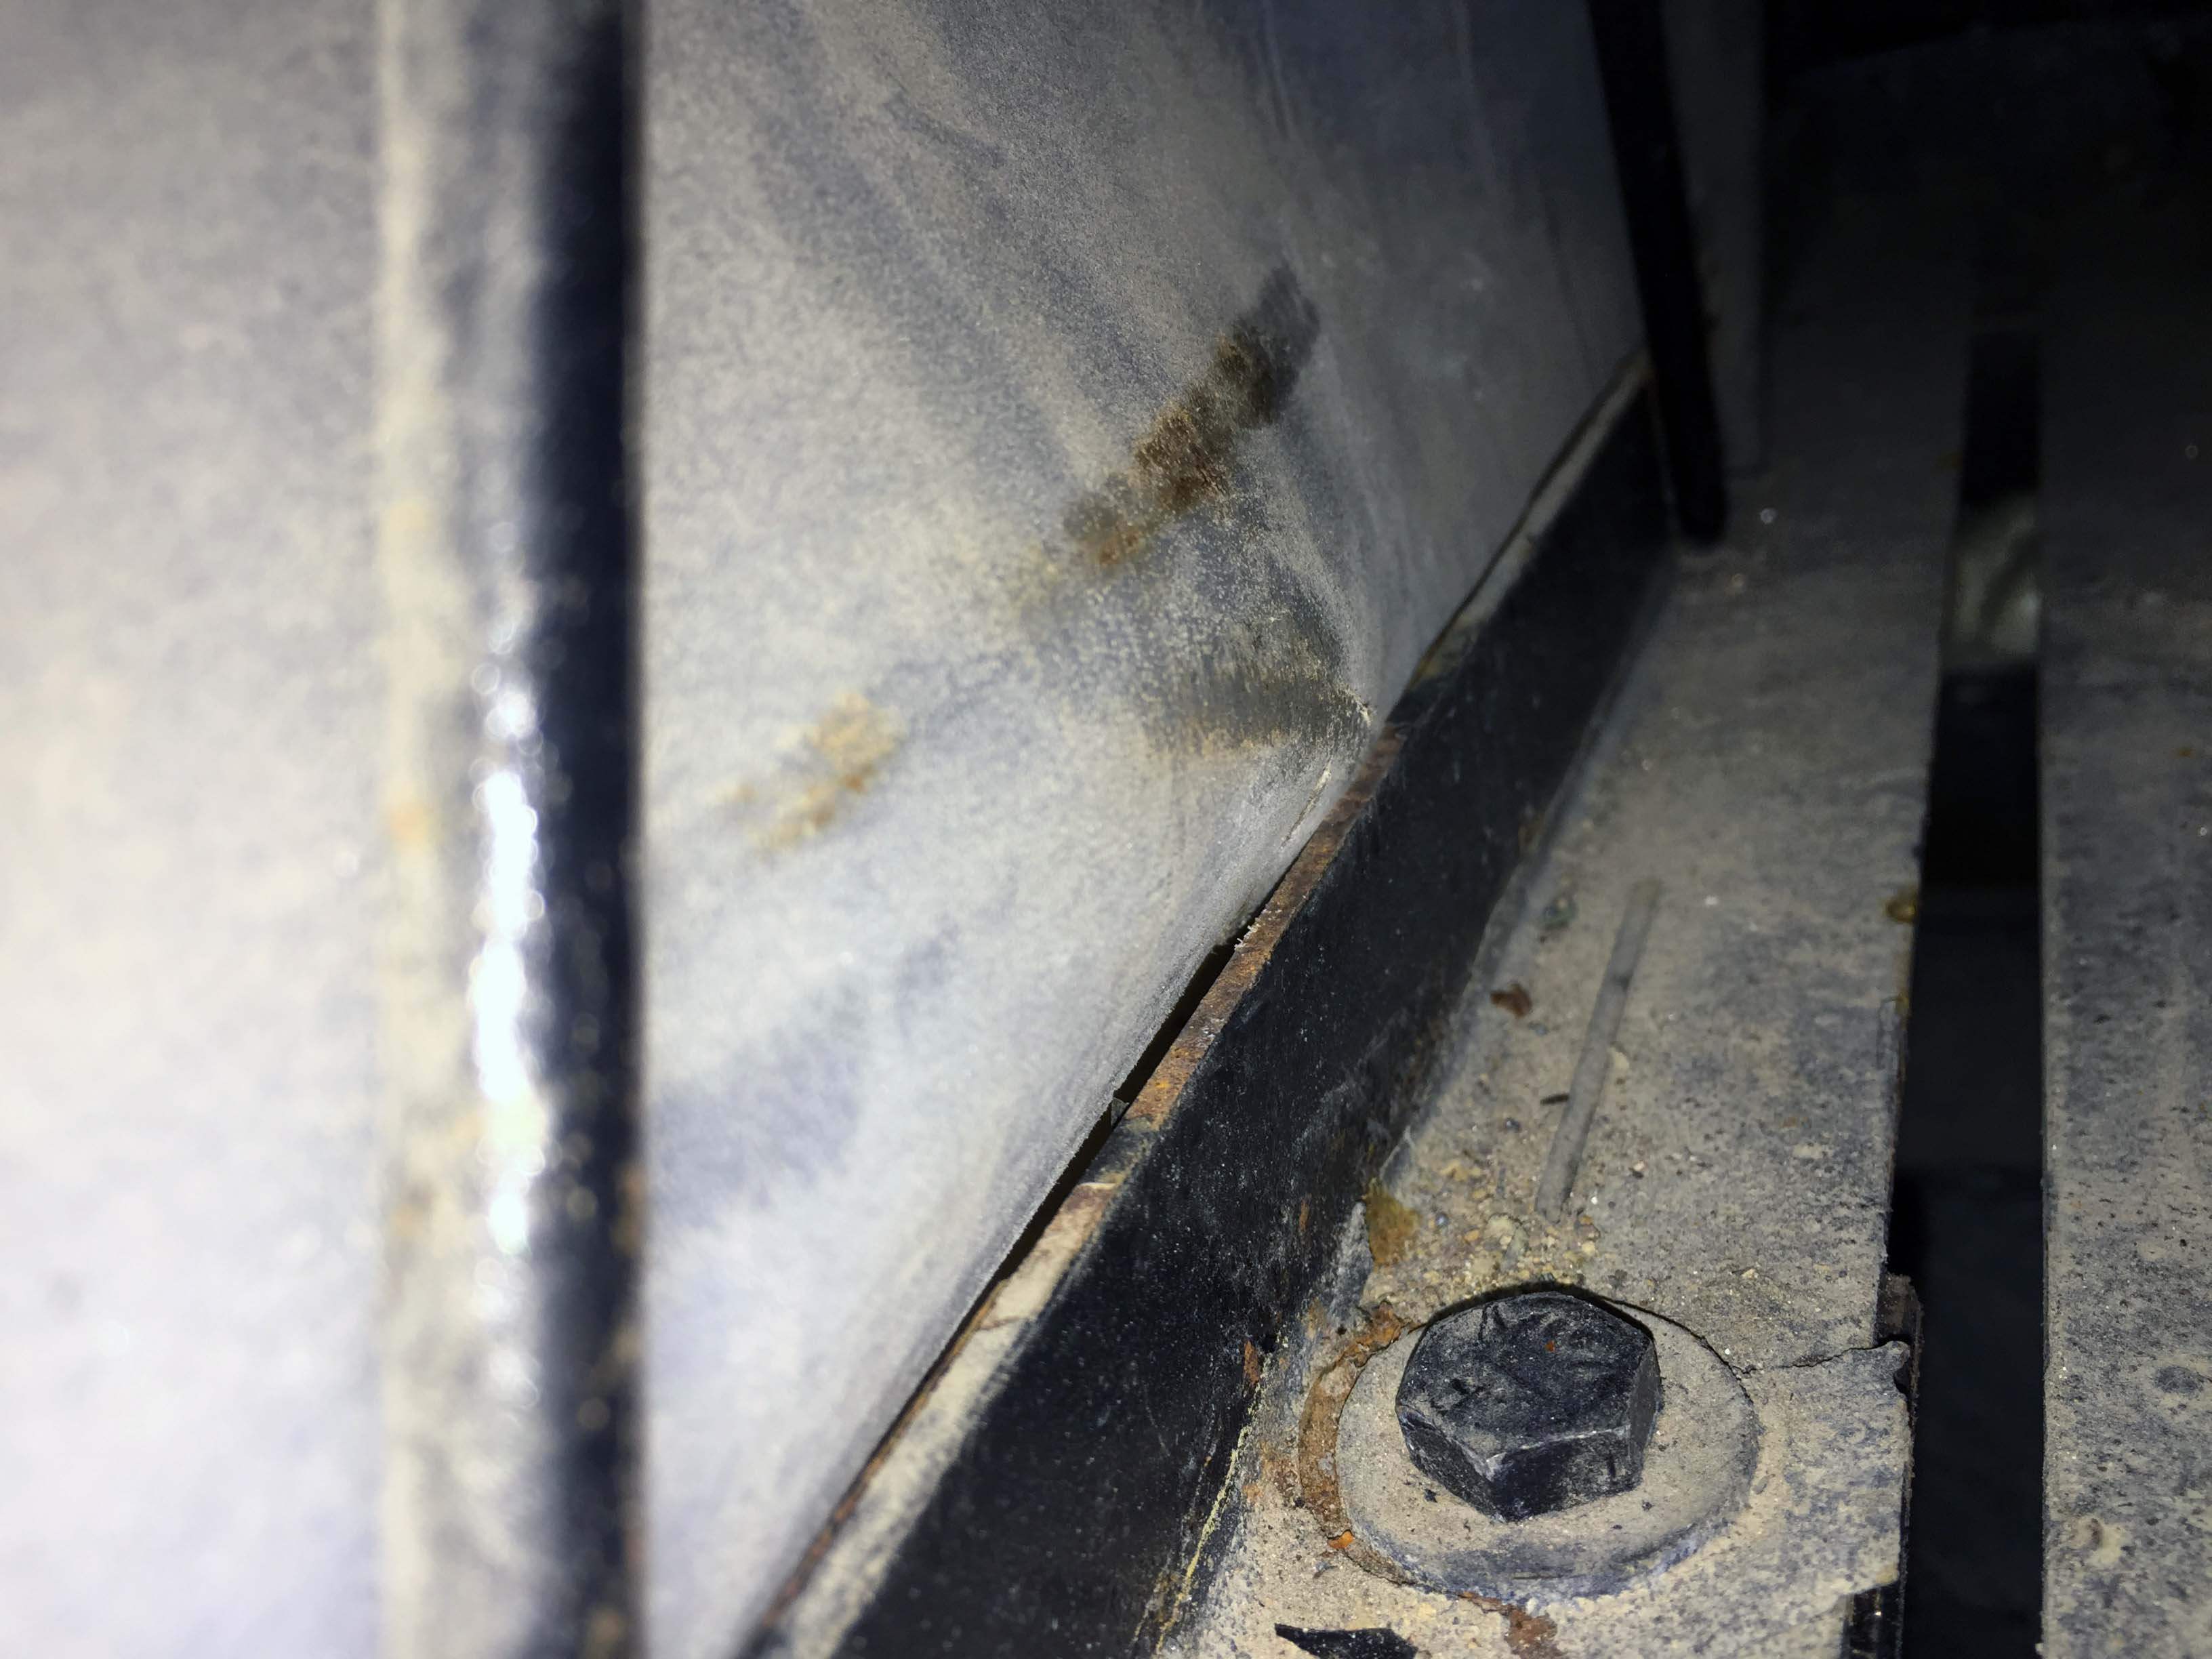
You can see where the water is running out from the edge of the hole and then dripping down. This is a “doughnut hole” formed into the black tank (the gray tank has two of them) I’m assuming to give the tank structural strength since it’s a very long rectangle. My immediate thought was, if the doughnut hole in the black tank is leaking, why doesn’t this water smell??? I looked up inside the hole.

It looks like the water is coming from the top, and just following gravity. So I need to follow it back. I used the scope camera and could see, but not very well, so up went my cell phone with a bluetooth remote trigger. (Those are VERY handy, by the way)

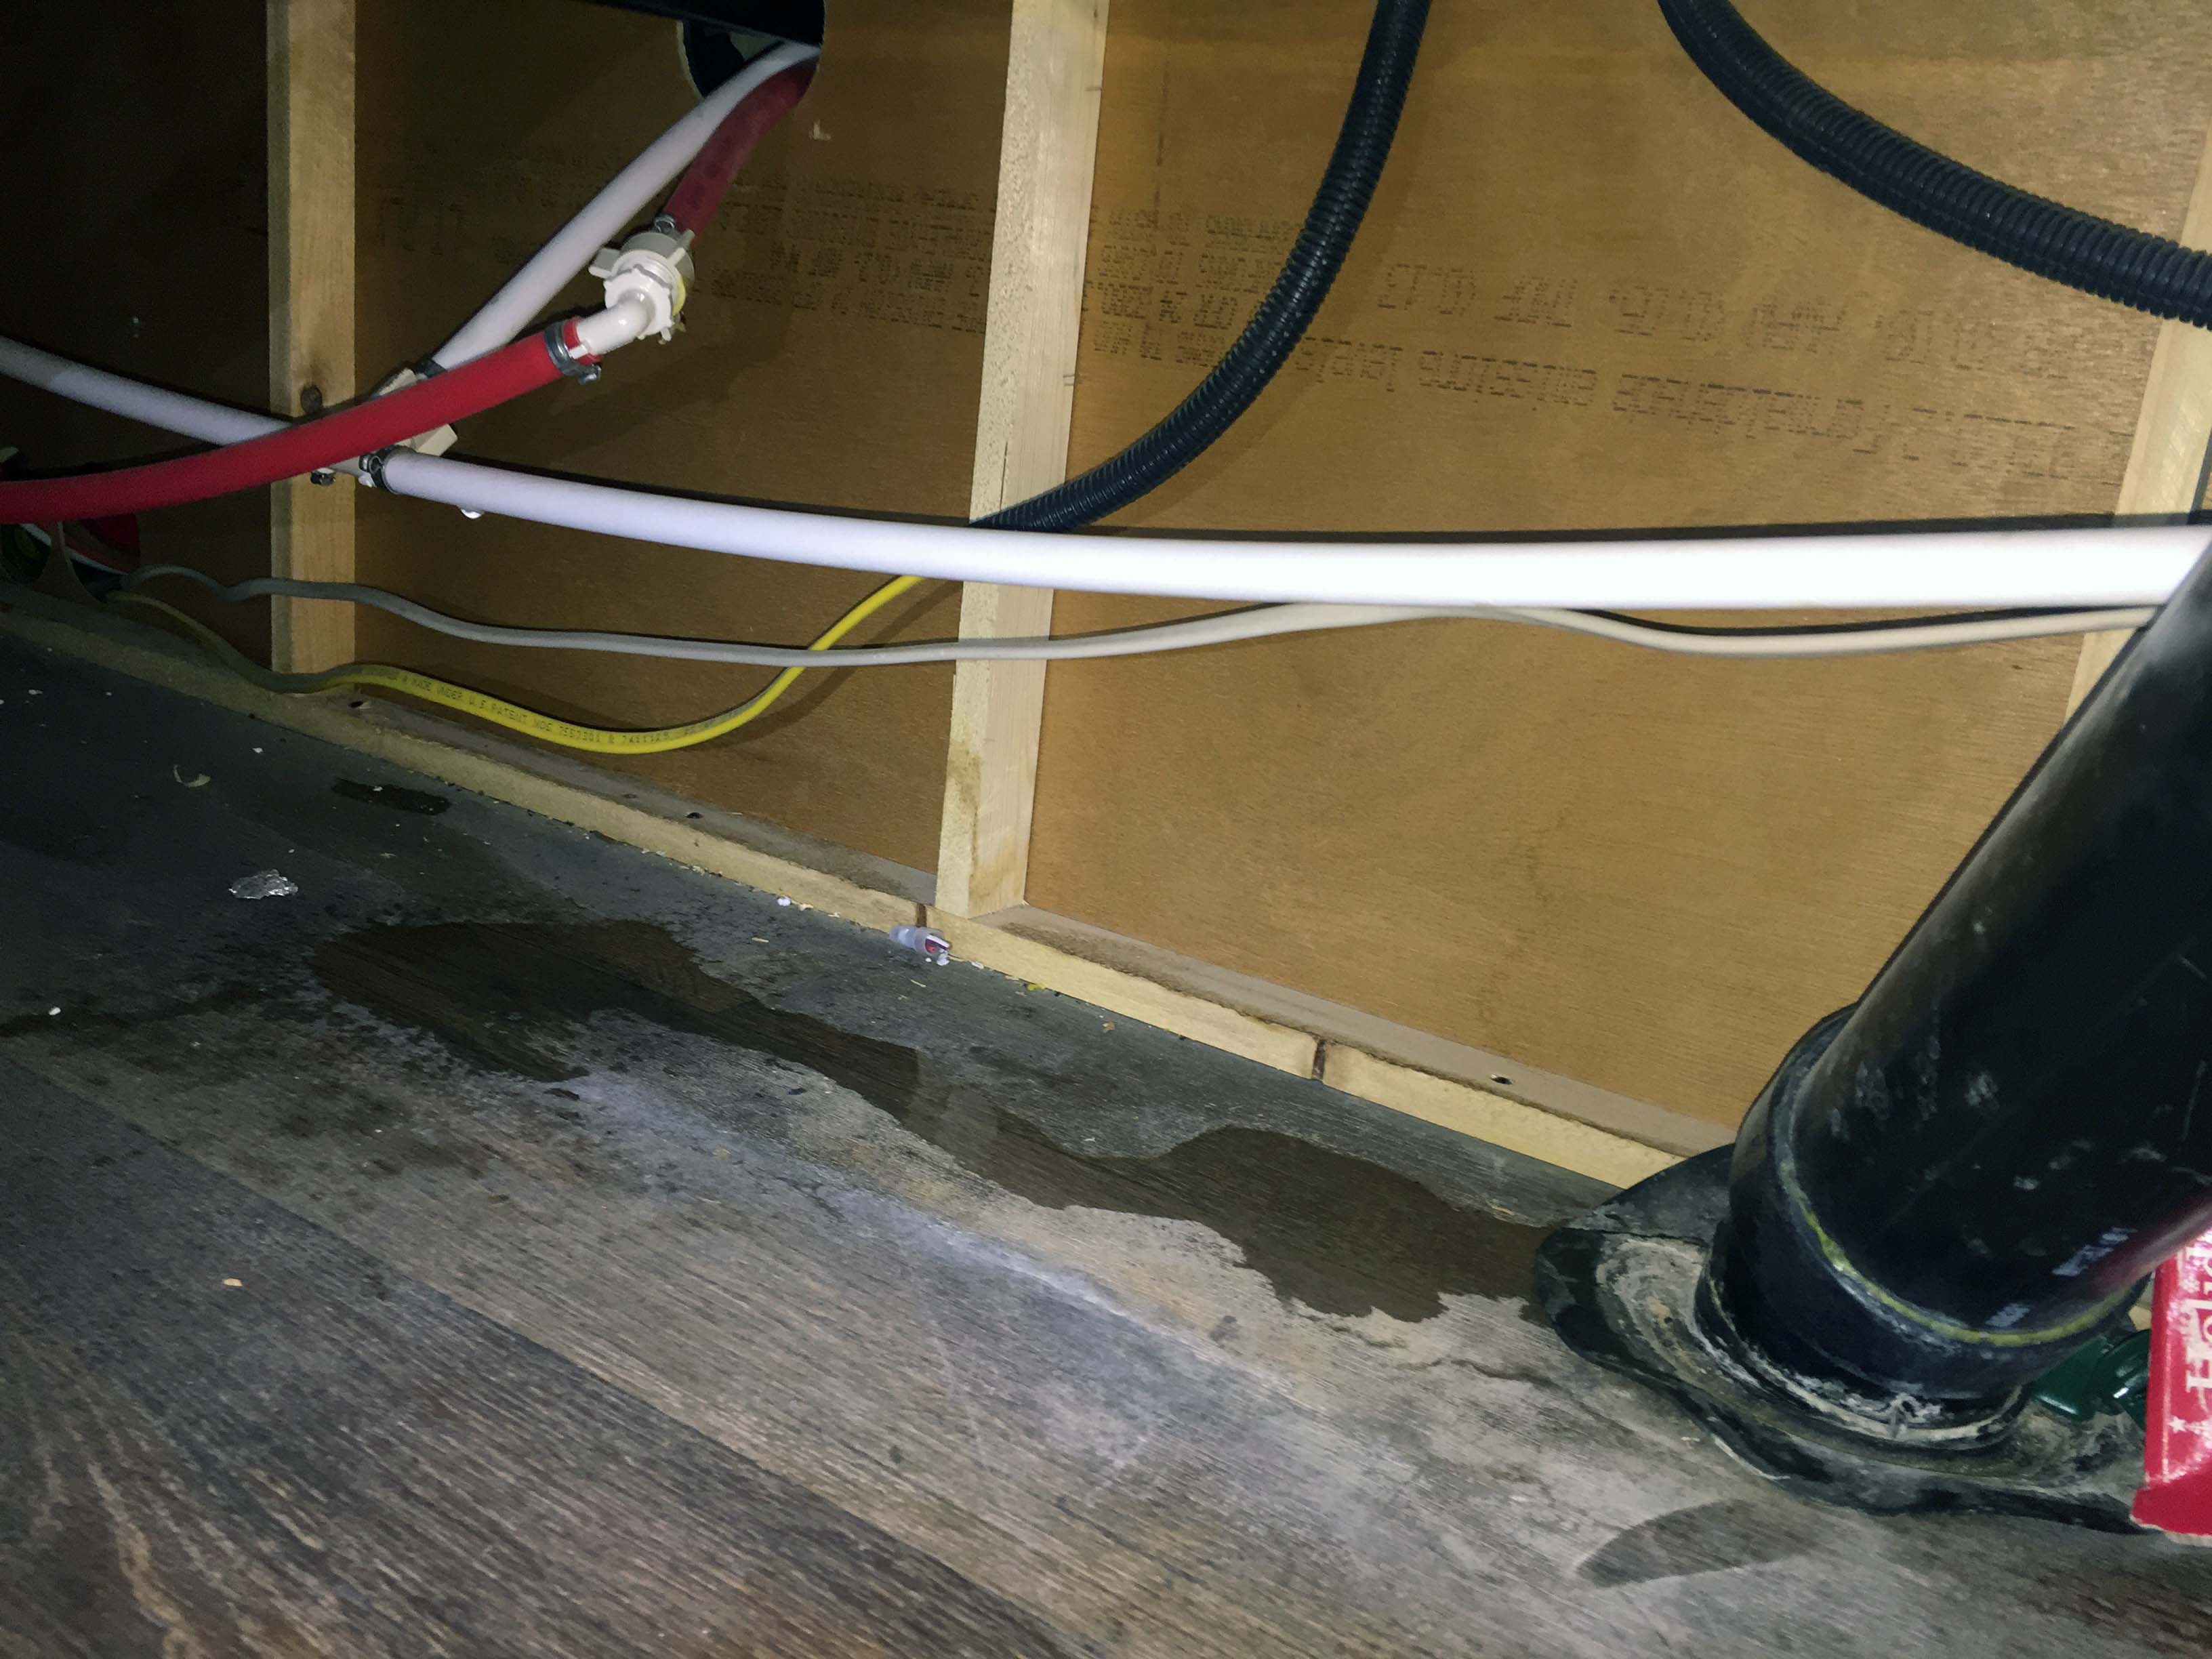
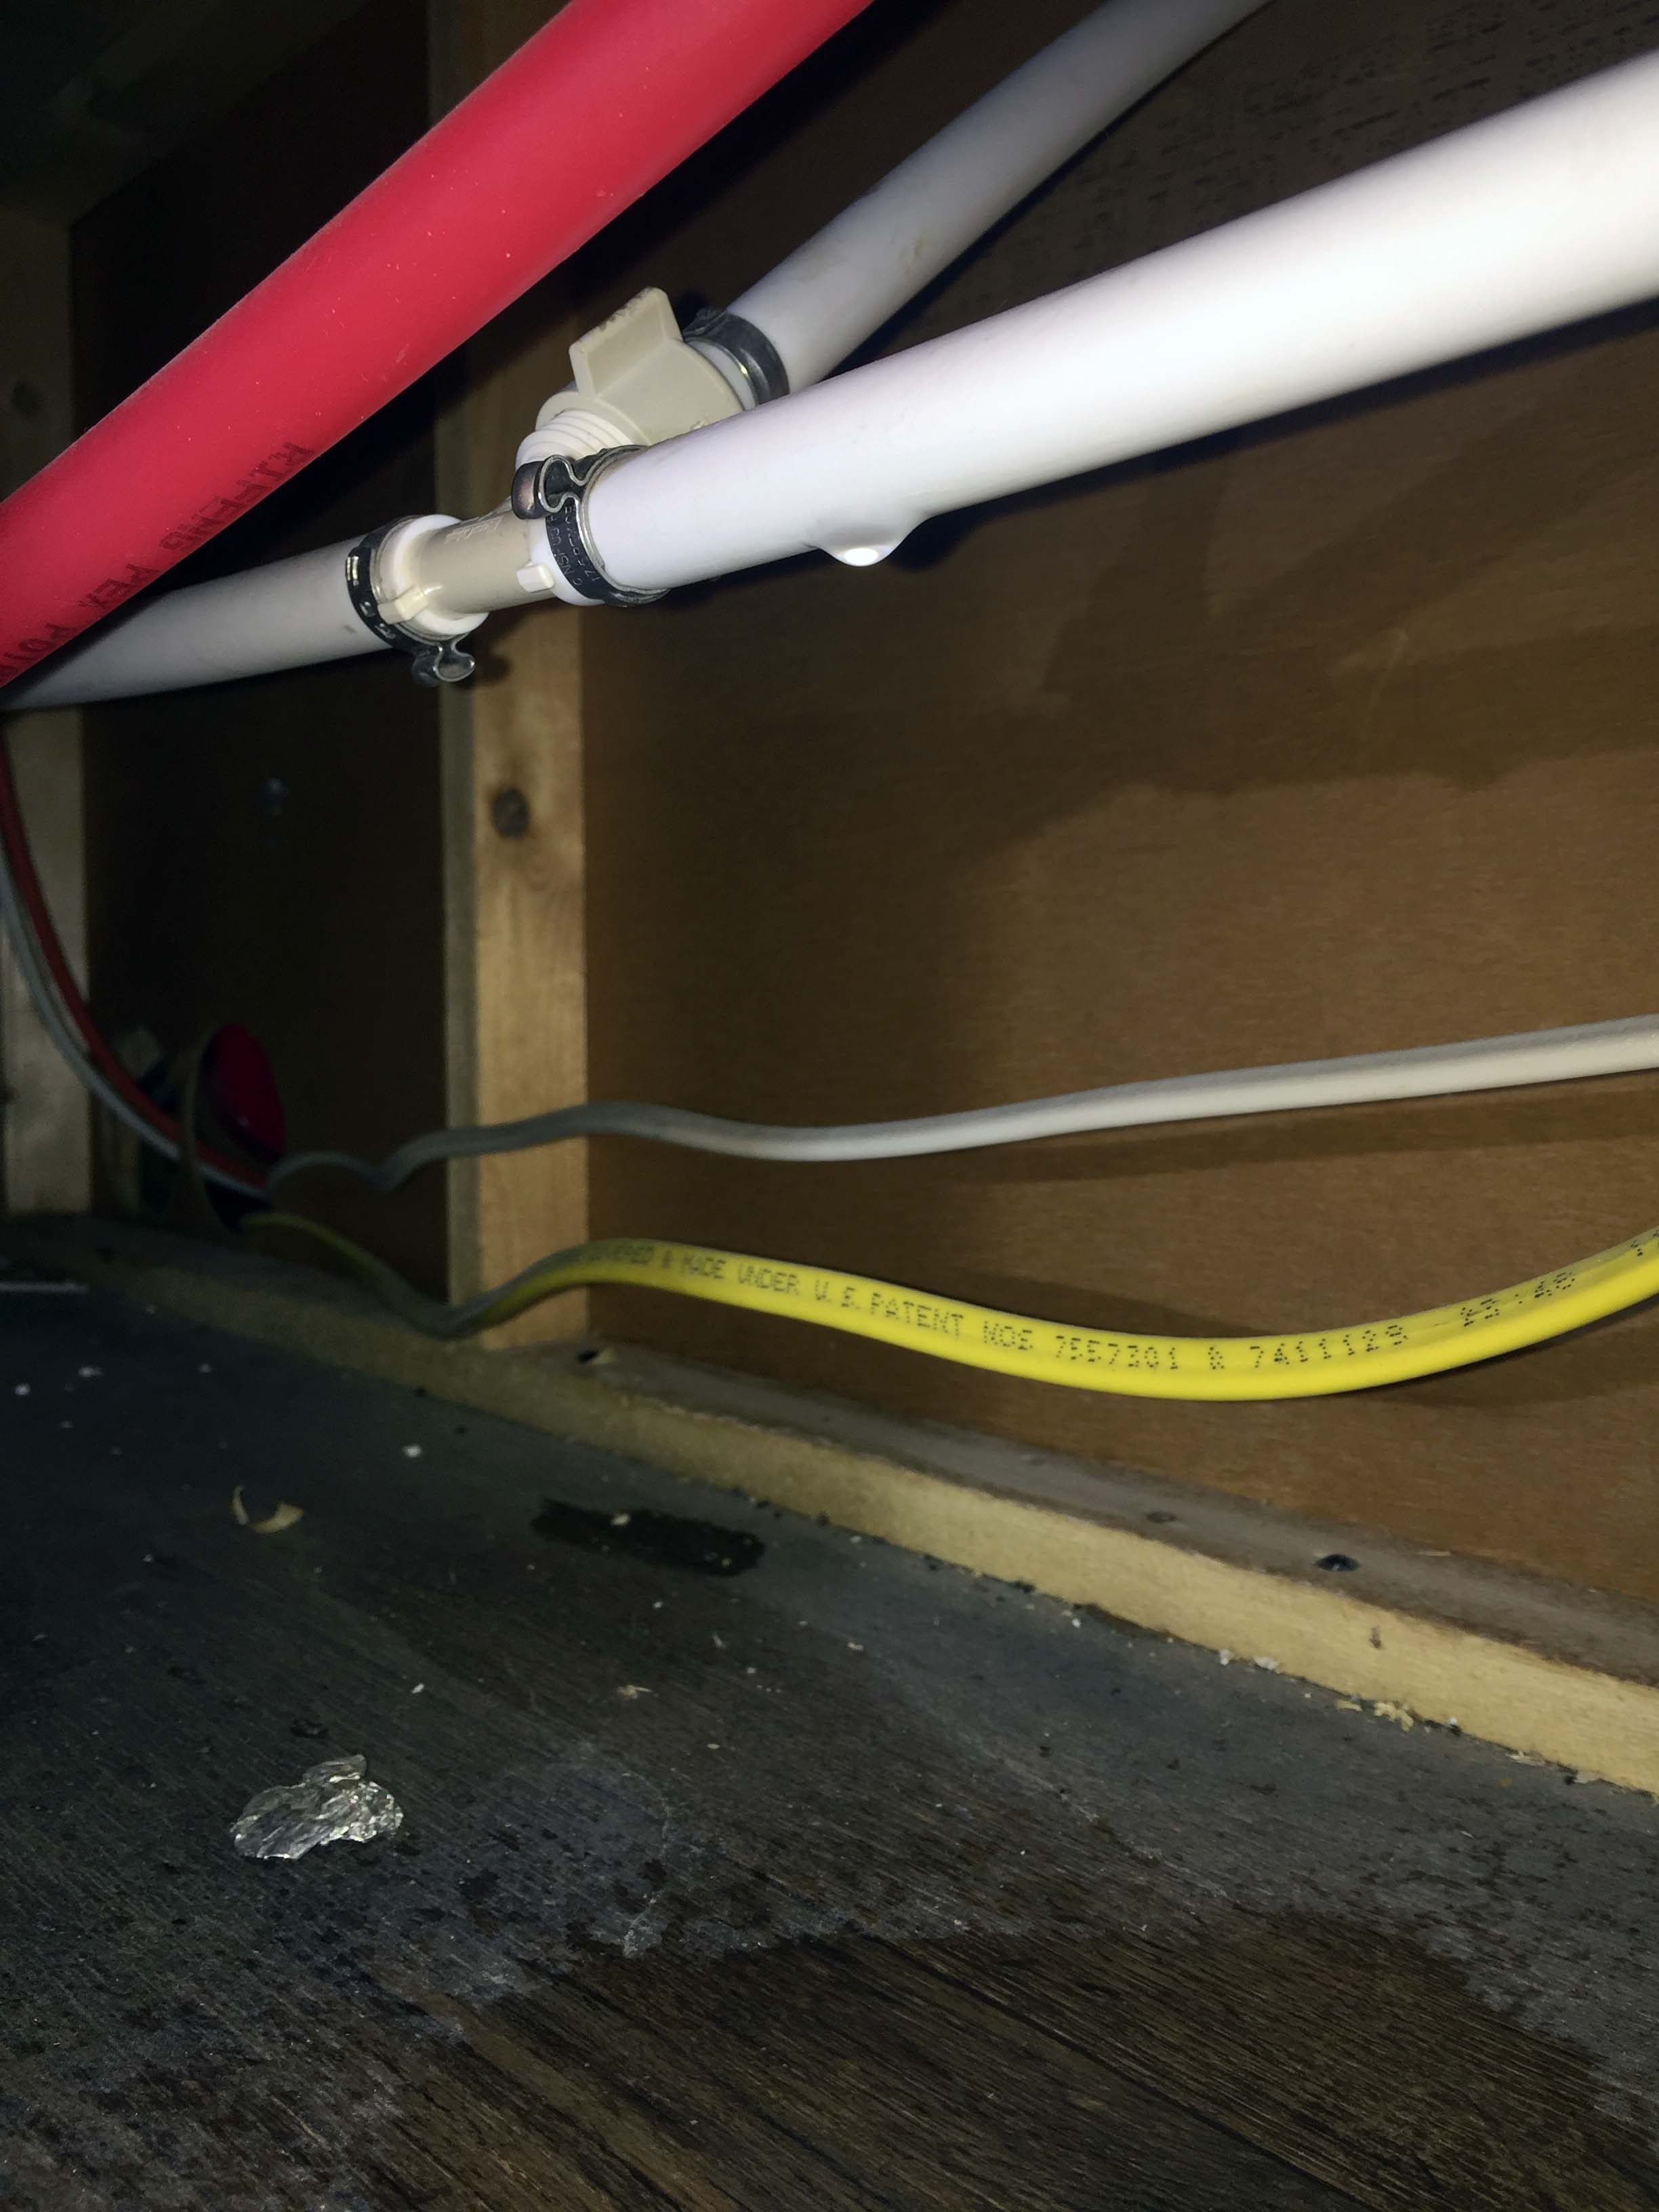
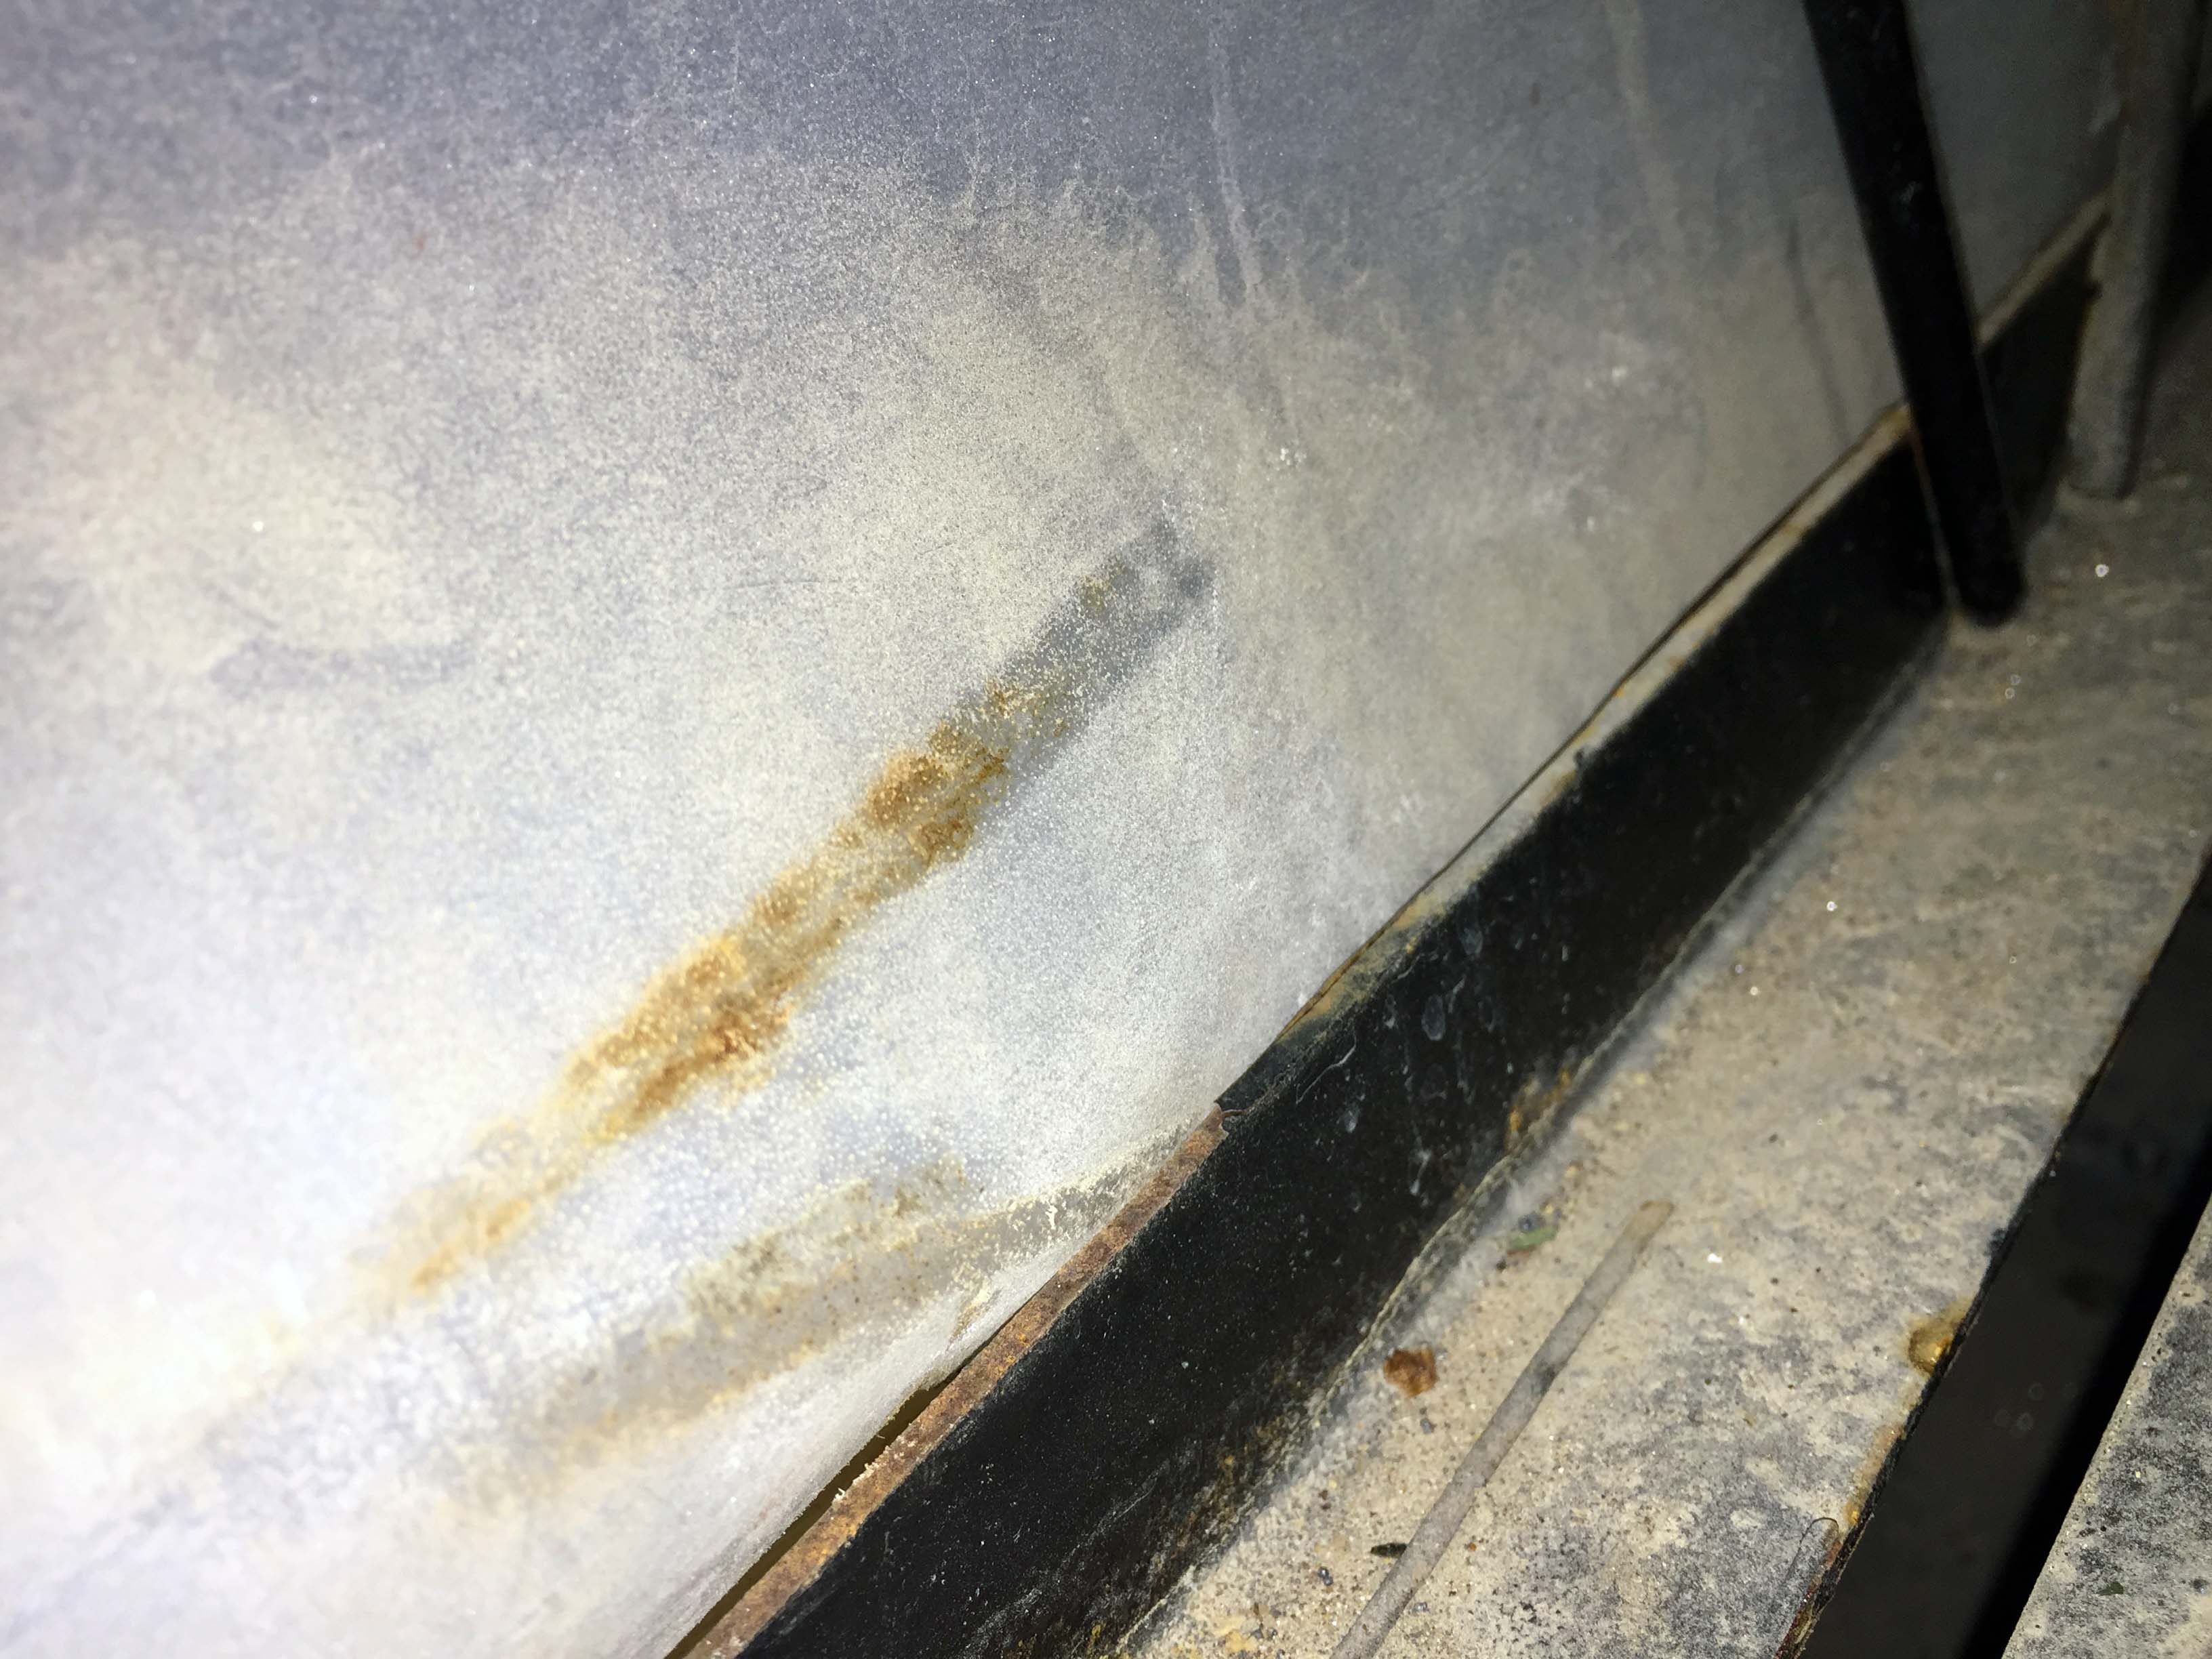
I could definitely see it was running along the top of the tank, not coming from the tank. Luckily, I have been over almost every inch of my rig, so I knew what was above and forward of this position. I crawled out from under, and then climbed up inside the crawl space between the rear storage and the kitchen, where the water heater, furnace, and all the water pipes are. Can you spot the next clue??? This is all feeling a little CSI, but pretty cool.  He’s using a scope and phone to see stuff. Gotta love that- Trace


So there’s where the water is coming from before it hits the top of the black tank. The pipe to the right is where the toilet goes into the black tank, and that rubber flange around it is there to covert the gap between the hole in the floor and the pipe. You can see where water has evaporated around that flange, which tells me this tiny little leak has been going on off and of for a while, most likely.

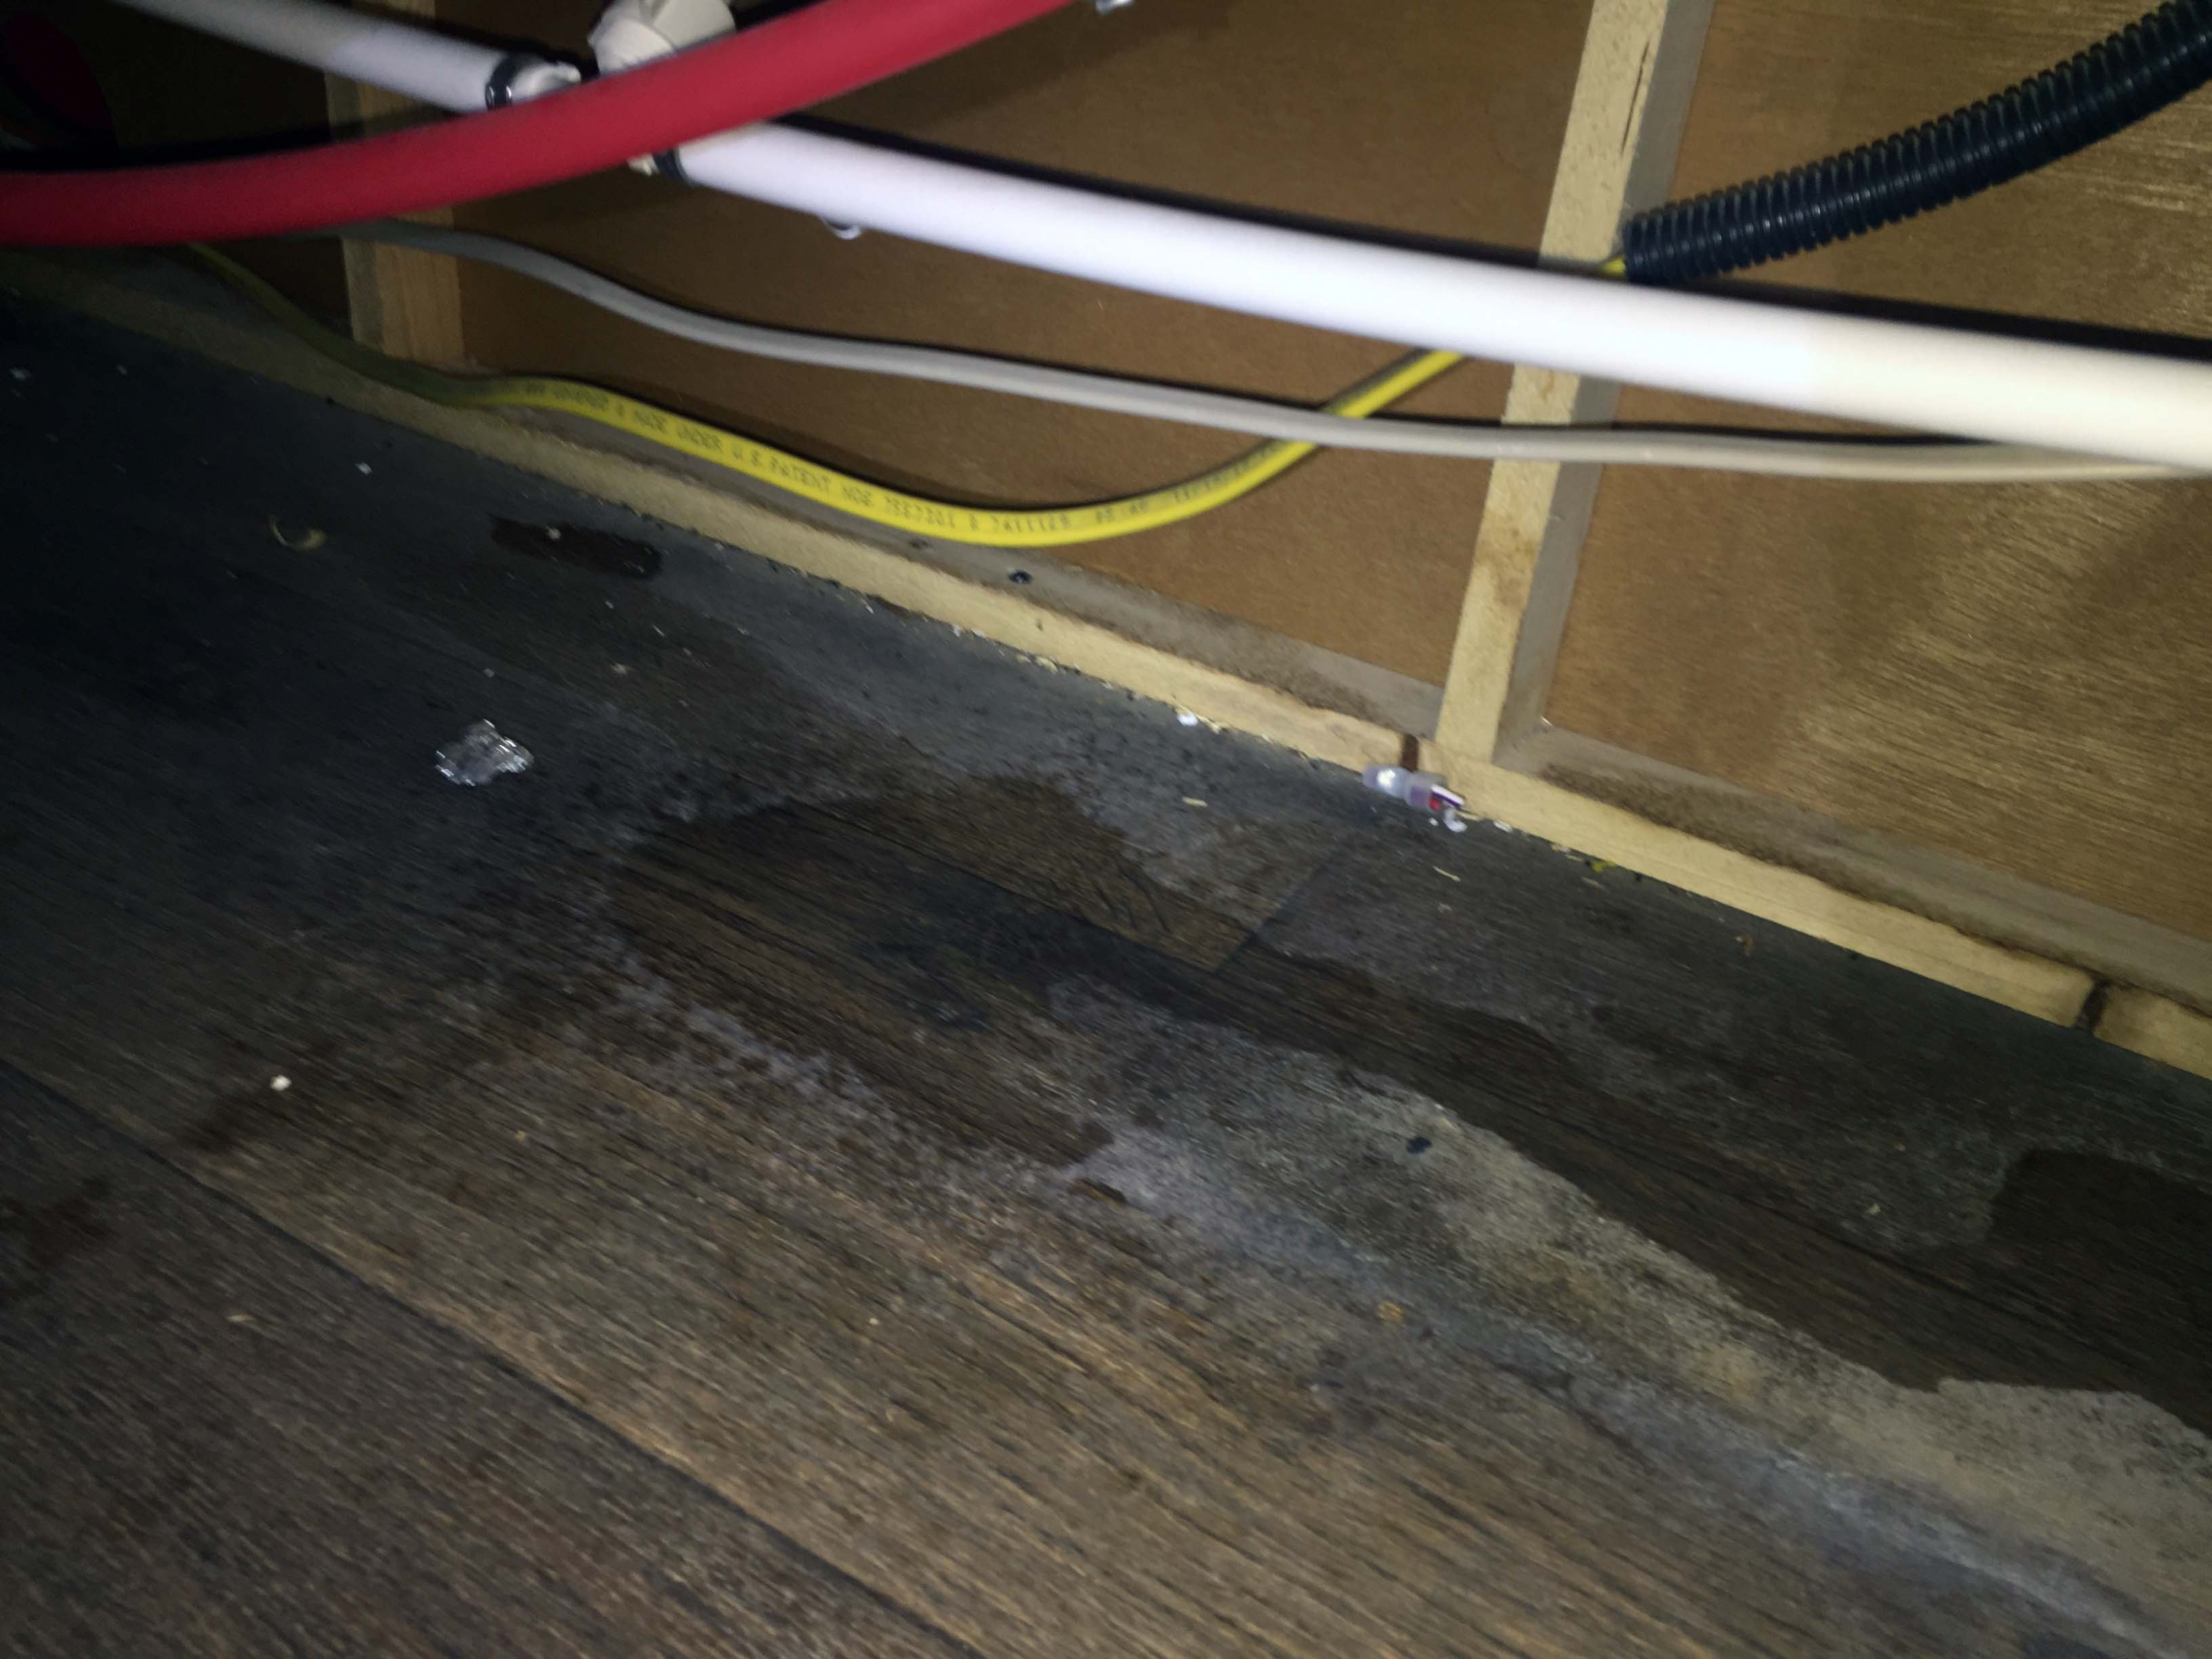
I took a closer look at the puddle to the left. Once again, there’s a spatter pattern that tells me that this is where it’s landing, and just above I can actually see a droplet of water getting ready to fall. I sat there for a while just watching it, and a droplet was falling about once every thirty seconds. After a few minutes, it stopped altogether. So that means that whatever the failure is, it’s very, very minor; the water is getting pushed out when a faucet, or the toilet valve, or the washer/dryer valve is opened and then closed, and the pressure is greater than normal standby pressure for just a moment. The good news is that the leak has to be in that crimp to the left, or another one to the right. The bad news is, I couldn’t find it in that moment.


Concern about the larger jobs that needed to be finished because we could get called to a gate at any moment drove me to put a Tupperware container under the drip and come back to it later.

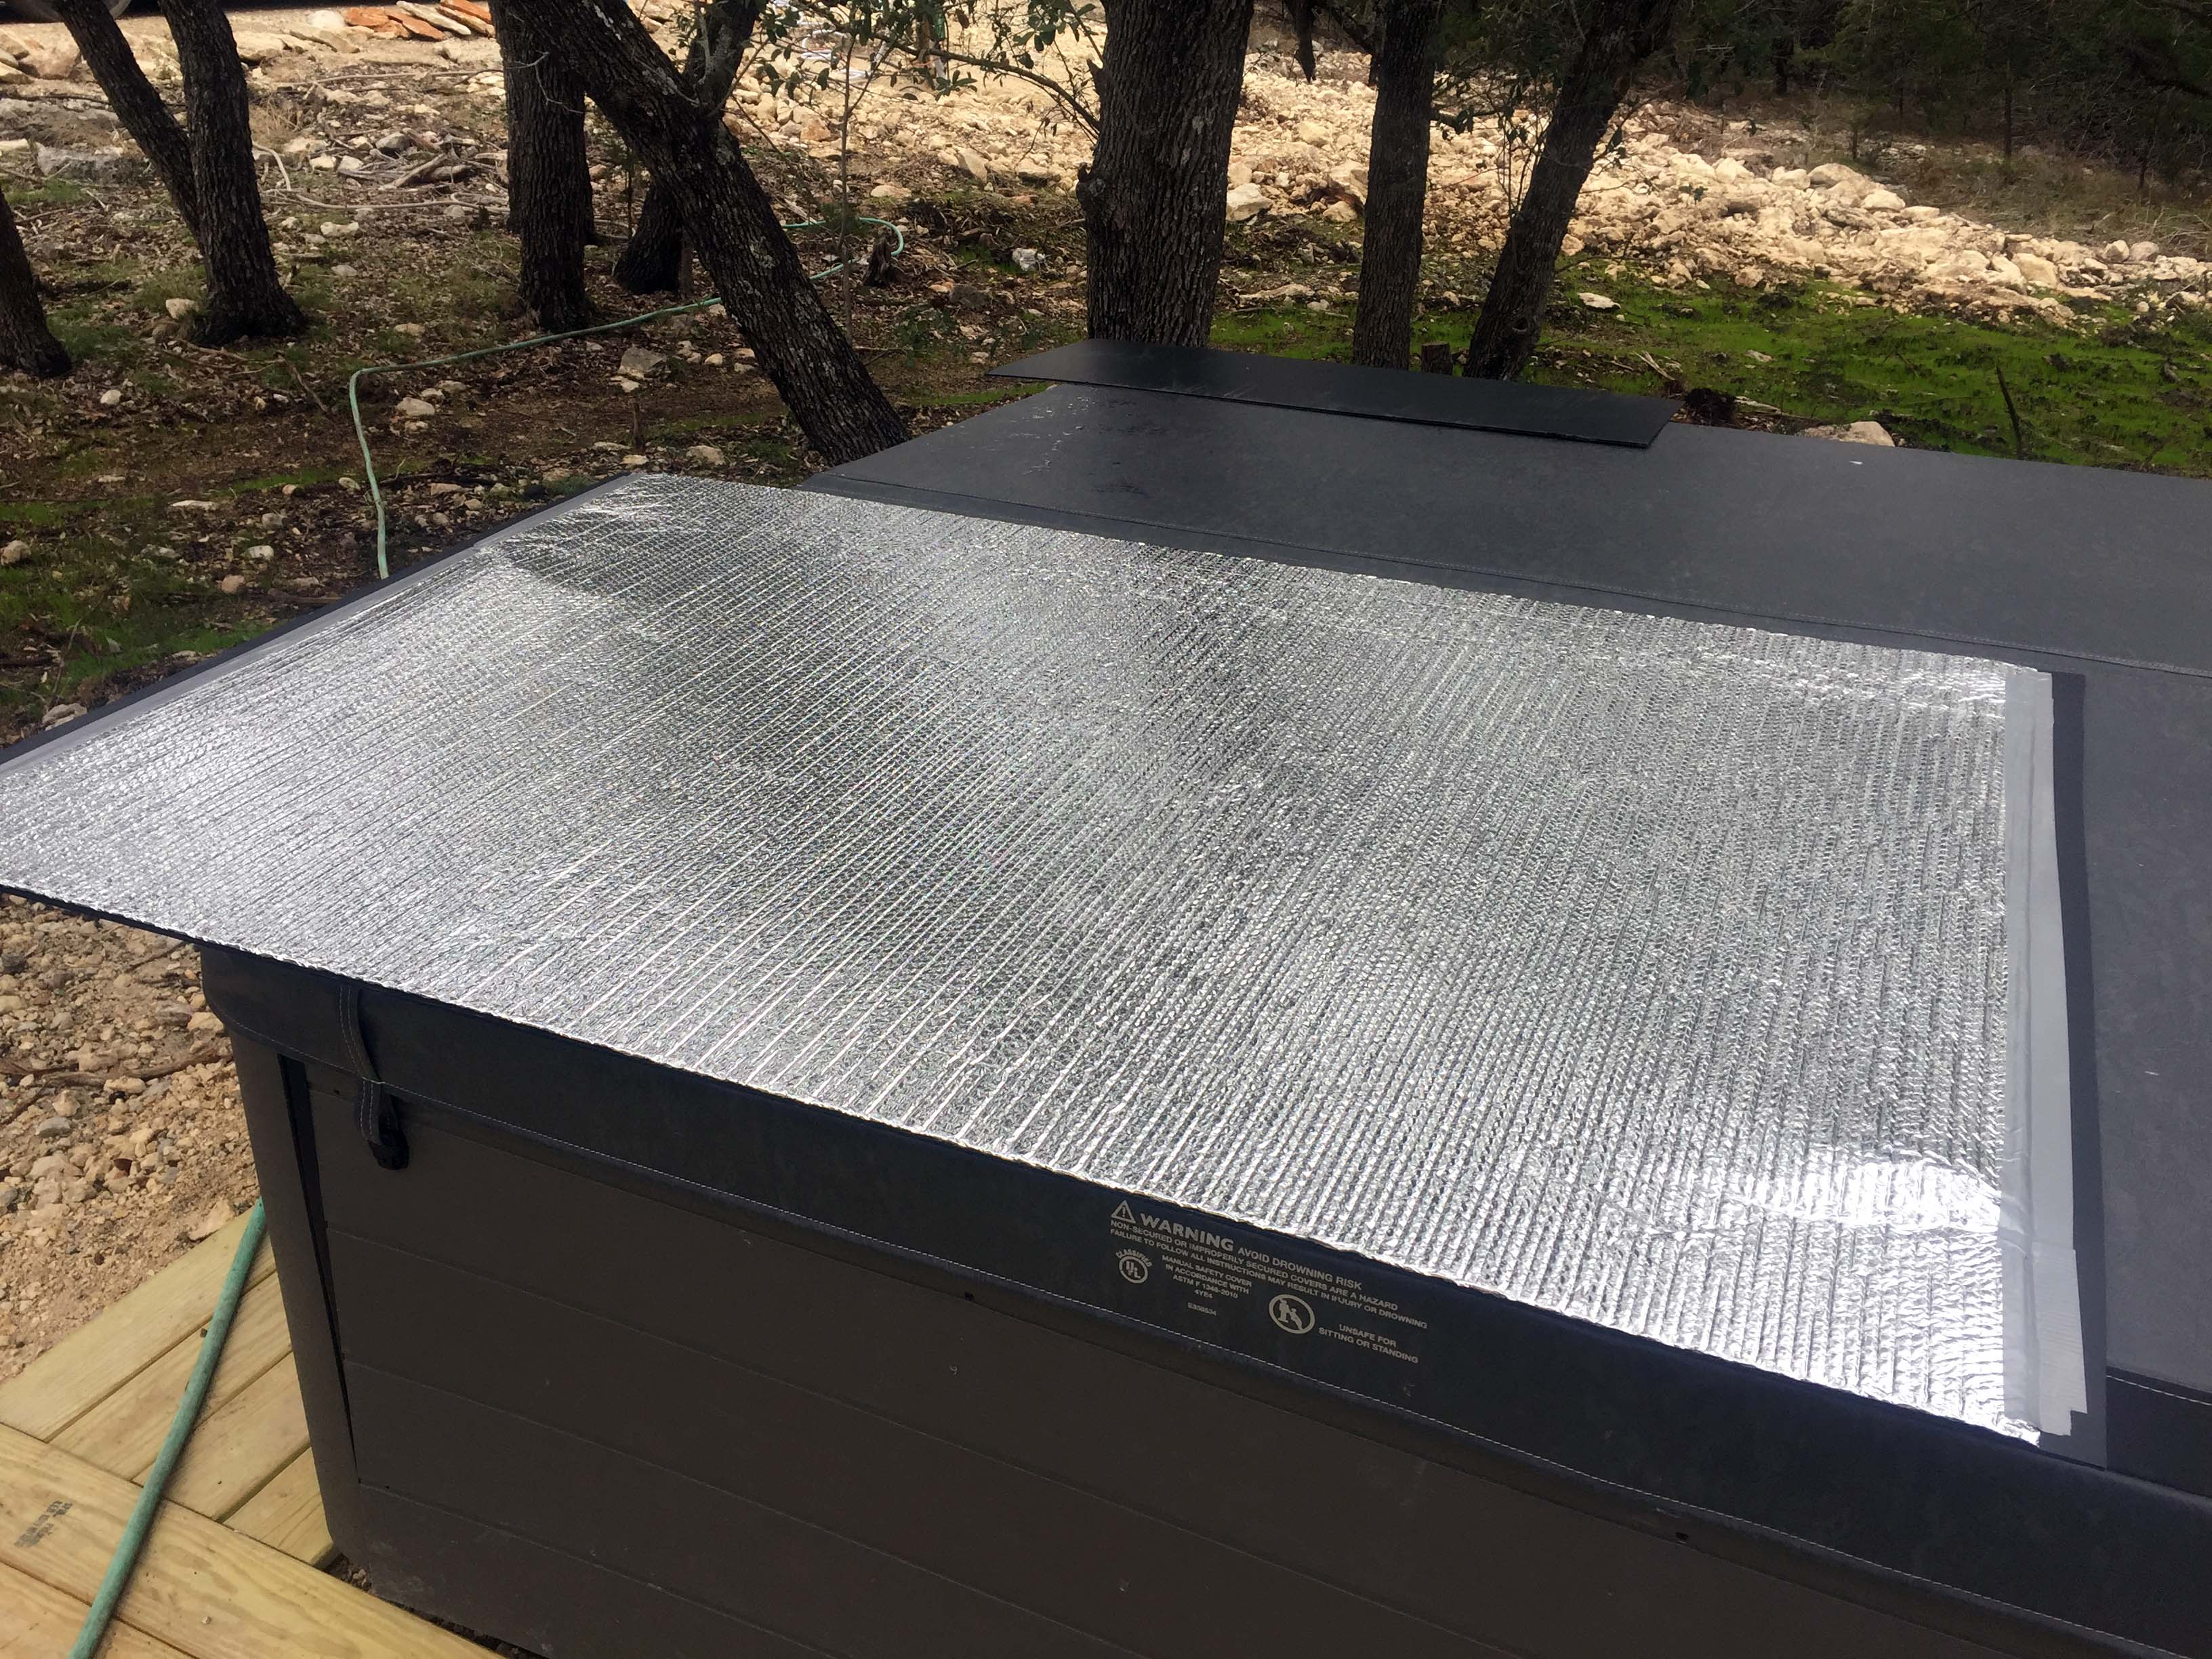
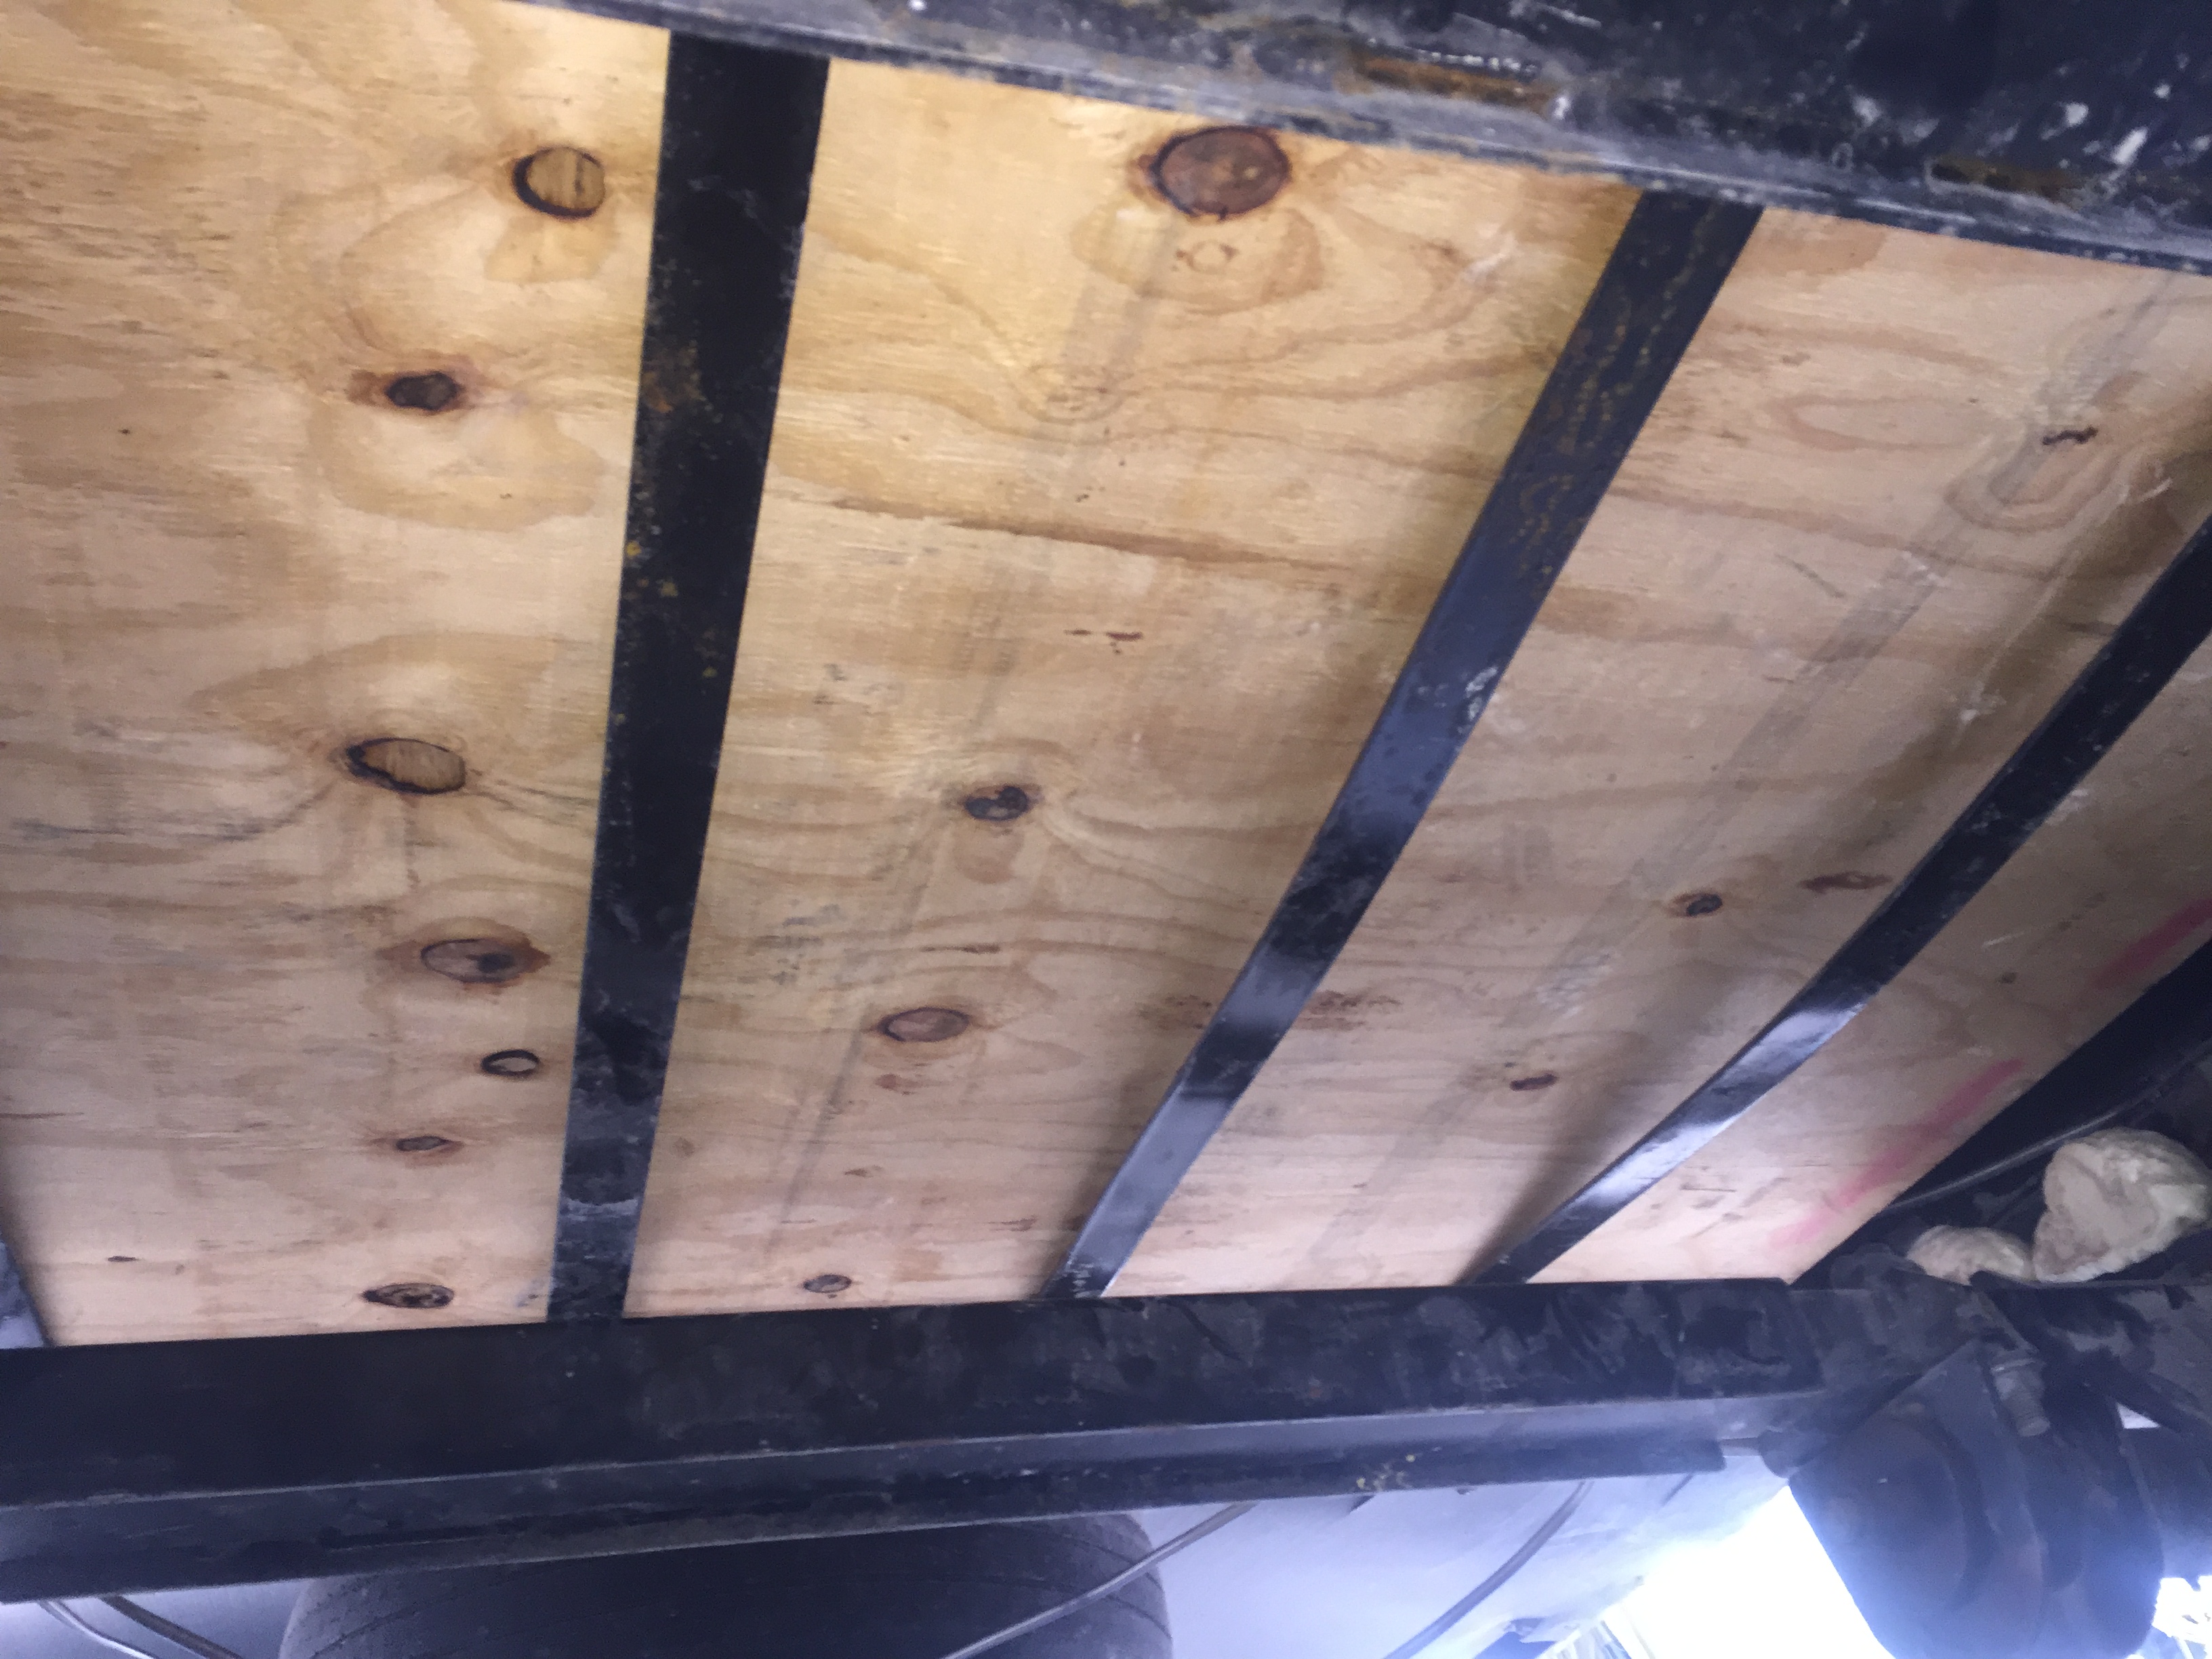
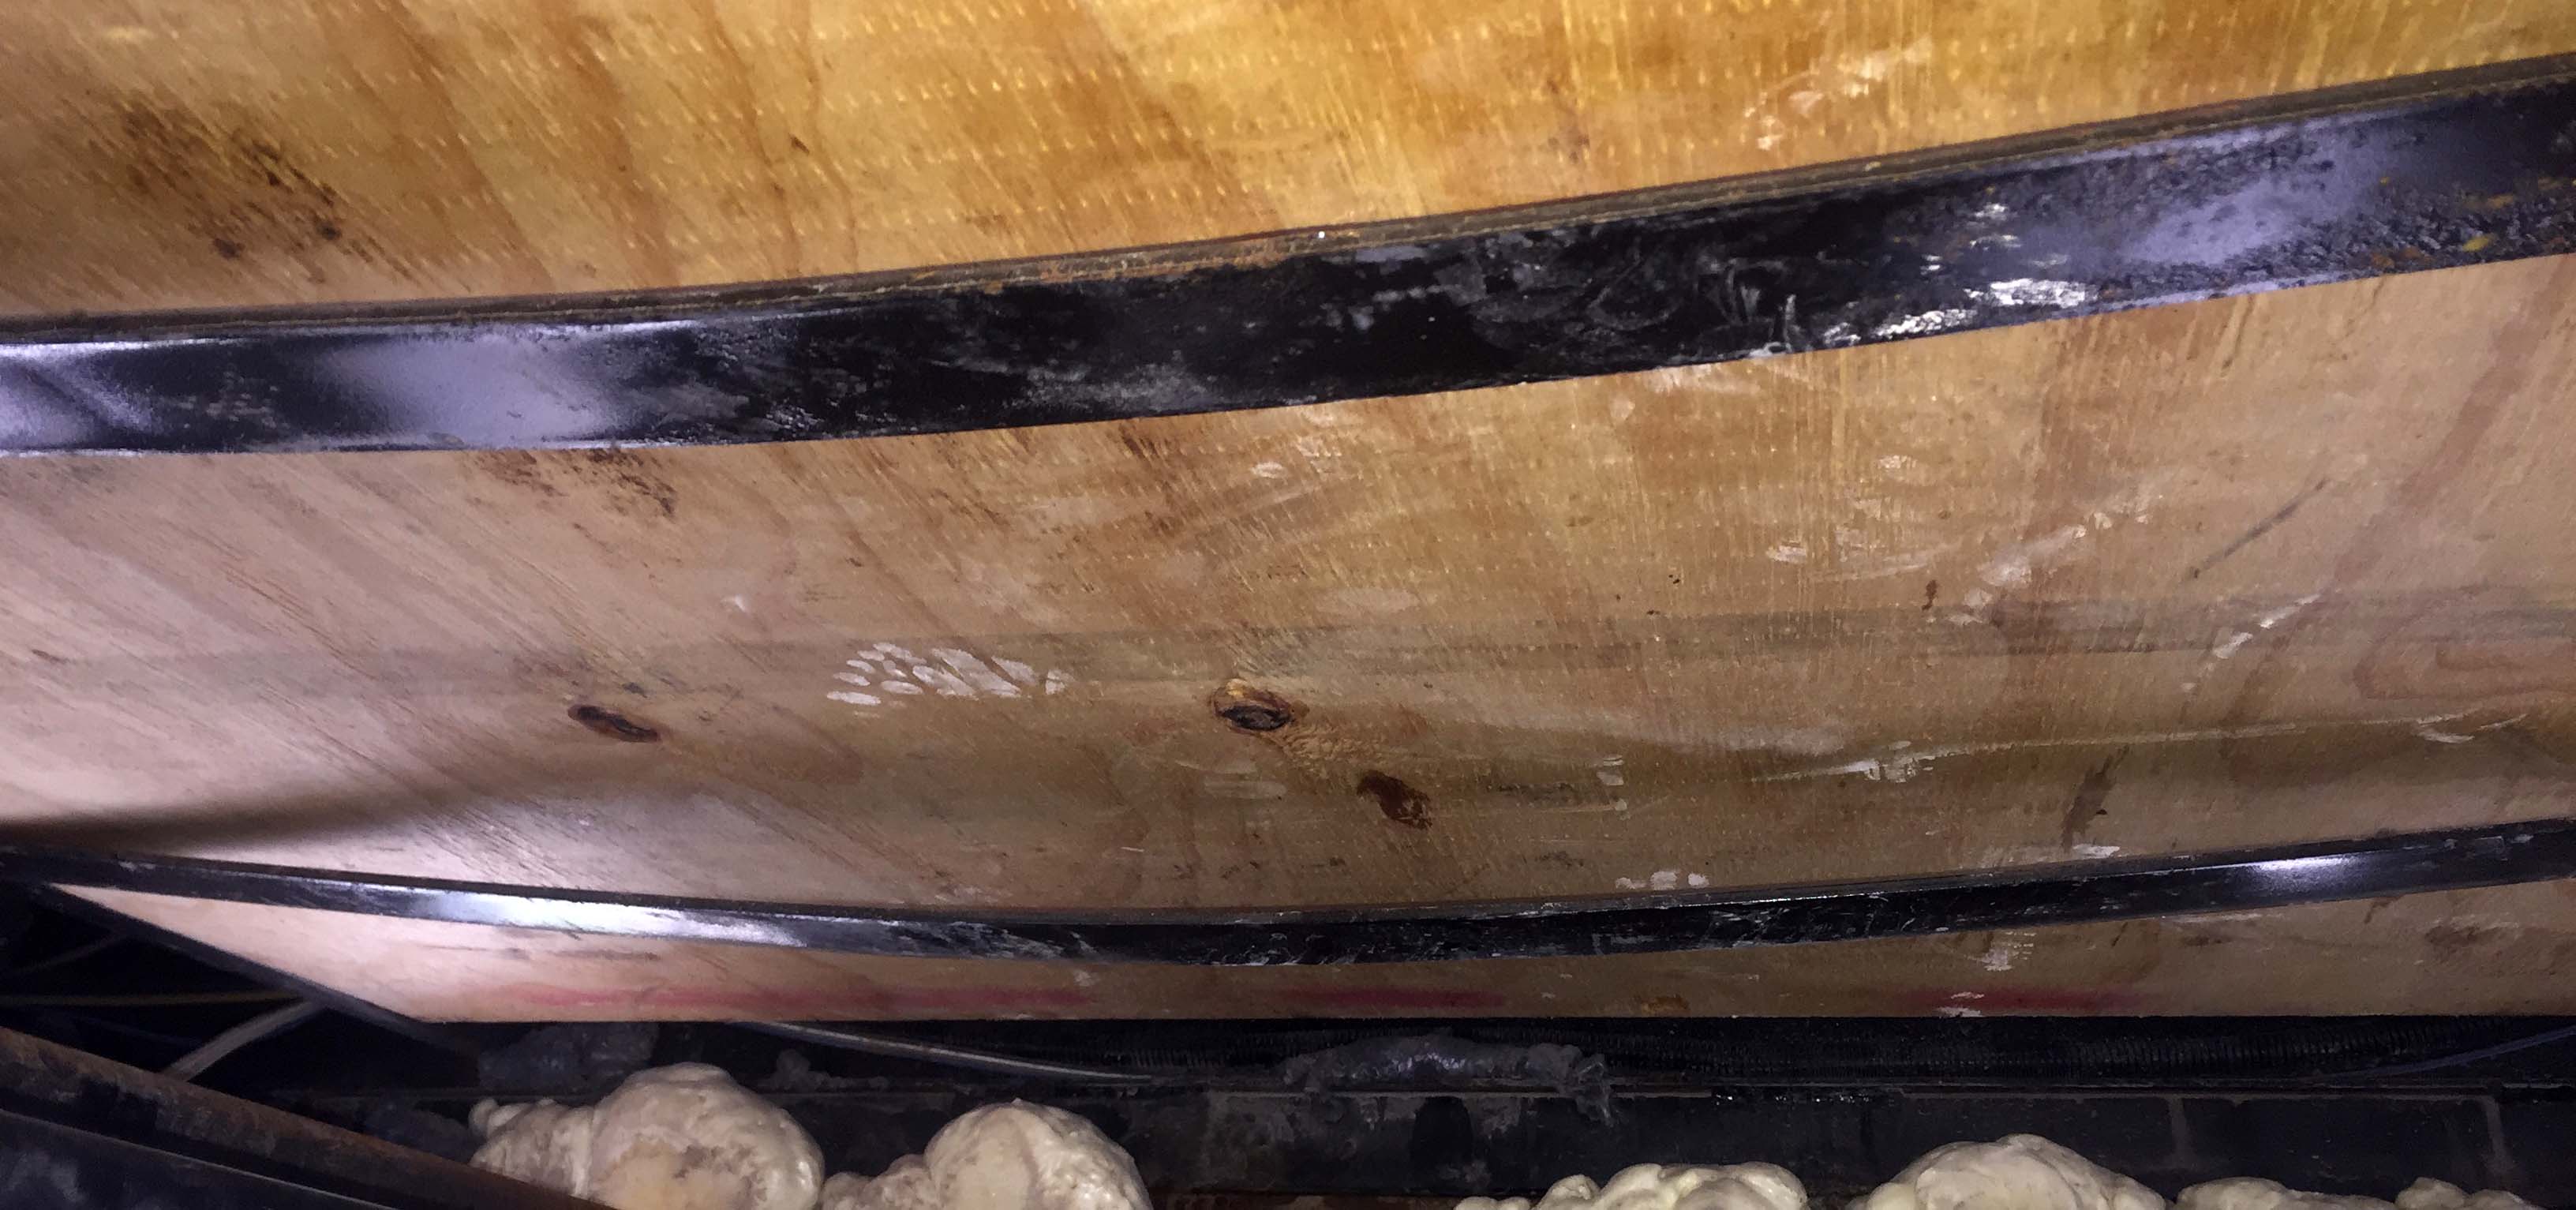
Going back to reinstalling the belly pan, I decided to replace the lousy foil insulation with a layer of Reflectix, which is a great insulator and is also very lightweight and easy to work with. It’s made of two outer layers of foil and two inner layers of bubble wrap.

I measured carefully and used a straight edge to trim the coroplast and then cut the Reflectix and used duct tape to attached it to the coroplast. All of the pieces were more or less the same, but here’s what one of them looked like before I installed it.


I installed using self drilling sheet metals and large fender washers, then I used a combination of expanding foam and Lexel sealant on Greg’s recommendation because it’s got great adhesive properties. I sealed up everywhere I could find, including around the washers and screw heads. I also overlapped the coroplast sheets by several inches wherever they met to give them more rigidity. I also put screws anywhere there was structure between the frame beams, in addition to along the frame, so it wouldn’t sag in the middle. Overall I was very happy with the end result, it should last for as long as I need it to.

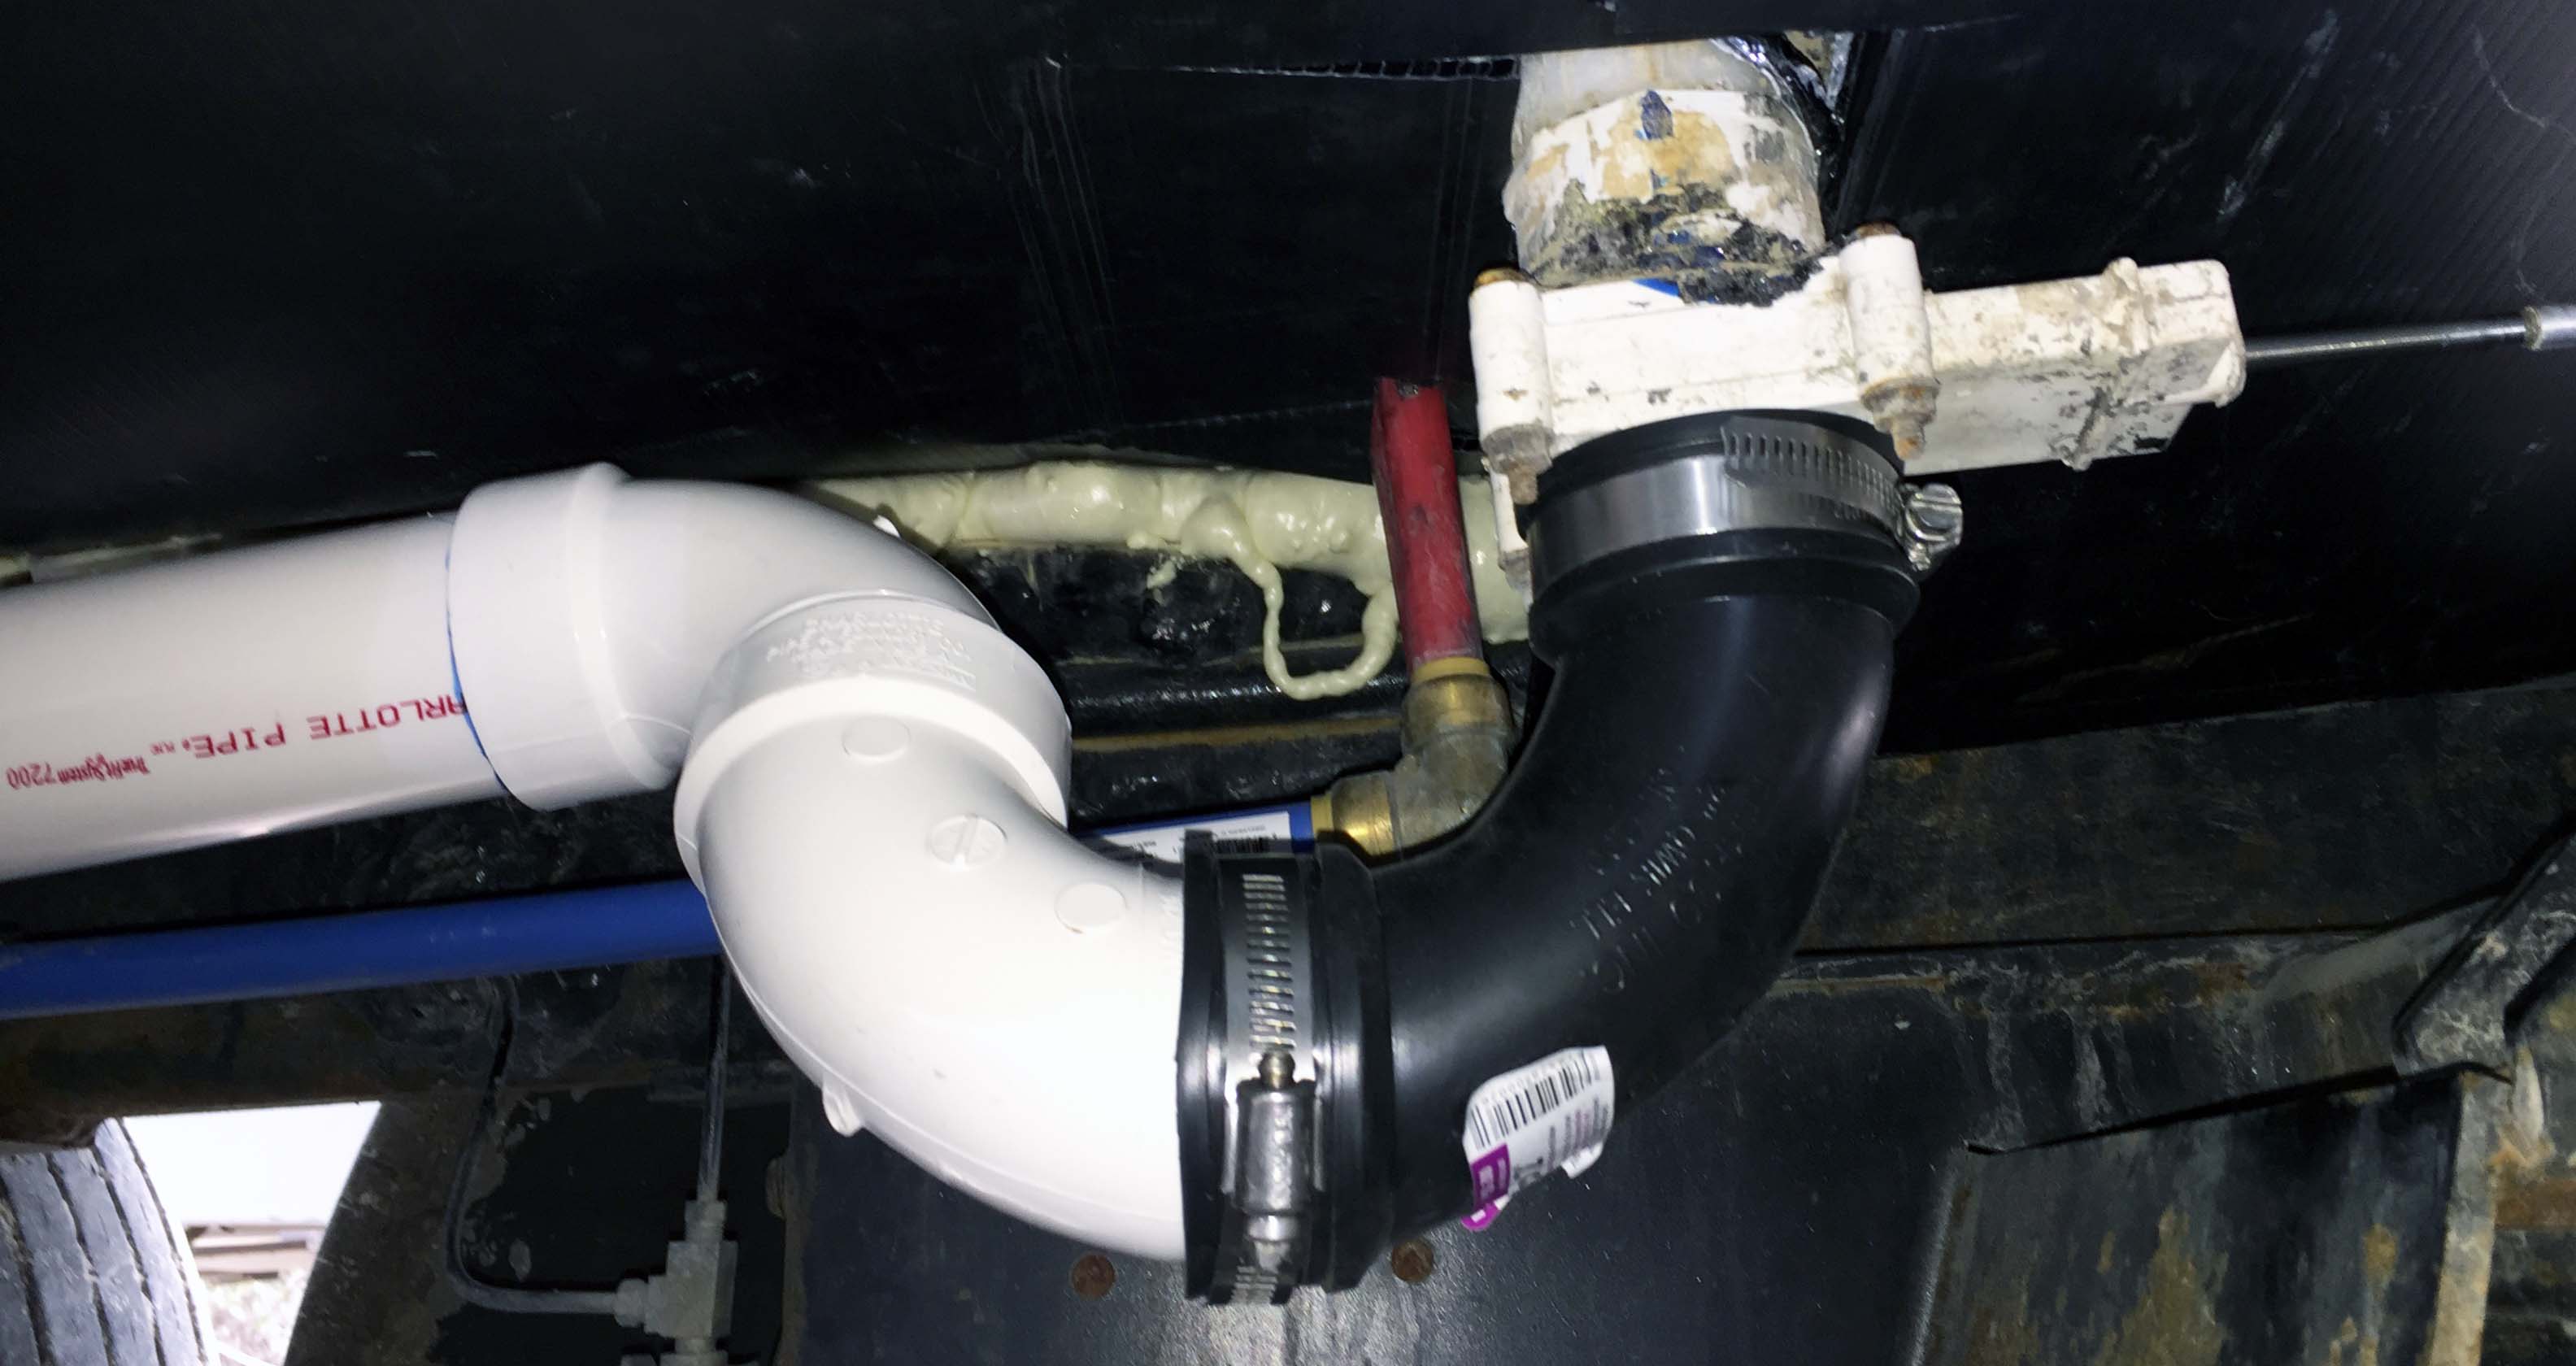
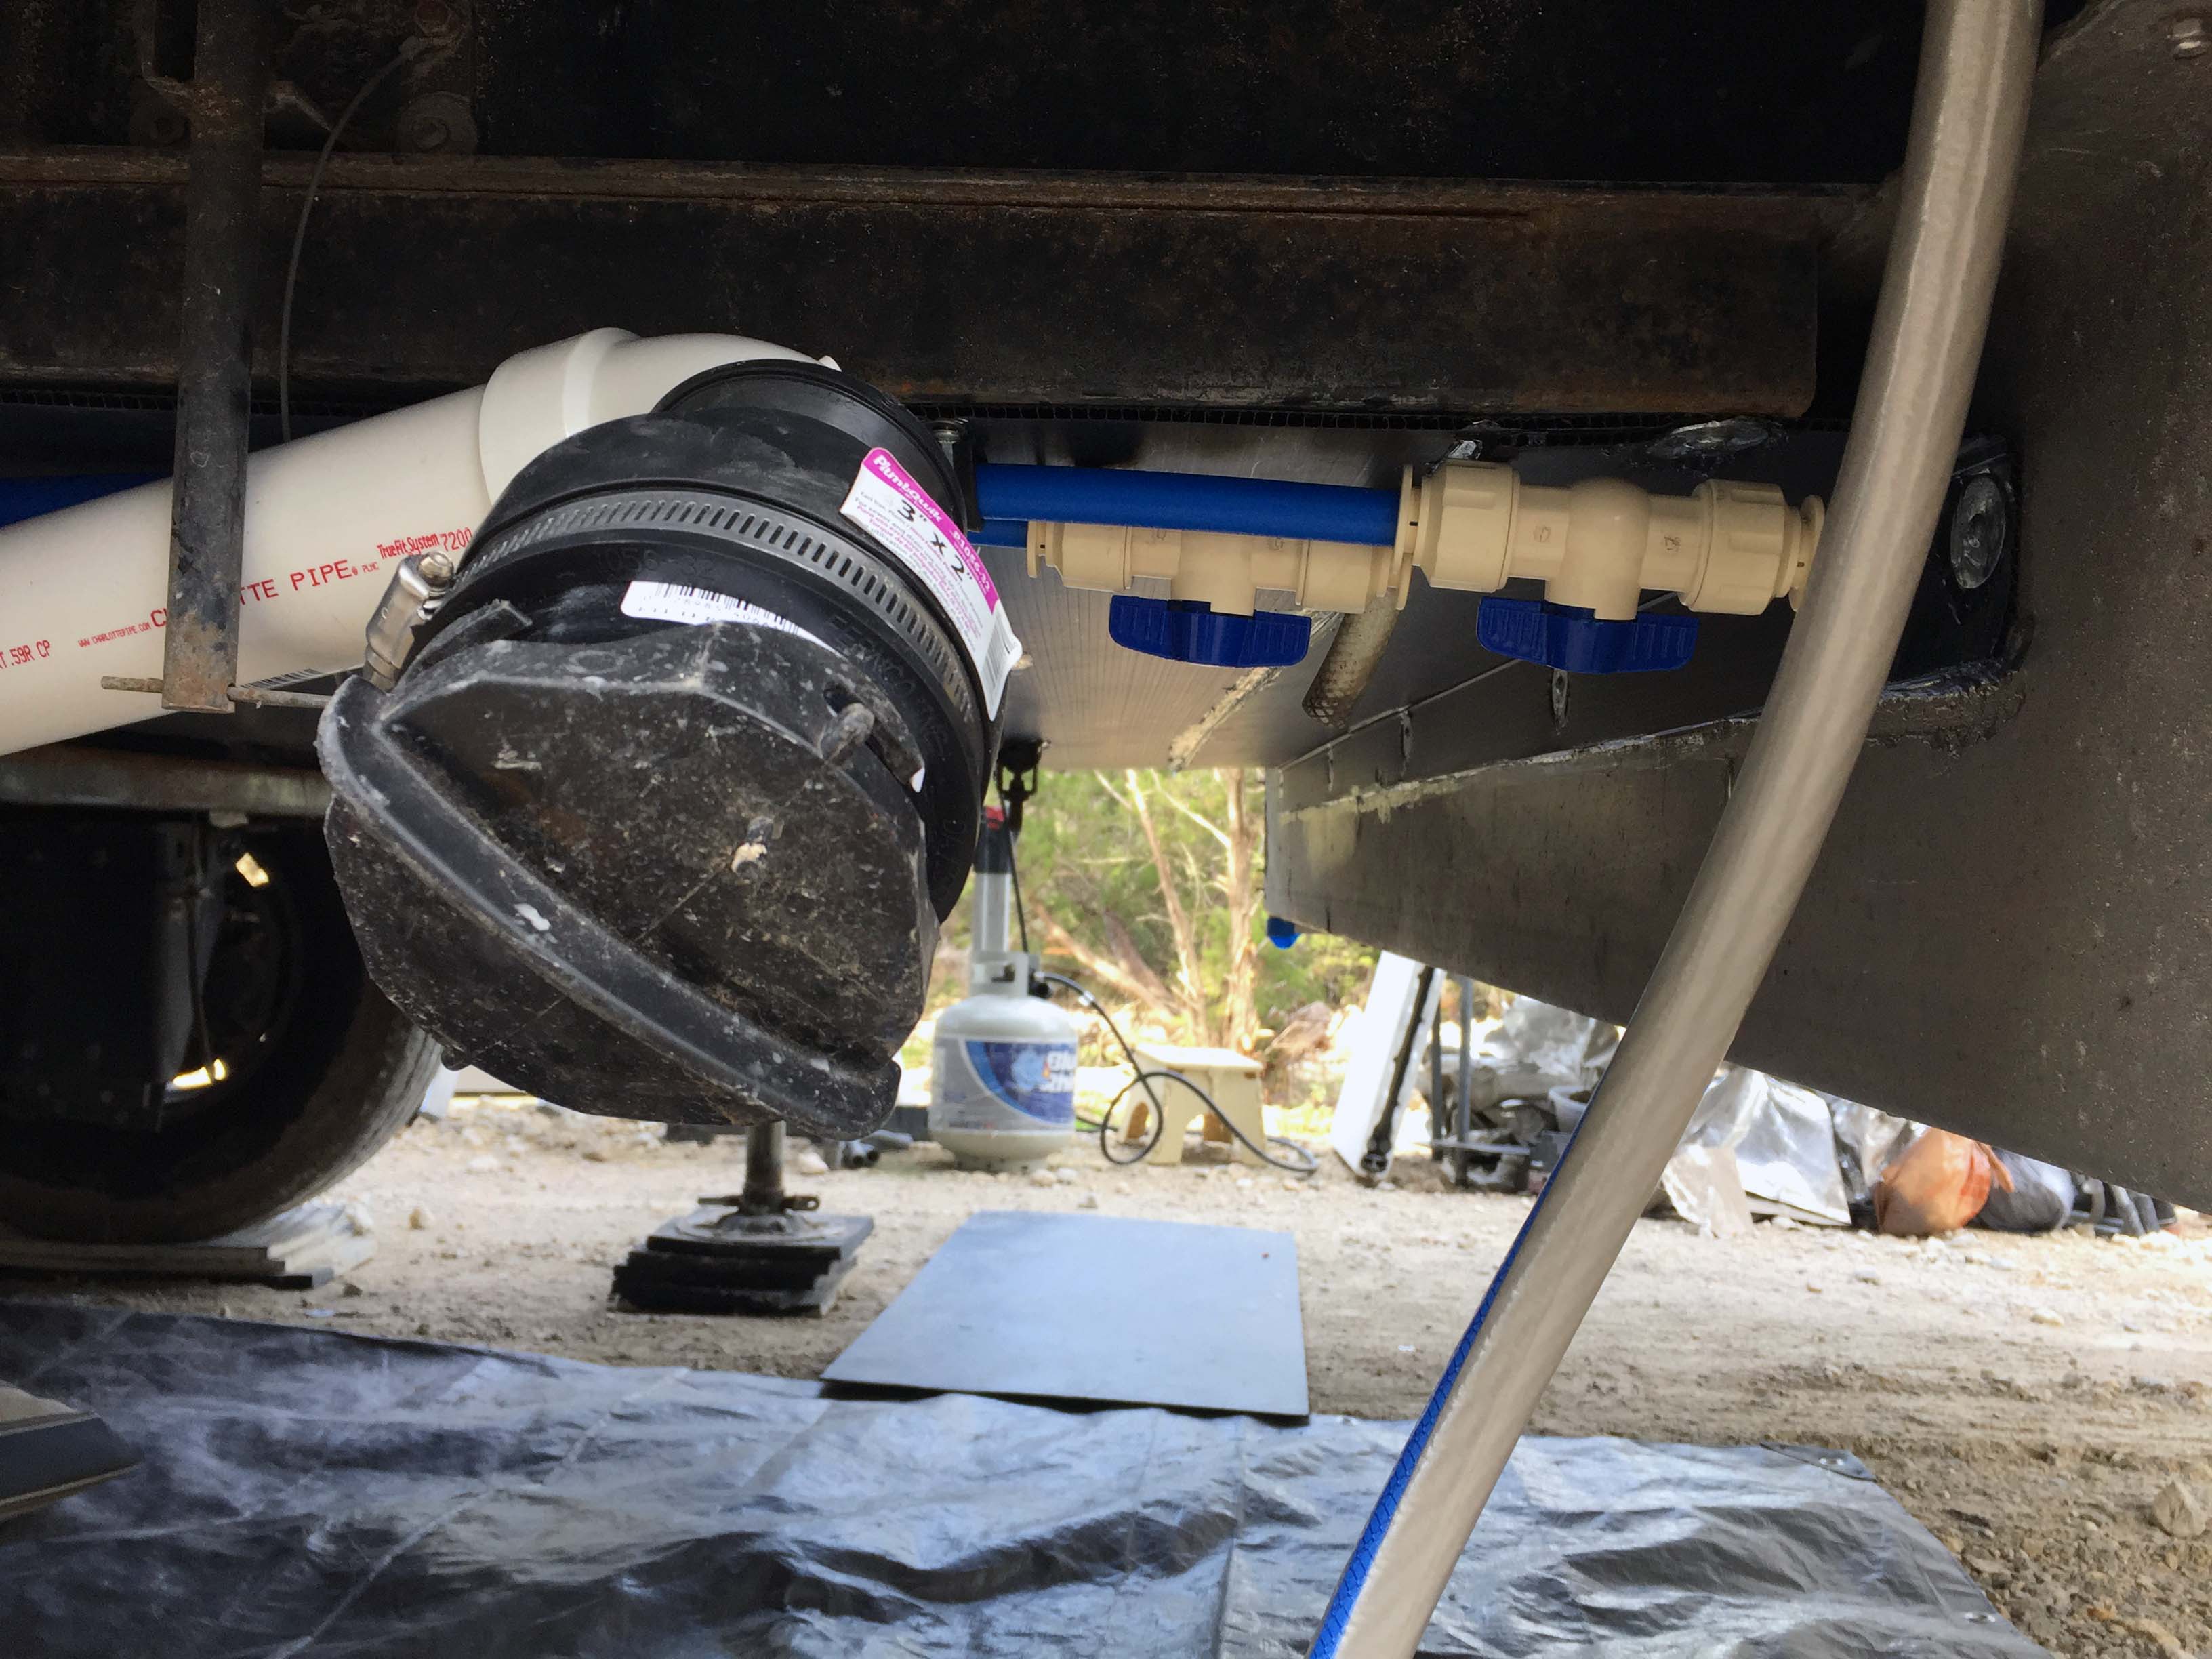
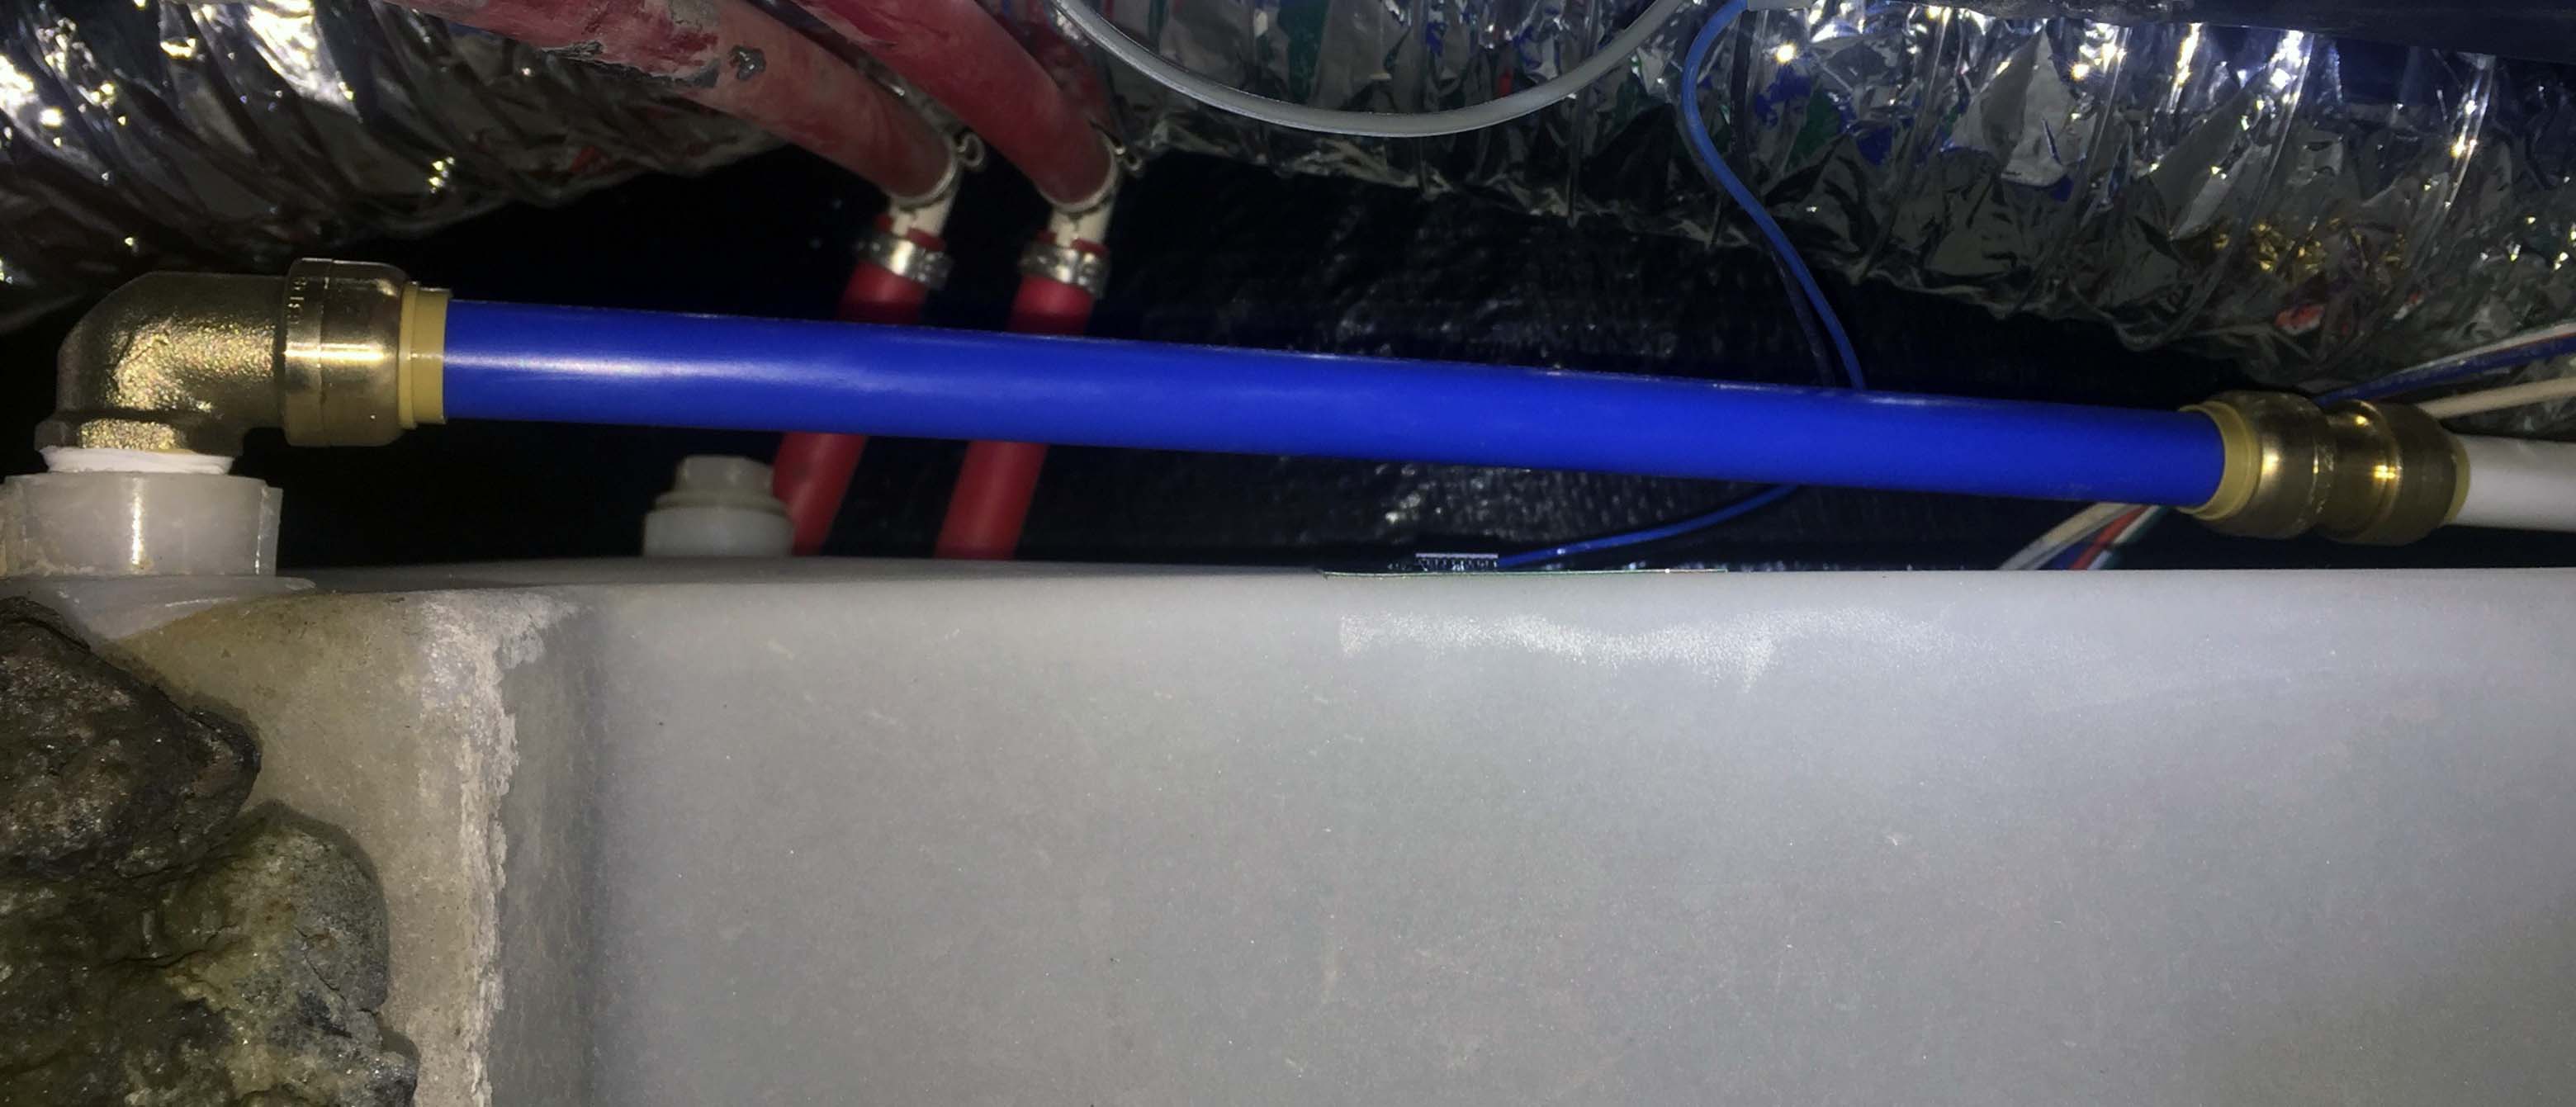
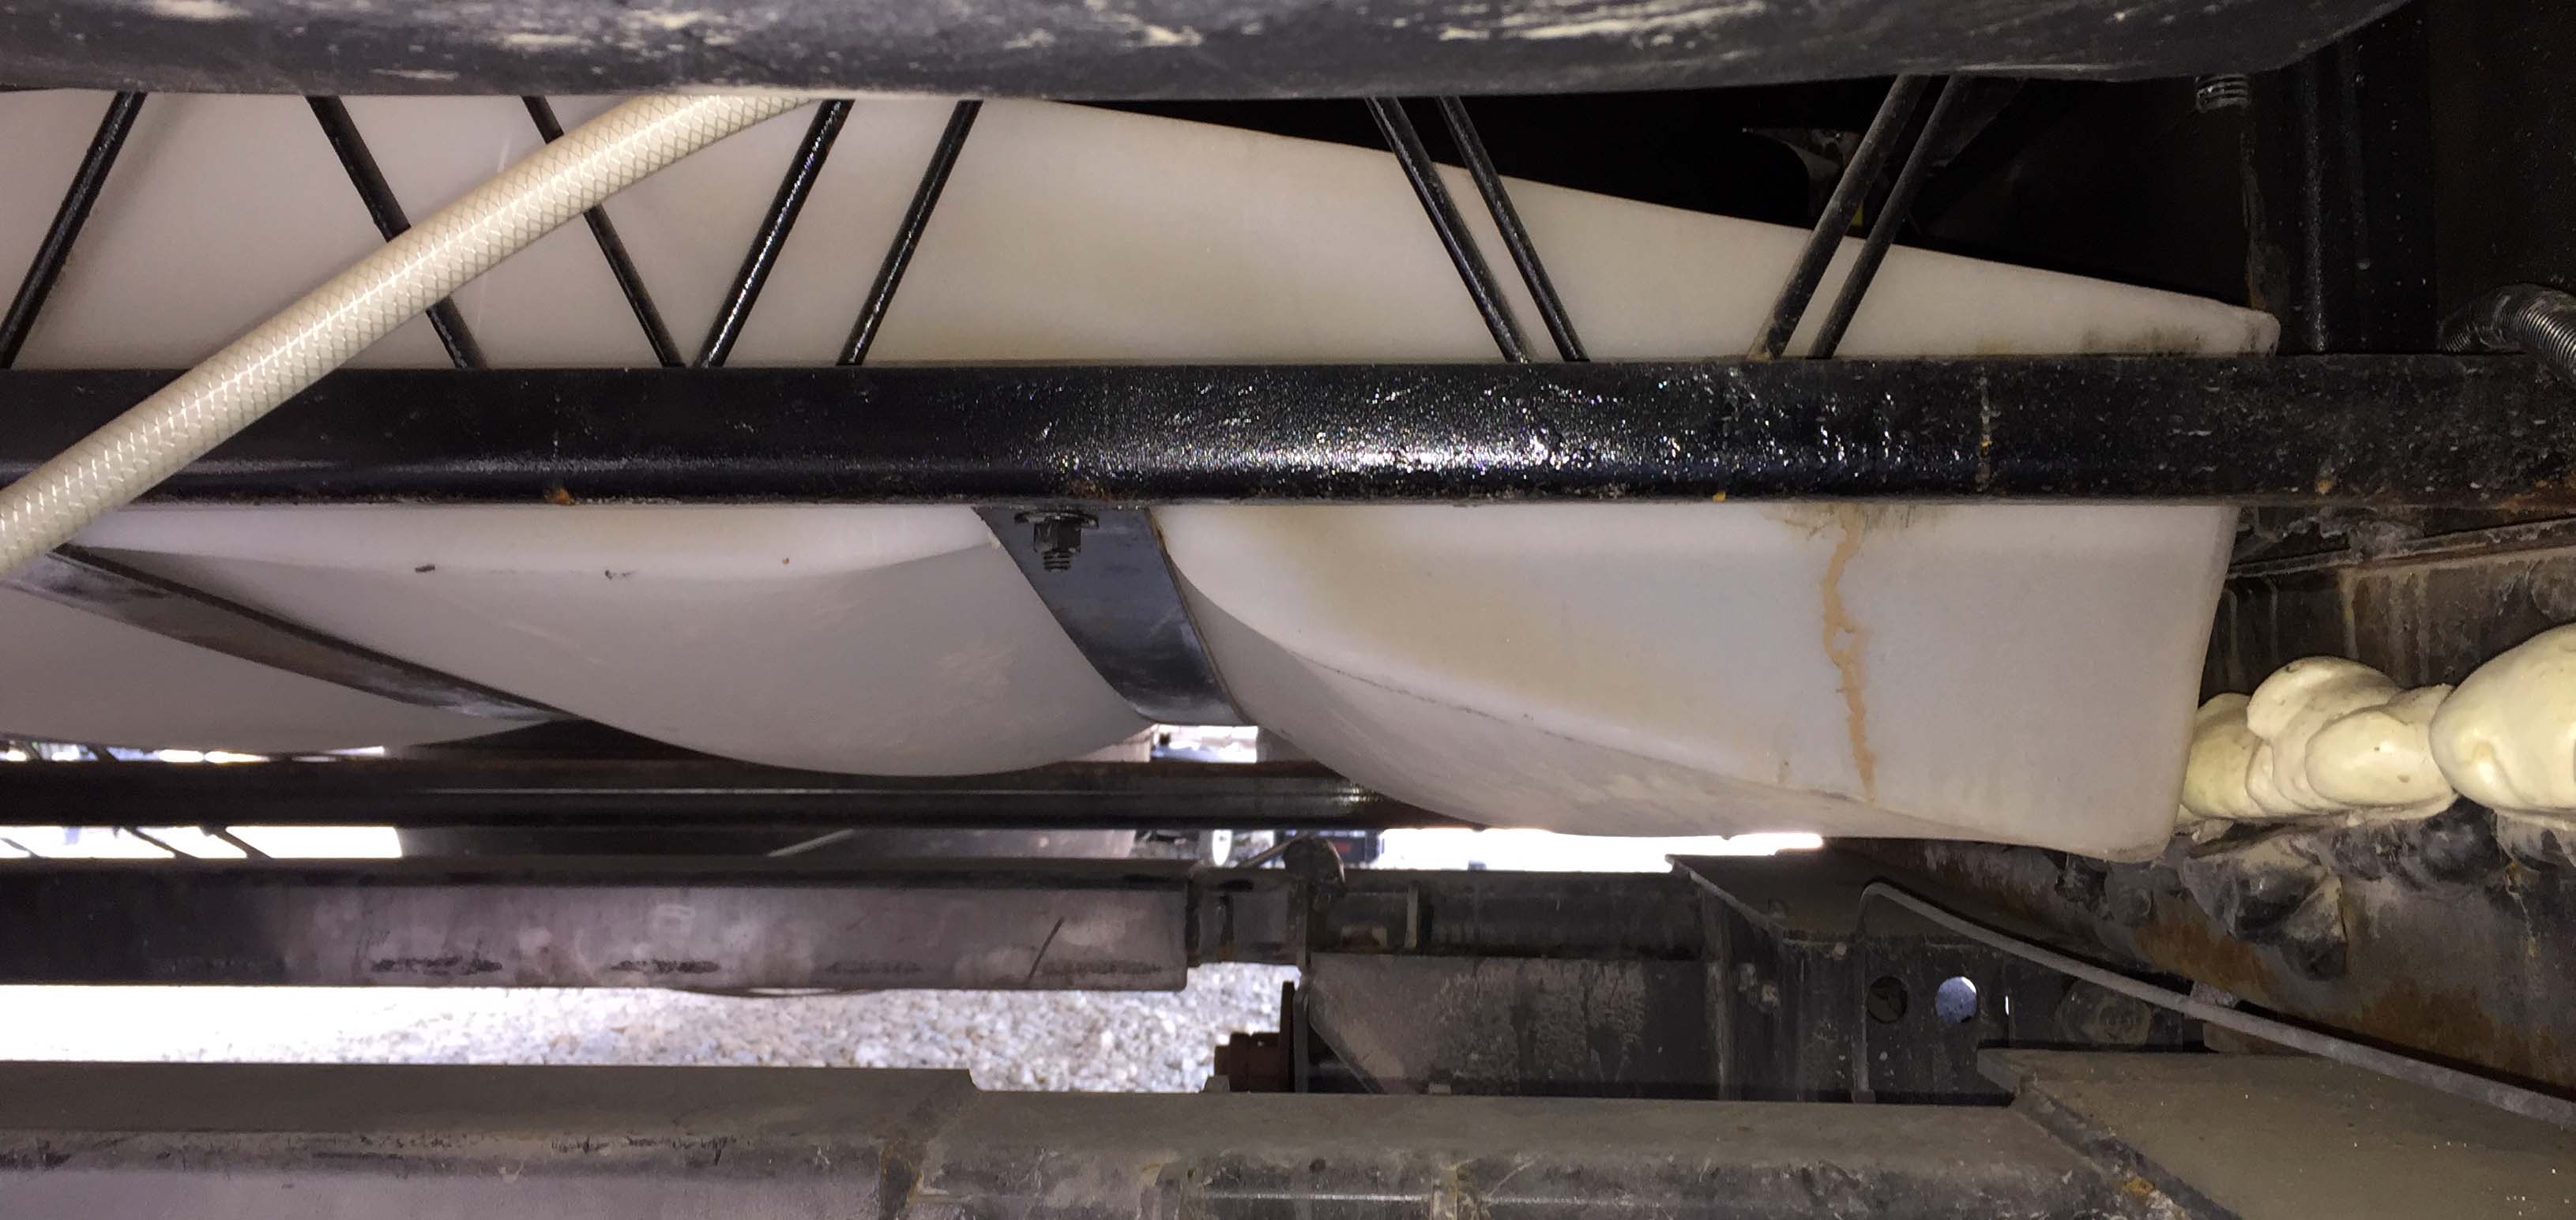
Once that was finished I got started installing the fresh outlet extension. As you can see in the picture below, the elbow allows some water to get caught in the “P”, but there was no avoiding that unless the pip ended up below the axle, which I did not want. Not to mention that towards the rear the termination would be way too low. We rarely are in situations where this will freeze, and if we are going to be, I can loosen the rubber elbow to drain that small amount of water. Later I can put in a petcock valve if I really want to. I was able to use the two PVC elbows to get the height and angle the way I wanted it so the termination would be where I wanted it.


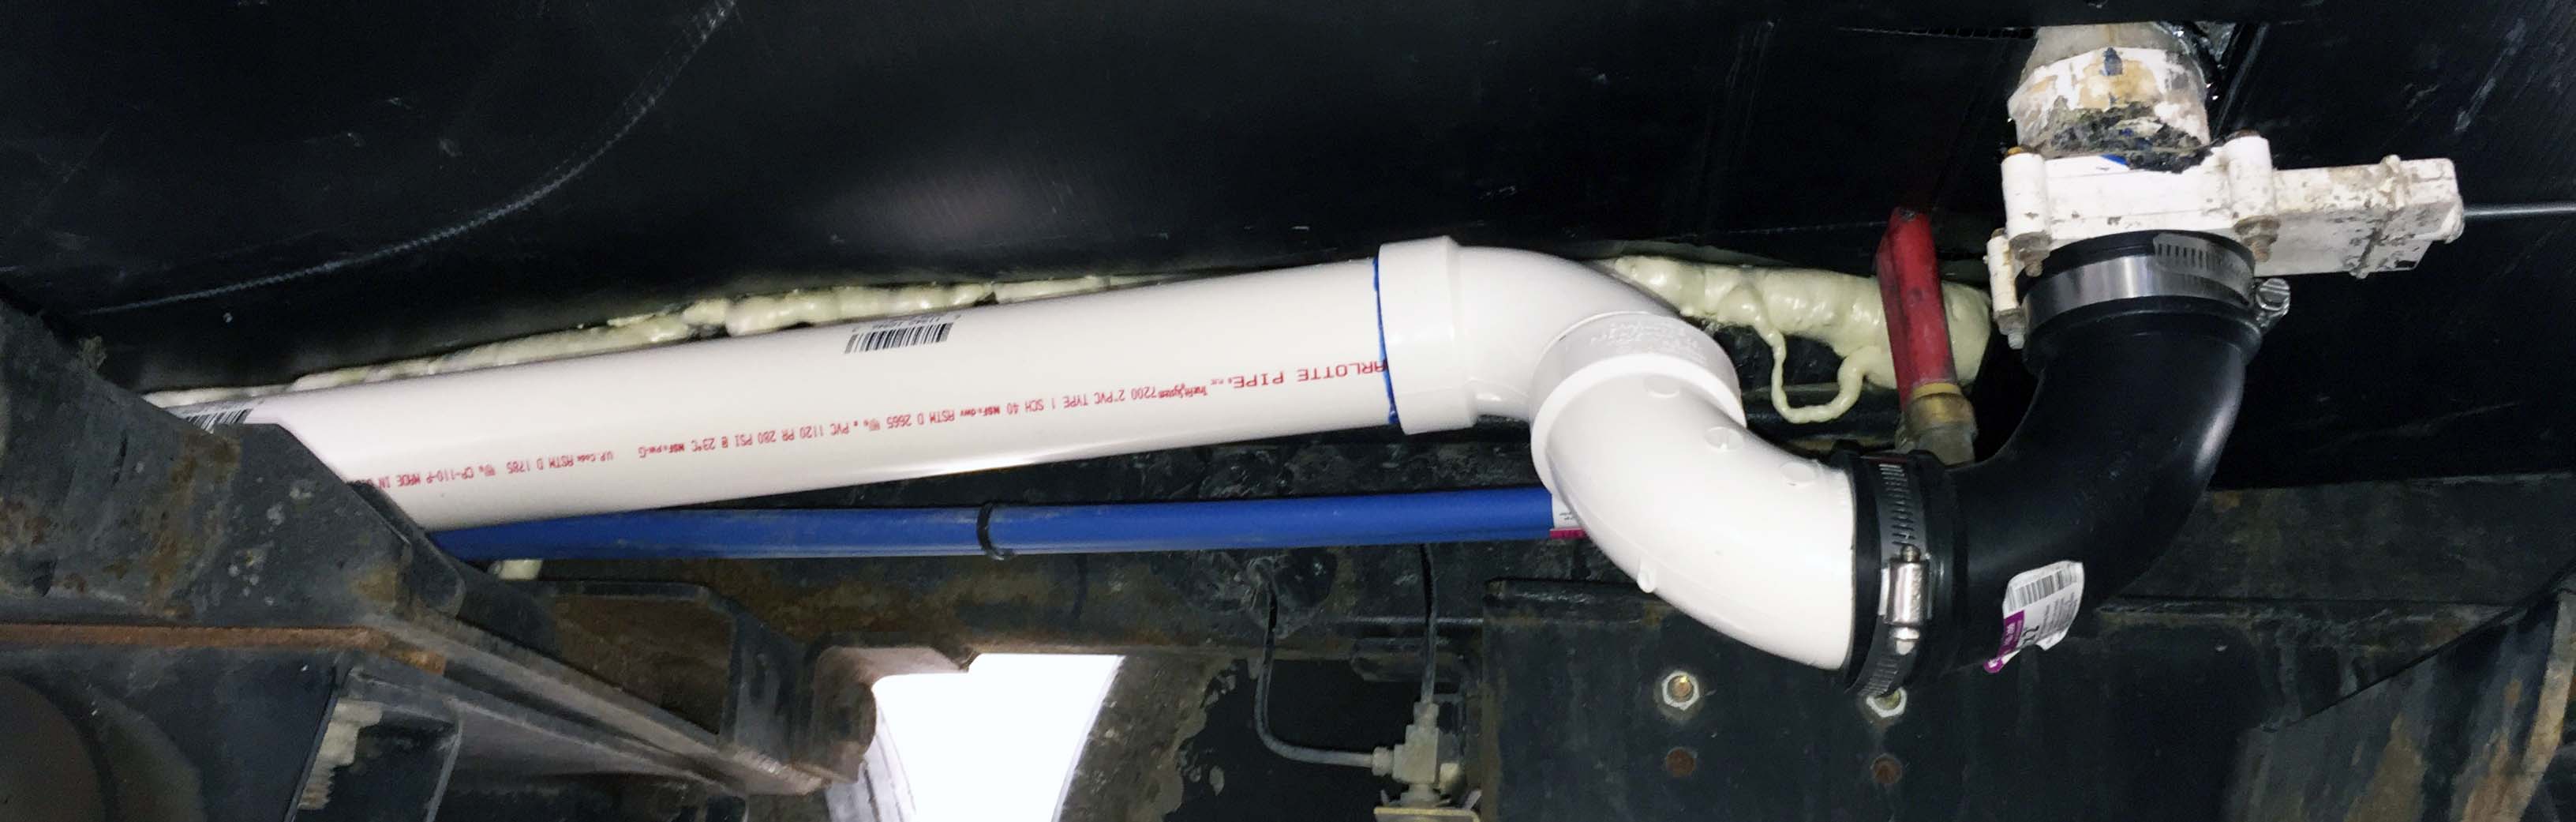
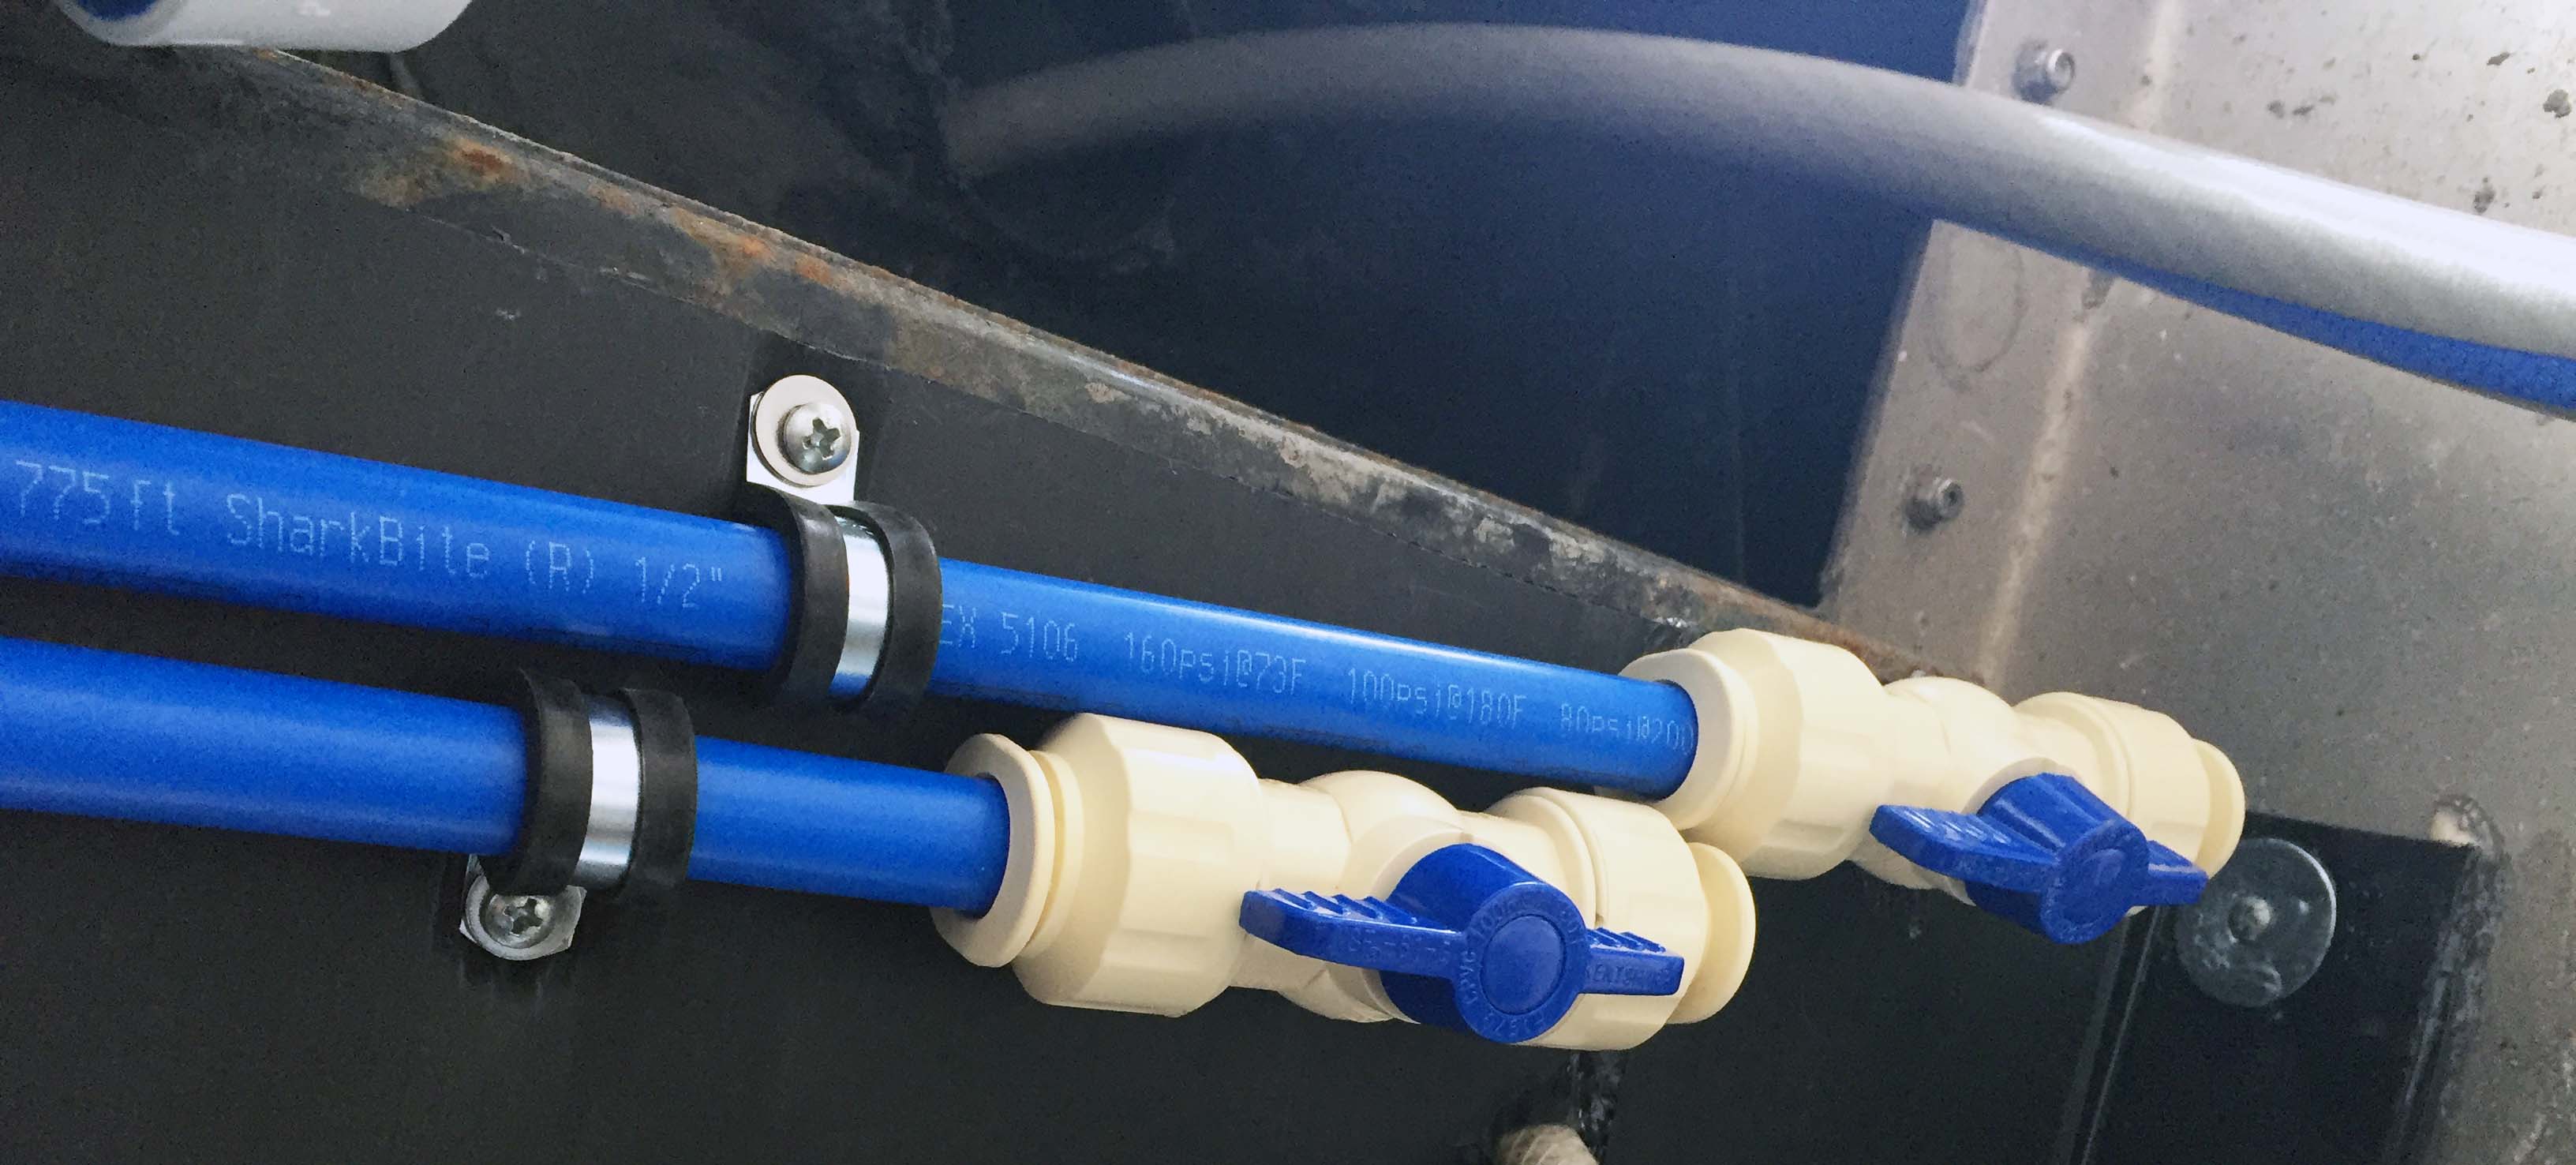
As you can see, the pipe goes over the axle nicely. If you look just beyond that, you can see the blue Pex lines for the fresh water vent extensions I put in. While I was doing the PVC line I also cut off the current awful valves for those and put in nice sturdy ball valves that I can turn easily and the handles won’t fall off. Plus the position of the handle shows me easily whether they are open or closed. With the old ones I had to get the handle out of a compartment and put it on each one to verify if they were open or closed.


I secured them with insulated cable clamps so they won’t slide around and rotate.


Once I got the PVC pipe to where I wanted it I was able to attach the adaptor boot and bayonet extension, and then secure it all with some galvanized hanging strap. It’s not perfect, but it’s not anything I can’t take apart and tweak over time as I get some experience using it and figure out if and how it can be improved. But for now, when I want to drain the fresh water tank, I can connect a sewer hose to it, and drain it to a sewer hookup or into grass without getting drenched. I am continuing to look for a way to open and close that valve without having to climb under the rig, but again, for now, at least I won’t have to get all the way under the axles since I have the extension rod, and I won’t get wet, either.

Having finished all that, I spent the rest of the day waiting for expanding foam to dry so I could trim away the excess with a razor knife, and using a headlamp to go over every inch of everything to make sure I hadn’t missed anything, then picking up all the tools and scattered screws, washers, and bits of dripped foam and cut up pieces of coroplast. That took a long time.

All of this took about 5 days from when I found the leak in the crawl space, so I crawled back in to see how full the Tupperware was. The 5 cup container was a little less than half full, so around a half cup every 24 hours, with two of us taking showers every day, running the washer every day, and washing dishes every day, causing a lot of pressure hits. That’s manageable for now, and this will have to wait. I went to look for a few fittings, and immediately ran into a problem. I can’t be sure what fittings I need until I take them off, and once I take them off, we have no water until I put them back together. I puzzled on it for a while and finally decided that first I need to completely dry all of the Pex and fittings and then put some paper towels around them and open a few valves and close them and them immediately check the paper towels and then repeat the process until I can find exactly where the leak is.

The “T” that’s part of that bit of plumbing goes to the washer, so in a pinch I can cut out the “T”, and use a coupler to to put the main line back together while I take the threaded fitting to the store to make sure I am getting what I need. Worst case scenario is that we are without a washer for a few days if I have to order the fitting. Or I can just just skip the threaded fitting and put in couplers, but I’m not sure that’s an improvement, so I don’t know that I want to remove the fitting. There’s also a half turn ball valve shutoff about a foot farther down the washer Pex line before that line continues to another set of shut offs where the washer hooks up to the line in the closet. That seems like an unnecessary shutoff to me, but again, I don’t see a reason to remove it. In any case, it’s a good thing I didn’t get started, because we got a call for a gate the next day, and there was no time. Since the leak is slow I put down about 8 layers of large terry towels to soak up and spread out the little bit of water that will leak, and once we get to our gate and get settled in I can start figuring out how to best fix this bonus issue. There will be a Home Depot about 30 minutes from our gate, so I’ll have access to resources.

All in all I’m pretty happy with how everything turned out. None of it went exactly how I wanted it to, but it never does. It took a LOT longer than I thought it would, and it ended up costing a LOT more than I thought it would, and WAY more trips back and forth to Home Depot than I thought it would. But that’s also always the case. It was great that we were able to stay at Greg and Cori’s for so long so I could do this, it would have really sucked if I had to do it someplace else, or a little at a time.

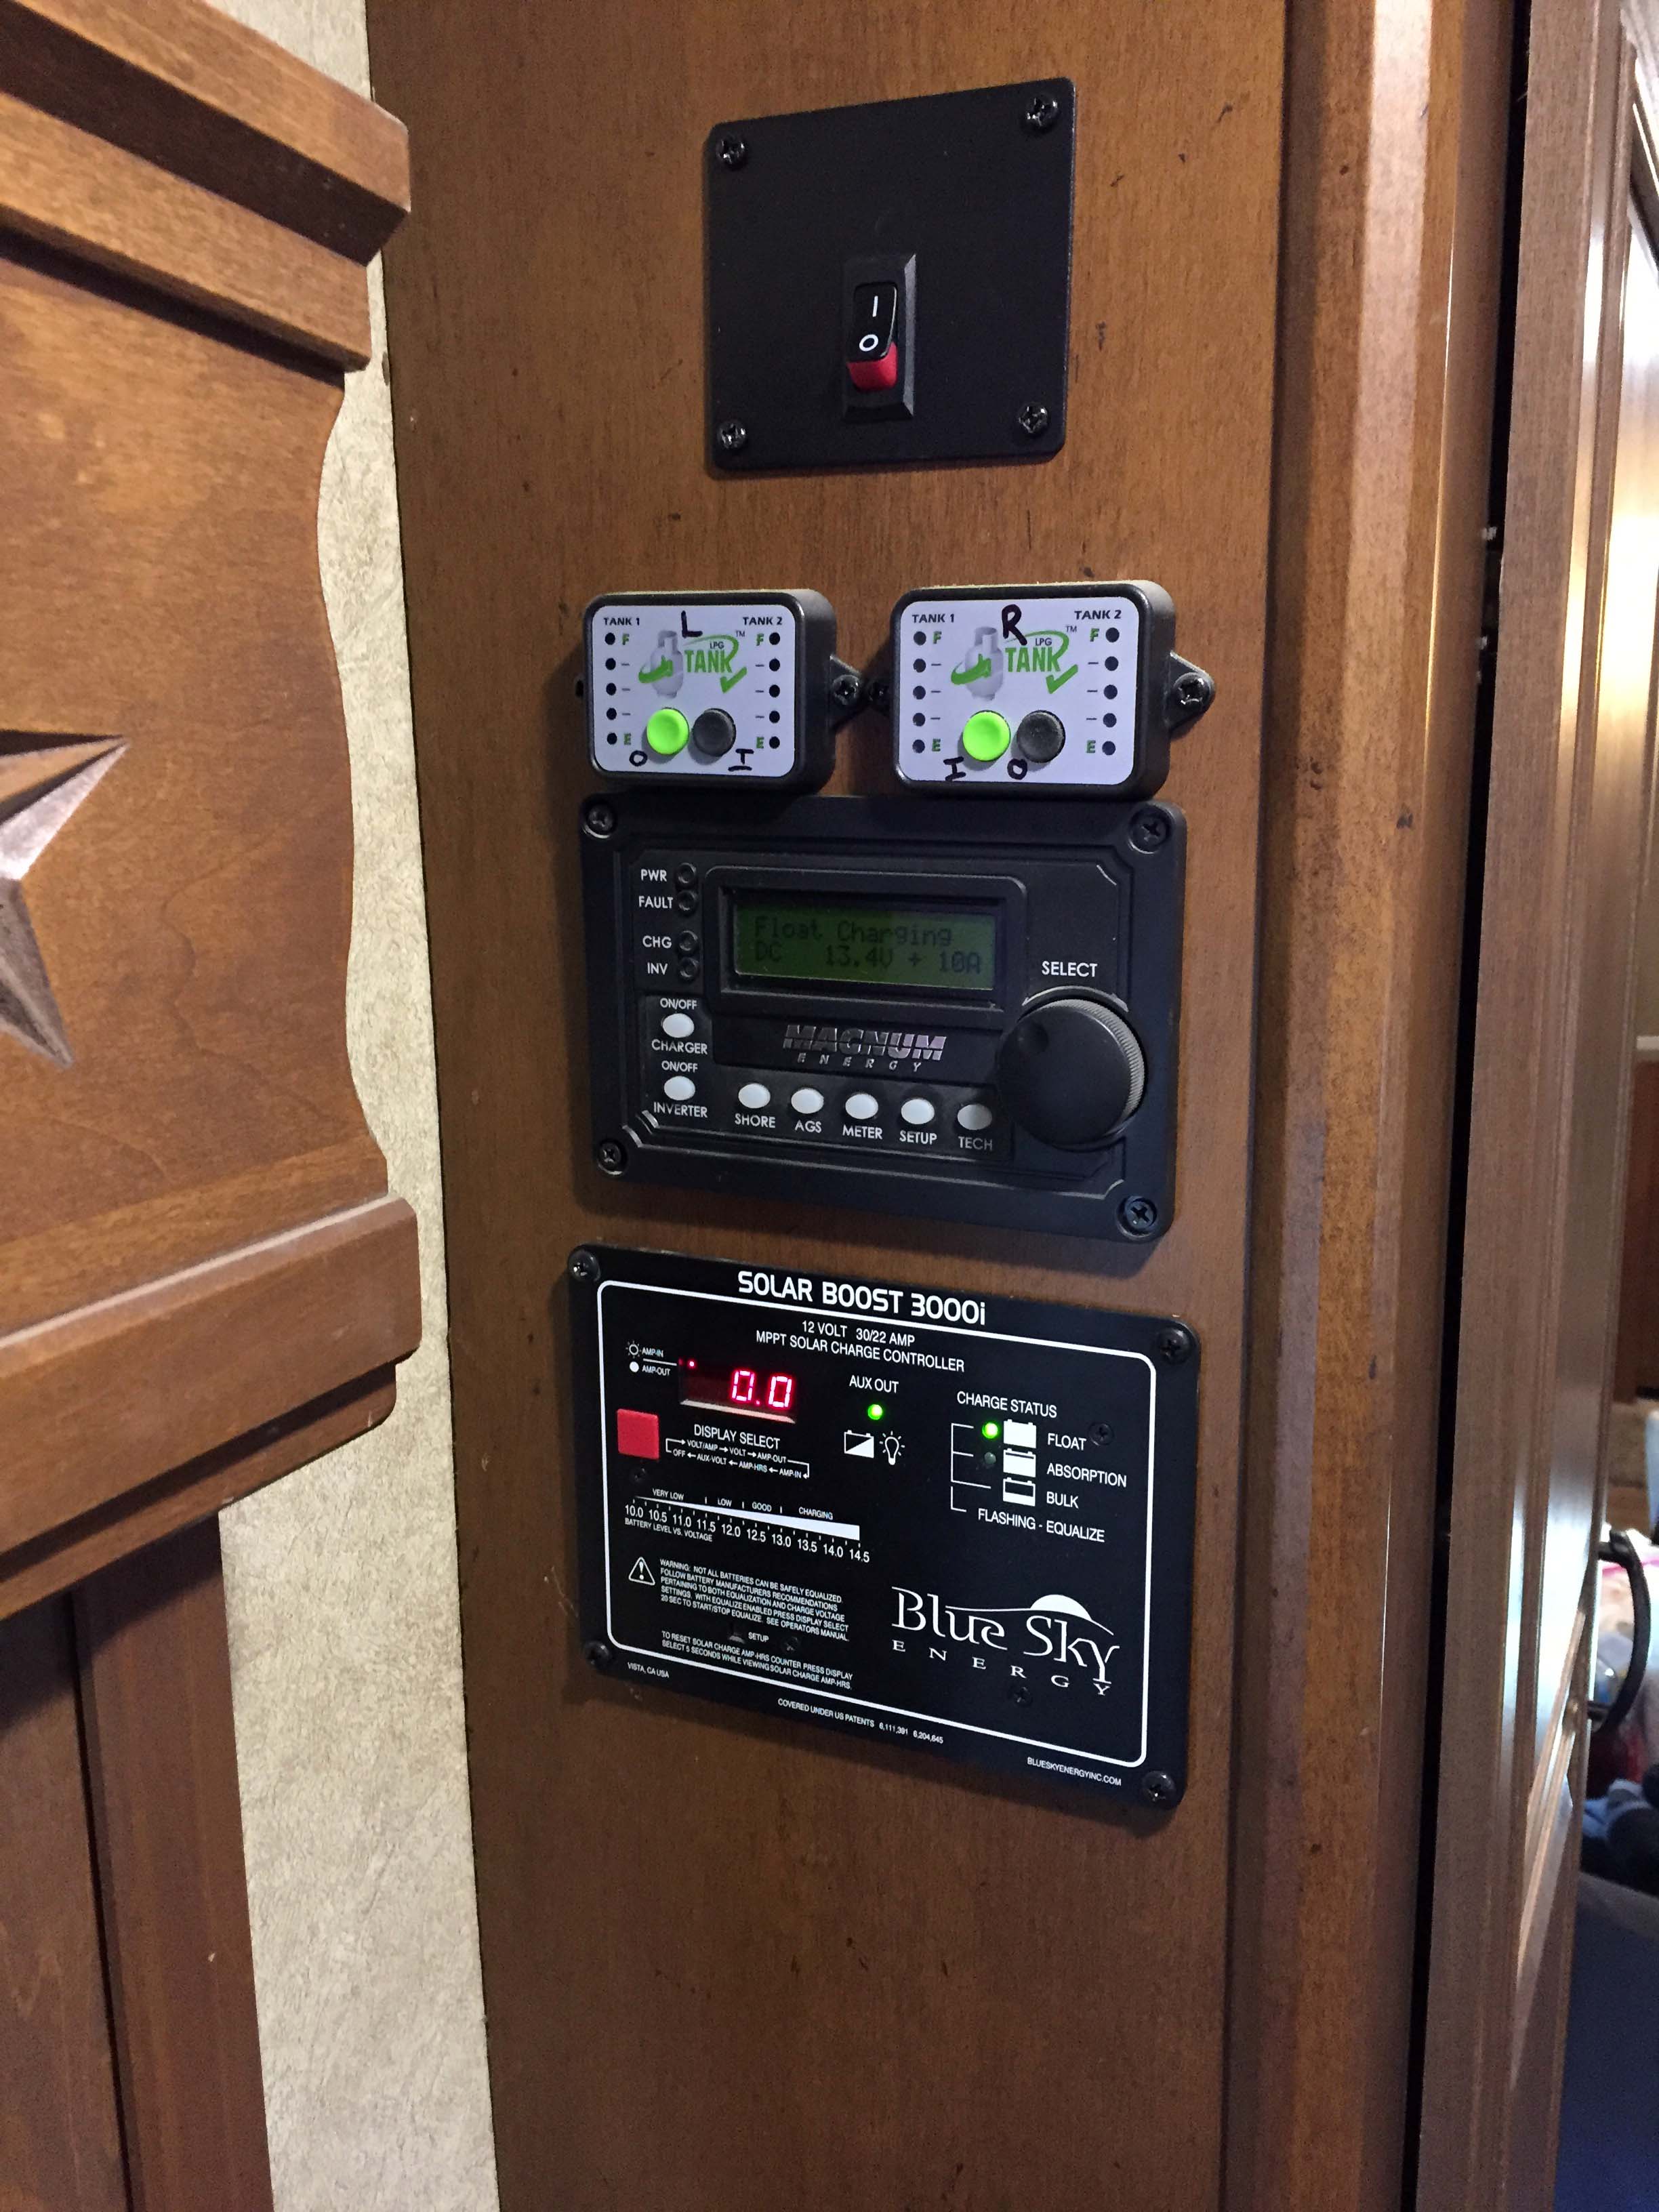
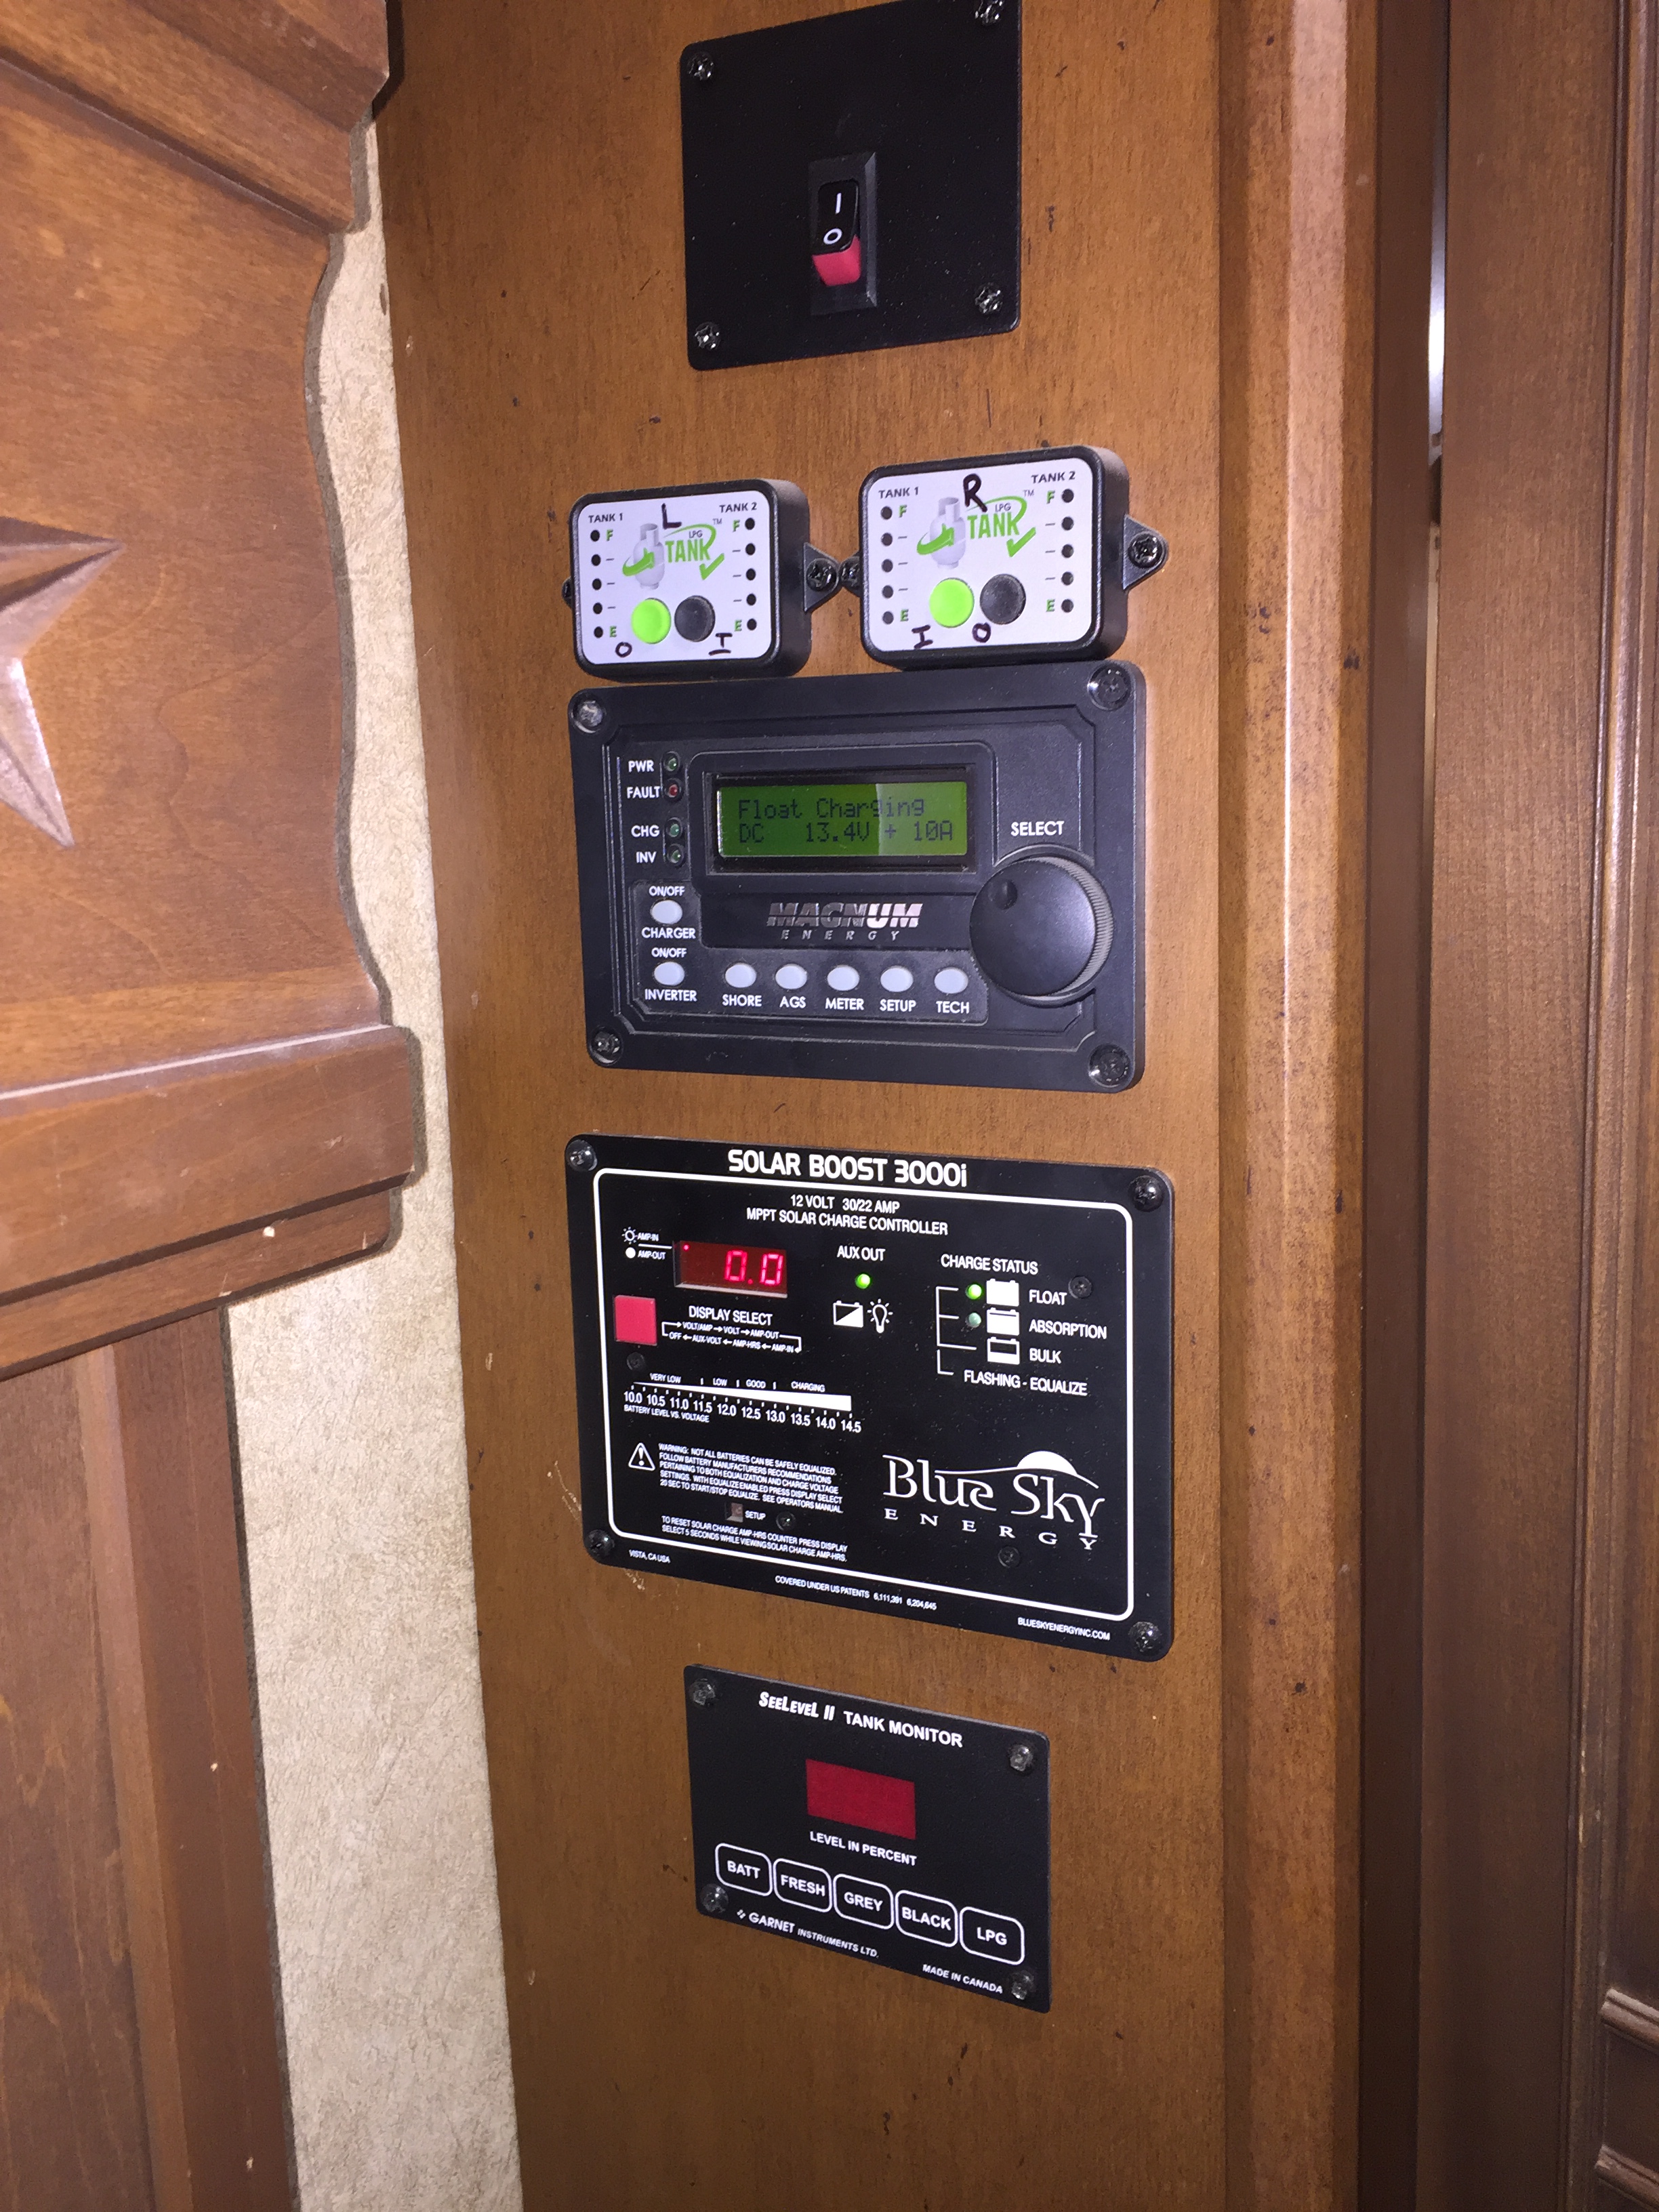
I got most of what I wanted; the See Level is installed, the fresh tank is mounted better, the fresh drain is now where I want it, the belly pan is new, secure, water tight and better insulated, the fresh inlet leak is gone, the vent valves are improved, and more secure and more accessible.  Eventually I will find a way to not have to crawl under the rig to empty the fresh tank. And I’ll fix the minor leak in the crawlspace.

So I’m less unhappy than I was before, and that’s all I can really ask for.

I’ll keep you updated on how the other stuff turns out.


Camper Chronicles is a participant in the Amazon Services LLC Associates Program, a program designed to provide a means for sites to earn advertising fees by advertising and linking to amazon.com. We very much appreciate any purchase you make via our website links.  There is no additional cost to you and helps support our blog.  Search Amazon.com here

Or you can check out our recipe book filled with 80 real recipes we have cooked in our RV and taste tested by Lee himself. The cookbook specializes in recipes that have a limited number of ingredients, without sacrificing flavor and is organized into categories that matter to full time RVers such as Happy Hours, Travel Days, and Pot Lucks   You can preview the kindle version on  Amazon or the Apple version on Itunes.    It is available in paperback on Amazon if you prefer.


Some Work Under The Rig – Part 2 – Wherein Things Are A Little More Fun

Again written by Lee – Trace

For those of you who aren’t interested in all of this stuff, just scroll to the end.

Previously, on Camper Chronicles…..

If you didn’t read the first post about this, here’s a speedy recap. For those of you suckers who read the whole saga, you should have just waited and read the recap, and saved yourself a bunch of time.

I decided to fix a minor leak in the fresh water tank, and also decided while I was at it to go ahead replace the belly pan, the fresh water low point drain valve, extend the outlet of the valve to a more convenient location, replace the fresh water vent valves, install a See Level tank monitor system, and add better insulation. (Basically a one day job turned into a multiple day job.  Don’t get me wrong, I appreciate it when he fixes things, but this felt like the never ending project. – Trace)  While I was under there I discovered a design flaw that was causing my fresh water tank to sag quite a bit, so I had to come up with a solution for that. Before I could do that, though, I needed to install the See Level first, for logistical reasons.

The See Level System

If you’ve never had an RV, it might surprise you to know that even though they come equipped with sensor that tell you how much fresh/gray/black water is in the tanks, the sensors in the black tank usually stop working the first time the tank is filled. Toilet paper and other……gunk gets on the sensors and they give false readings. The gray usually stops working a little while later. I hate that, and I’ve been wanting to install a See Level for a while now. Those sensors mount on the outside of the tanks, so they don’t get gunked up, and they give you a percentage reading of how full the tank is, as opposed to the Empty, 1/3, 2/3, Full options of the standard monitors. And since they mount on the outside, there’s no need to remove the old sensors.

Another great feature is that they use the existing wiring that your current sensors use, so not only do you not have to remove the old sensors, you don’t need to run new wires. You just snip the old wires from the original sensors, and splice them to the wires on the See Level sensors. See Level is available in a wide variety of configurations for just about any rig arrangement, so you will almost certainly be able to get exactly what combination of tanks/LP/monitors/pump switch options you need or want. We have 1 each of fresh, gray and black, and the model I got includes those, battery voltage and a button for LP, which I didn’t hook up, because I didn’t need it. The SL “senders” are basically flexible circuit boards with a series of sensors on them. You actually cut them with a scissors to the exact size you need. Before you order them, you need to know the height of your tank, and if your tank is taller than the tallest sender they have, you can stack them. Once you know exactly what you need, and you’ve ordered and received them, installation is actually very easy. Taking the belly pan off was more of a pain than this install.

If you look at the picture above, you can see a row of dark rectangles along the right edge. If your tank is shorter than the sender, you cut it to size between those dark rectangles, which are the sensors. Then you prep the tank by cleaning it really well, and using painter’s tape to tape the sender to the tank for testing. The senders have a very strong adhesive back, but once you place them it’s very hard to remove them so it’s best to test everything to make sure the placement works before committing the adhesive. The wires get connected to the positive and negative from the original wiring, and then at the control center end your wires get connected to a harness that goes to the back of the display. As long as everything shares the same ground connection, the system will function.

Above is the back of my control center. I needed to locate and snip the wires from the original display, which was top right on the panel, lower right of the picture. The red, black and blue wires you see there are the wires going to the new display so I could test it. I decided to put the display inside, instead of in the convenience center outside. I thought the best place for it would be on the side of the cabinet along with the solar displays, the Winegard switch, and my LP tank monitors. The existing control center is already crowded, plus there’s a nice cable chase where all that solar and other stuff is, so fishing the wire would be easy.


The scariest thing, as always, is putting a hole in the rig, so I carefully measured and used a drill to do the corners, and then a fine edge rat tail saw to make the display hole as neat as I could. My biggest concern apart from screwing up the cabinet wall was cutting into something else by accident, so once I got the corner holes drilled I used my little scope camera to peek inside to see what I might be hitting. Sure enough, there was a fair number of loose wires in there, so I was extra careful when cutting, and as soon as I had enough room to get a finger in there, I used a pinky to hold the wires back away from the saw. Here you can see the wires lurking inside waiting to cause havoc.


Once I had the hole ready, I fished the wires up and hooked everything up and then tested the system.

Everything worked perfectly, so I completed the installation of the display and then went back to the tanks to finalize those senders.


Sadly, I was so involved in being extra careful to place those senders in exactly the right spot and secure the wires that I completely forgot to take pictures of the senders on the tank. I do have one image of the fresh water tank inlet repair where you can just barely see the sender.

Here’s a closer shot where you can see it a teeny bit better:


Like I said, it’s very simple, and so far it is working well consistently.

Once that was all done, I was comfortable testing the replacement fitting on the fresh water tank for leaks. I put twenty gallons of water into the tank, waited an hour  and no leaks. Excellent news, which allowed me to start work on the fresh water tank sagging problem. My first thought was to just add more straps, but I realized that would be a ton of work drilling through all that steel and sourcing new straps, etc. It also occurred to me that I would still get sagging between the straps. There was several inches of headroom above the tank, so I decided to use 3/4″ plywood across the straps covering the entire length and width of the tank. Measuring and cutting was the easy part, but getting a 5′ x 4′ piece of 3/4″ plywood under the rig and then laying on my back and getting it up onto me and then up above the axle and between the straps and the fresh water tank was a bit of a challenge. (I will mention here that I did offer to help, but he has his teeth in the project and politely declined.  Didn’t want you to think I was laying around eating bon bons while he was working so hard 🙂 – Trace).   I unbolted one side of the straps and sort of let them hang down like a ramp, and I was able to lift just one side of the tank and wiggle it around until it was wedged in place and then slide the edge of the plywood up onto the straps and then slowly work it up the strap ramps until it was all the way in, and then hold it up with one hand while I re-bolted the center strap. After that the rest of the straps were easy.

Unfortunately, once I got all that done, it was painfully obvious that the straps were still bowed a lot, and I wasn’t happy with all the weight load being along the edges, and possibly the plywood bowing or maybe even cracking. So I took a moment to one at a time remove each strap and flip them over so the bow would be oriented up instead of down. There was still some gap between the straps and the wood, but not anywhere near as much. I felt better. (This is why I love this guy.  Most people would have called it done, but he looked ahead, saw a possible problem, and proactively worked to fix it.  That’s my guy – Trace) 

I also was able to get a really good look at the part of the tank that was the most “wrinkled” before. Here’s what it looked like once it was on the wood instead of just hanging out in space.

As you can see it’s settled a little, but it’s still not completely straightened out, and there’s still a pretty large amount of gap between the bottom of the tank at that wrinkle, and the wood. It was reasonably warm out, which helps plastic regain it’s shape, so I started the fresh water fill and sat under the rig with my head between the black and gray tank carefully watching and listening for anything that might indicate a leak. As it slowly filled, the weight and the warmth helped it settle in pretty well. After about 15 gallons I could already see it settling. It was a little like watching the minute hand on a clock move almost imperceptibly slowly, but it was definitely improving. I took a picture about every 10-15 gallons, and you can see the slow improvement.


Once I was well over half full, at about 340 lbs of water, I checked the gap between the straps and the wood. The straps were more or less straightened out, and the wood had settled against them evenly and flat, wit no gaps anywhere.

I also took a look at the unsupported end, and there was only about 1/2″ of deflection, so I’m confident that the fix is a good one and will hold more or less indefinitely.

This was a good day’s work, the rest could wait till the next day, so this is also a great place to stop this post. The next day I tackled the next part of the project. Some of it went well, some of it didn’t. Foreshadowing!

If you find all of this boring and would rather have something fun to read, you’re not alone.


Camper Chronicles is a participant in the Amazon Services LLC Associates Program, a program designed to provide a means for sites to earn advertising fees by advertising and linking to amazon.com. We very much appreciate any purchase you make via our website links.  There is no additional cost to you and helps support our blog.  Search Amazon.com here

Or you can check out our recipe book filled with 80 real recipes we have cooked in our RV and taste tested by Lee himself. The cookbook specializes in recipes that have a limited number of ingredients, without sacrificing flavor and is organized into categories that matter to full time RVers such as Happy Hours, Travel Days, and Pot Lucks   You can preview the kindle version on  Amazon or the Apple version on Itunes.    It is available in paperback on Amazon if you prefer.

Some Work Under The Rig – Part 1 – Wherein Things Do NOT Go As Planned

Written by Lee because you know he is repair guy…thank heavens. – Trace

One of the things I wanted to take care of while we were sitting for a while and not working was a very minor leak where the inlet/outlet is on our fresh water tank. It’s been leaking since January 2015, but only when the fresh water tank had water in it, and only a very slow small dripping leak. Like less than a cup of water a week. And since we rarely use the fresh water tank it just kept getting put off. Right after I discovered the leak,  I put a small hole in the belly pan so it would drip straight down and out and not pool in the belly pan, and then it just wasn’t a huge priority.  I wanted to replace the belly pan, which was starting to sag in a few places.  It also had numerous access holes from previous repairs cut in it and then taped back up, so I decided that while I had the belly pan off I would go ahead and do the leak, since it would be more accessible. And I wanted to change out the fresh water overfill vent valves, which I did a while back, but didn’t really like the end result. The first fix worked but still required getting under the rig.

I extended the vent lines and put in valves that were more accessible, but those were were designed for a toilet water supply line, and so the knobs kept falling off and were hard to turn.  I wanted to replace those with ball valves that were easier to turn and the handles would stay put. Here’s the second fix I plan to replace in this project:

I also wanted to change out the fresh water low point drain valve. I don’t like to travel with very much fresh water for weight reasons, but the fresh water drain valve is a T handle pull valve which is on the driver’s side. The fresh water tank sits above the axles, and the handle is between the axles. So opening that valve involves crawling under the kitchen slide (if it’s out) and under the front axles, and pulling the valve. It’s a 1 1/2″ drain, which is awesome because it drains really fast.

Gotta crawl under here and back between the axles in order to get drenched.

On the down side, I am directly in the path when that water comes rushing out, so it’s impossible to do without getting soaked. And then crawling back under to close the valve involves getting into the water which has drained, unless I pull the rig forward. About a year ago I put on a handle extension rod which allowed me to NOT crawl under the front axle, but that really wasn’t a good solution.

This is after I put on the extension. A little better, but not much. This picture was with the belly pan removed.

And finally, I wanted to install a See Level tank monitor system that I bought almost a year ago. The tank monitors that come with a rig are terrible.  The See Level gives you an accurate reading from outside the tank, so they don’t get fouled or clogged with material. The readout is a percentage of full, which is great for waste and gray tanks, and also for filling fresh water tanks. Much better than “EMPTY   1/3  2/3    FULL” With that measurement, and an 85 gallon tank, there’s a 25 gallon variance. Not useful.

So with all of these things piled up together, lots of time on my hands, really good weather, and a Home Depot and a Camping World within half an hour of where we were staying, I decided it was time to tackle it all.

To start with, I needed to remove the belly pan. For those who don’t know, the belly pan is usually made of 4mm thick Coroplast, which is essentially the same as corrugated cardboard, but is made of plastic instead of paper. Other thicknesses are available, but 4mm is the standard for this application.

Coroplast is really great stuff to be the first line of defense on the bottom of a rig. It’s tough and can withstand the abuse of road debris and rocks and other things thrown up under a rig.  In addition,  when you use screws to attach it to things, as long as you use a fender washer, it won’t tear. It plays nice with expanding foam and silicone sealant. It’s easy to work with because it flexes, and is easily cut with a razor knife. And it’s water proof. It’s the same stuff that “Custom Signs Today” type places use for signs. It’s also available in lots of colors, although lighter colors are cheaper and easier to get.

In just about any large community you can do a Google search for plastic suppliers and find a source for this stuff at very reasonable prices. The largest standard sheet is 4′ x 8′, which is nice because the frames of most rigs are generally under 8′ wide. If you can’t find a plastics supplier, you can get them from sign makers, but they generally don’t have more than a sheet or two in stock. Everyone I talked to could get me more within a day or two.

When our rig was built, the belly pan was put on as a single sheet that was cut to fit perfectly around everything on the bottom of the rig. It was attached with a mixture of self drilling scews and what looked like nails driven in with an air gun. Taking those off was not a big deal, although a few broke off and I needed to grind them down. I also did not need to remove the entire belly pan, just the back half, because the front half had nothing I needed access to, and it was in great shape as well. So that saved me some time and money. I ended up buying 3 4’x8′ sheets for $12 per sheet. I also bought a box of #10 3/4″ self tapping sheet metal screws and a box of 1 1/2″ #10 fender washers.

Laying on top of the belly pan as I removed it was a thick sheet of paper foil, which is a vapor barrier/insulation, but was pretty torn up from various access holes being cut over the years.  My removal scheme consisted of cutting the pan in 2′ sheets to make it easier to deal with. Laying on my back under the rig and working up, I got a lot dust and debris in the face, so I needed to work with smaller pieces to mitigate that. That foil didn’t survive, but more on what I replaced it with later.

Once the belly pan was off, I was treated to a great view of my electric gray and black valves, which is one of the reasons access panels had been cut. (There’s no post about those, but you can read about them on the outside mod page. After four years, they are my all time favorite purchase!) I am such a fan that I am going to post a link here to a short video from etrailer showing how they work. They’re amazing.

I was also able to see the actual gray tank and black tank, which I had never seen before. It’s nice to now know exactly where they are, and where the outlets are.  The black tank is on the passenger side, and the gray tank is on the driver side. The outlets for both are in the rear, so if I ever want to completely drain them, I just need to lift the nose a little.   Here you can see the wiring and through-tank connectors for the existing horrible “sensor” system along with a small piece of wood supporting the electric valve on the black tank.

And here’s the wiring and connectors for the gray tank sensors. The great thing about the See Level system is that it uses existing wiring, so there’s no need to run any wires at all.


I was also able to get a much better view of the fresh water drain valve, and started to work out a plan on how to extend and relocate the drain, and a possible solution to the valve problem.

But then I looked at the actual fresh water tank, and saw this….

As you can see, the fresh water tank is hanging from 2″ wide steel straps, and rather than put a strap all the way at the end to support the passenger side edge of the tank, they just didn’t. That’s an 85 gallon tank, and there are 4 straps. So each one of those straps is supporting a point load of about 150 lbs. The tank is made of polyethylene, and is a very pliable material. With all that weight on such a small area, it’s not at all surprising that the tank is bowing and sagging between the straps, and on the end with no strap, it’s completely failing. On the other side, where the drain valve is, there is a strap. I just don’t understand why the manufacturer decided not to put a strap on the other end. There is over a foot of unsupported tank,  about 140 lbs of water, on the far side of that strap. I’m actually surprised it didn’t fail completely.   Here’s a closeup of the “wrinkle” in the plastic where it was folding over the strap.  The plastic actually had already started to settle back to it’s normal shape once the pressure was off, but you can see where the strap was, and how close it came to cracking the plastic.

Oh, and it gets better. While I was taking off that section of belly pan, I got hit in the face with a nut and a washer. Once I got everything clear, I could see where it came from…

Yup. One of the straps wasn’t even attached on one side. (You can also see where I cut the belly pan to remove it, and parts of the insulation/vapor barrier foil)

Here are a few other pics of the fresh tank from various angles. Try not get as mad as I did, but consider taking a peek at your own to make sure you don’t leave it on the highway one day. We actually know a couple who lost their fresh water tank while they were driving one day and didn’t even know it was gone until they stopped for the night. True story.  – Trace


In the upper left of this picture is the hose that comes from the hookup center and runs to the black tank to rinse out the black tank. I’ve always wondered where that water comes in to the tank, now I know it’s at the front of the tank, directly opposite the drain, so the rinse water travels all the way across the tank.


This is the left or driver side of the fresh tank, you can see where the first strap is right at the drain valve.


This shows how much sagging there is in the tank, and how much bowing there is of the straps. This view is actually what helped me decide how to fix this!

With this discovery, the project got a little more complicated, but luckily I had time, stores nearby, and plenty of motivation to get it done. Before I tackled the fresh water tank,  I starting working on the inlet/outlet fitting for the fresh tank, which was my original problem.  I didn’t get a picture of the fitting before I took it off because I was pretty preoccupied thinking about how to fix the strap problem. Once I finally decided to cut the Pex line and turn out the fitting I did get a picture of it. That was a very tough decision because the fitting is for both filling the tank and the pump to pull the water out. I couldn’t see if it was a standard fitting that screws in, or if it was a spin weld. If I removed it and was unable to get a new fitting, I would be unable to use the fresh water tank. Since we were waiting to hear about a gate, I could get a call any minute, so I was nervous to commit to something that I might not be able to finish if I had to wait for a part. Finally, with Greg and Bill both assuring me they thought it would be a standard fitting, and even if not I could always get one next day. Since I wasn’t 100% sure it wasn’t a spin weld, I decided to cut the Pex line a good 8″ away from the fitting so if it was a spin weld I could just use a coupler fitting and go back to the way things were until I could get it into a place that could deal with a spin weld.

Luckily, it was just a threaded fitting, so it came out easily. Here’s the culprit. The leak was in the crimp, which are a terrible way to connect Pex. Hose clamps or Sharkbite or other push fittings are much better than these junky crimps. I’ve had several of these fail already.

It tuned out to be a part I could get at Home Depot, although it was only available in copper, so a little plumbers tape and the first repair was complete.

I had to add some Pex because I cut it so far from the fitting, and I decided to add some more to move the coupler away from where the See Level sensor would be mounted. They don’t work well if there’s metal within 4″ or so of them.

And again I used copper Sharkbite fittings, because Greg told me to. He’s pretty smart, so I listened to him.

Having replaced that, I needed to leak test it by putting some water in, and then I would need to drain the water to fix the fresh water tank straps. I didn’t want to fix the tank straps and then find out I needed to redo the fitting, because the tank strap fix would make getting to the fitting difficult. It would also make it difficult to install the See Level sensors, so as much as I hated to start mixing up projects, I decided to install the See Level sensors and go from there. Which was fine, because that was one of the fun things involved in this project.

So coming up next, installing and testing the See Level system!


Camper Chronicles is a participant in the Amazon Services LLC Associates Program, a program designed to provide a means for sites to earn advertising fees by advertising and linking to amazon.com. We very much appreciate any purchase you make via our website links.  There is no additional cost to you and helps support our blog.  Search Amazon.com here

Or you can check out our recipe book filled with 80 real recipes we have cooked in our RV and taste tested by Lee himself. The cookbook specializes in recipes that have a limited number of ingredients, without sacrificing flavor and is organized into categories that matter to full time RVers such as Happy Hours, Travel Days, and Pot Lucks   You can preview the kindle version on  Amazon or the Apple version on Itunes.    It is available in paperback on Amazon if you prefer.

November 2018 Budget

Although we applied for unemployment in November, there was a one week delay, and then the first check was mailed to Florida, so we haven’t actually been able to collect a paycheck yet.  Lee is collecting $176 a week (taxes were taken out) and my check is $180 a week, and that money will show up in our December statement.  We also spent quite a bit on the dog this month which was totally unexpected.  The combination of lack of income and extra expenses has us dipping into our savings to cover our costs.  I don’t mind dipping into savings when it is just a matter of timing between jobs, but since we still haven’t nailed down a gate guard job (getting closer), it is making me pretty uncomfortable.  Having a free place to stay really helps, and I just keep telling myself that that is what we have savings for. And just to show you how quickly things can change as I was typing this (not kidding) I got a call for a gate.  We need to be down there tonight so I will stop writing this and start packing!

(Pack, pack, pack, hitch, hitch, hitch, drive, drive, drive…. – Lee)

OK, we arrived and I am thrilled that money will start flowing in the right direction again.  So back to November.

We spent $4,630 with no money coming in this month, but in all fairness $1,135 was related to getting the dog, and the bulk of that was one time expenditures.  If you take the dog related costs out, we spent a more reasonable $3495.  For more details by category please see below.

Campground Fees–  Even though we weren’t working we did have a place to stay for free for the entire month, which is what made not working in November even possible.  This is the first time in our four years of being full time we have had the opportunity to stay for free with friends for an extended period of time, and we are super grateful for it.  I will say we do know lots of people who stay for extended periods with family or friends so this is not that unusual in the RVing world.  Just wanted to be transparent about it.

Groceries – We went over by $340 in this category which was due to a Costco run and staying with friends.  We always eat group meals, which end up costing a little more, but we ate very well in November!  We also have tons of food in the RV and I am planning on working our way through that while we gate guard.  Never know how close we will end up to a Costco so we also stocked up on paper products etc.

Dining Out – I am happy to say we were able to offset some of the grocery bills by not eating out much and we saved $110 in these categories. Everyone knew we were on a budget because we weren’t working and so we ate in almost the entire time. Our friends are awesome that way.

Entertainment – We went over in this category but that was mainly due to purchasing books.  San Antonio has several Half Price Book stores, which we love, and we stocked up on books in preparation for gate guarding.

Truck Fuel – This was another area we did really well in, only spending $130.  We carpooled on several occasions and kept most of our trips local.

Cigarettes – This is our quarterly cigarette purchase.  We buy tobacco and tubes in bulk and roll our own.  Even though we take a hit in that particular month it always averages out over the year.

Shipping/Postage – Most of this $34 overage was shipping a present to my oldest daughter.  I had some things in the RV I had been holding onto, and when we did a purge decided they were too nice to simply donate, so I sent them to her.

Pets – OK, let me break this down.  The dog himself was $750 from a breeder.  He was actually a bargain because the female puppies were $1200.  That being said if you are wondering why I just didn’t adopt a pound puppy, I refer you to my previous post on adopting Jack.  Trust me, spending that much money was not my first choice.  The remaining $384 was a crate, puppy bed, a trip to the vet for $95, a trip to the groomer for $35, dog food, and a ridiculous amount of dog toys and treats.  The last purchases were totally discretionary, but have you seen him?.  He’s a cutie patooty.

Gifts – I went over in this category for two reasons.  One I purchased a gift for the people we have been staying with.  They wouldn’t let me contribute towards the utilities, so I got sneaky and bought them a gift instead!  The second purchase was calendars.  A couple of friends of mine have created their own calendars the last couple of years using pictures from their travels, and I took advantage of a Cyber Monday Sale at Vista Print and bought some for my friends and family.  I am still $200 under budget annually in this category though, because I have done a much better job of watching my spending this year.

Home Repair – A positive and a negative of staying in a place for awhile and not working is Lee can work on the RV.  Good news, RV stuff gets fixed, bad news, it always costs money.  Considering the HUGE lists of things he got done (and I promise those posts are coming up soon), $265 over budget is really not that bad.

This month definitely brought it down to the wire and like I started with, I am thrilled we are back to work.  Hopefully we will be able to squeeze by and not have to take anything out of savings, but then we need to hunker down and definitely put some money back.  I am less worried because we have already locked in our summer job, and if necessary can extend our gate guarding a little bit into April although neither one of us wants to do that.


Camper Chronicles is a participant in the Amazon Services LLC Associates Program, a program designed to provide a means for sites to earn advertising fees by advertising and linking to amazon.com. We very much appreciate any purchase you make via our website links.  There is no additional cost to you and helps support our blog.  Search Amazon.com here

Or you can check out our recipe book filled with 80 real recipes we have cooked in our RV and taste tested by Lee himself. The cookbook specializes in recipes that have a limited number of ingredients, without sacrificing flavor and is organized into categories that matter to full time RVers such as Happy Hours, Travel Days, and Pot Lucks   You can preview the kindle version on  Amazon or the Apple version on Itunes.    It is available in paperback on Amazon if you prefer.