
Written by Lee because you know he is repair guy…thank heavens. – Trace
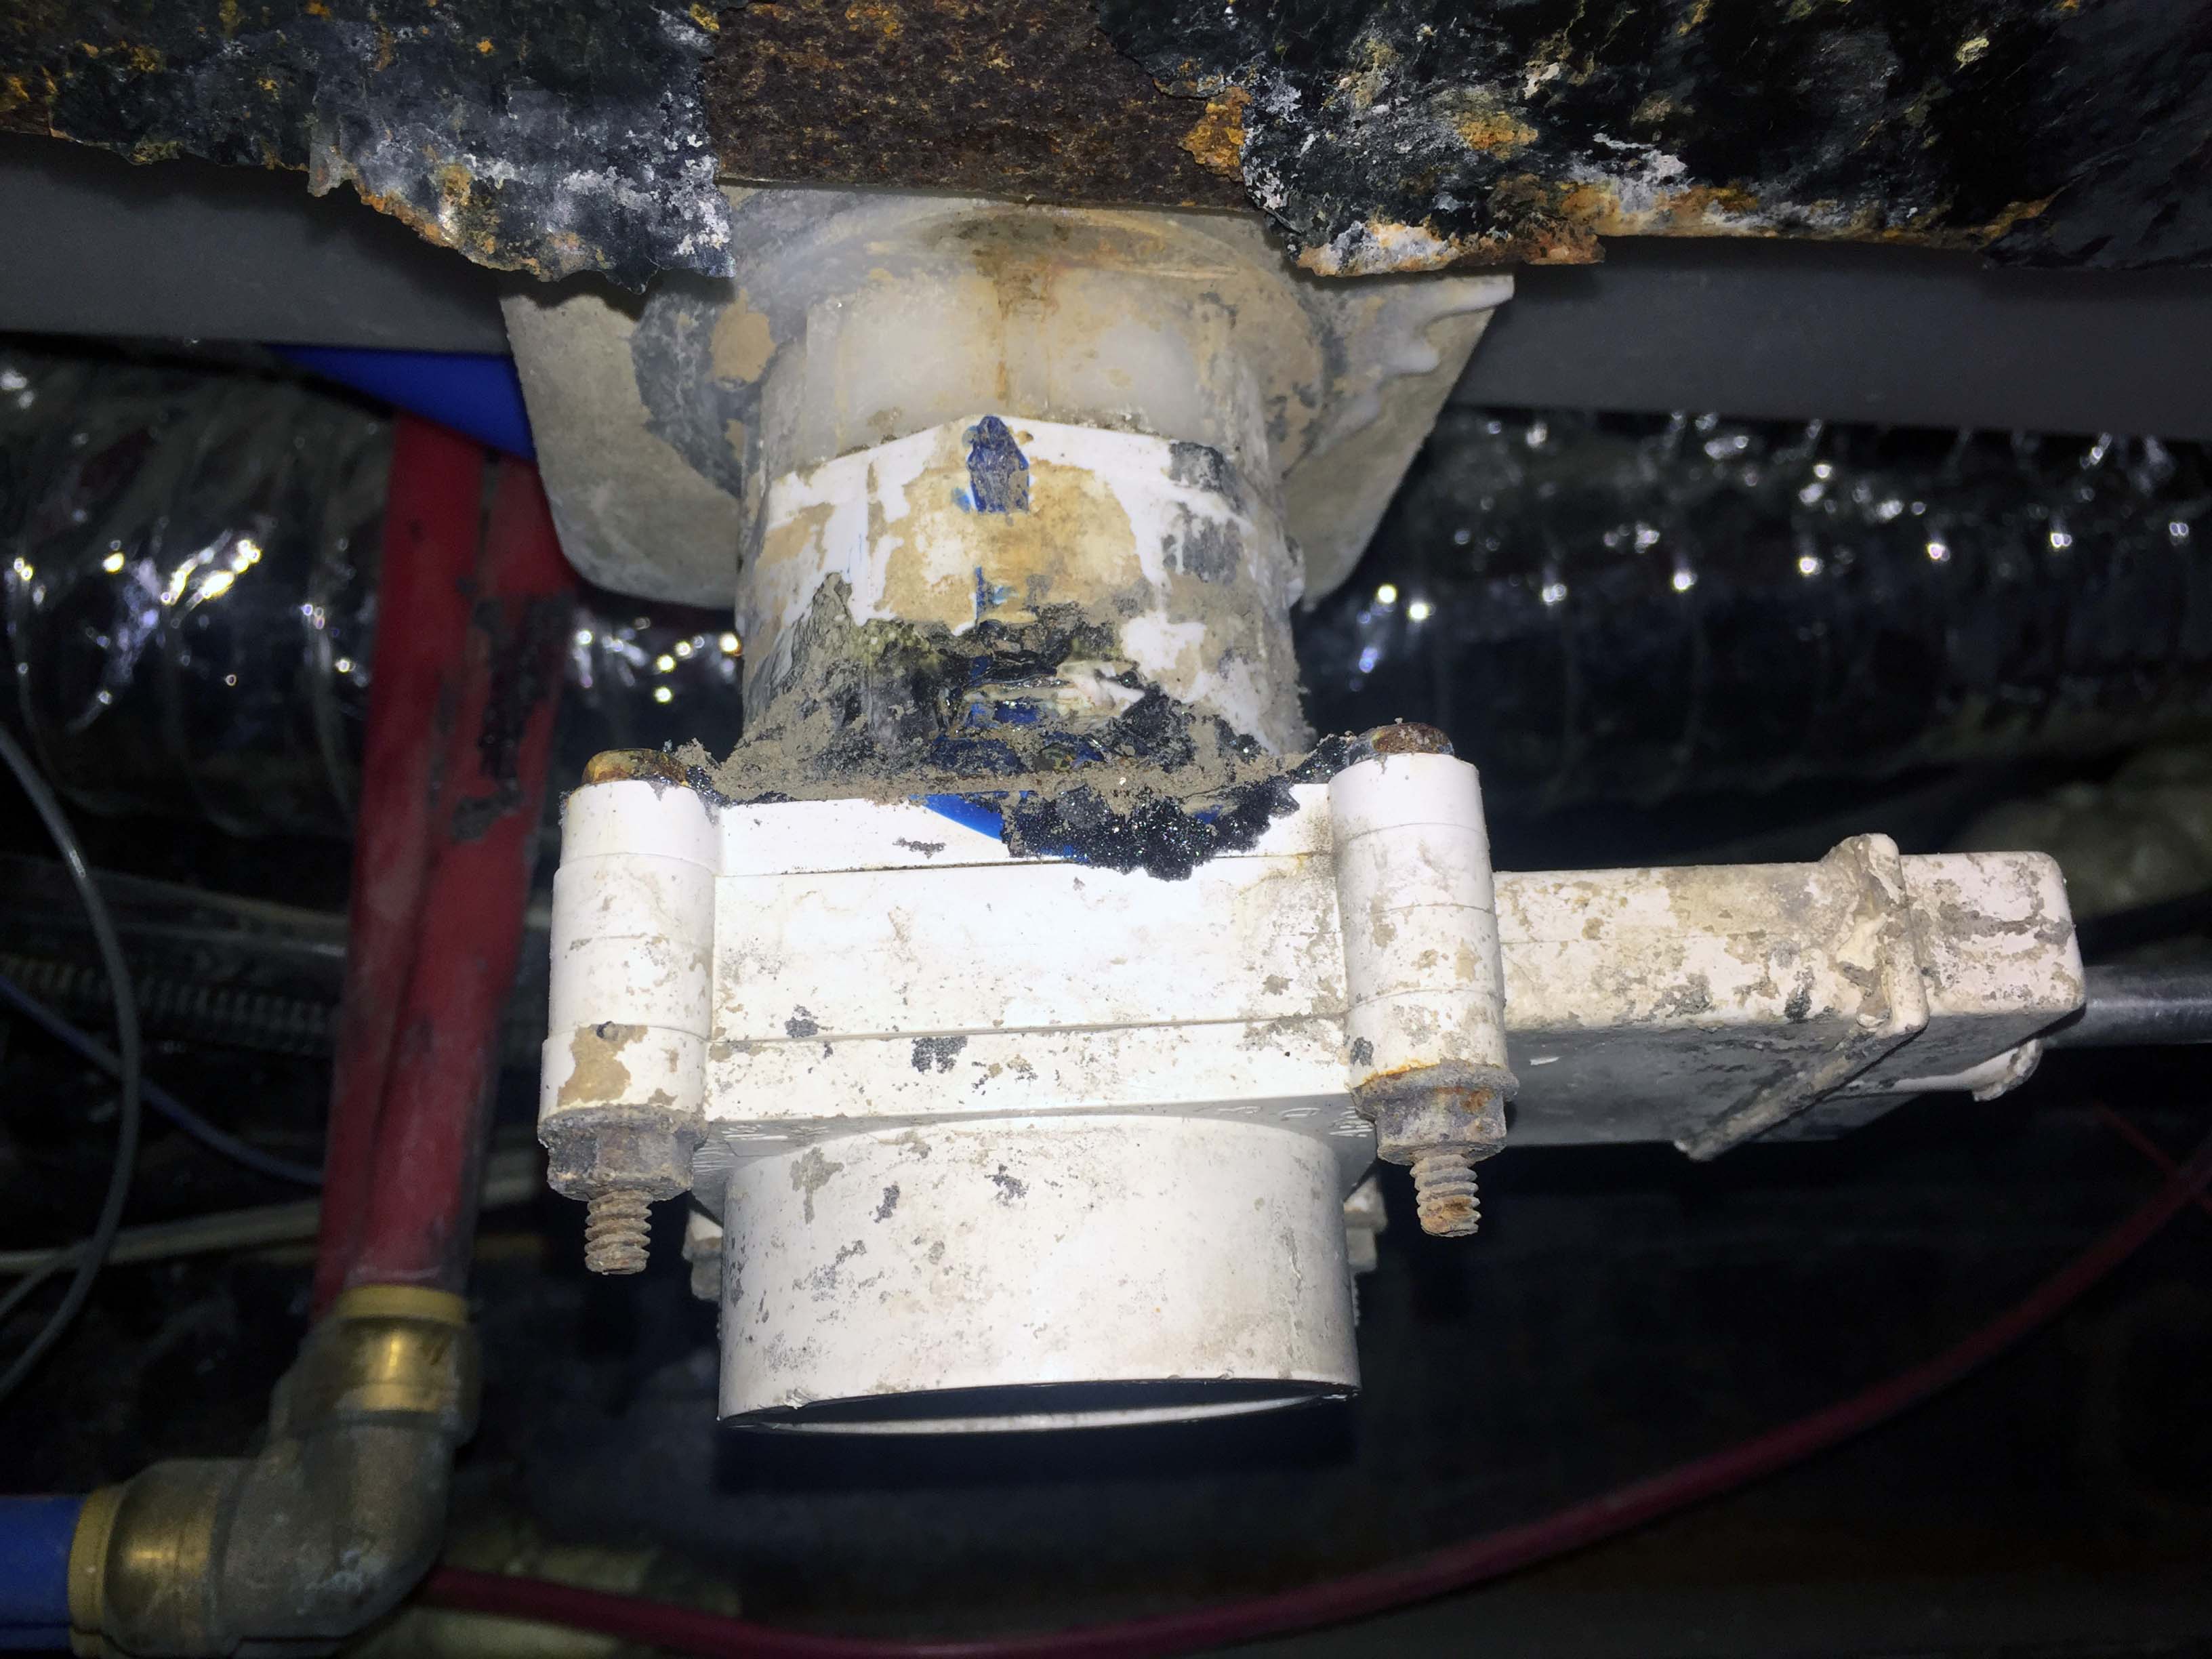
One of the things I wanted to take care of while we were sitting for a while and not working was a very minor leak where the inlet/outlet is on our fresh water tank. It’s been leaking since January 2015, but only when the fresh water tank had water in it, and only a very slow small dripping leak. Like less than a cup of water a week. And since we rarely use the fresh water tank it just kept getting put off. Right after I discovered the leak, I put a small hole in the belly pan so it would drip straight down and out and not pool in the belly pan, and then it just wasn’t a huge priority. I wanted to replace the belly pan, which was starting to sag in a few places. It also had numerous access holes from previous repairs cut in it and then taped back up, so I decided that while I had the belly pan off I would go ahead and do the leak, since it would be more accessible. And I wanted to change out the fresh water overfill vent valves, which I did a while back, but didn’t really like the end result. The first fix worked but still required getting under the rig.

I extended the vent lines and put in valves that were more accessible, but those were were designed for a toilet water supply line, and so the knobs kept falling off and were hard to turn. I wanted to replace those with ball valves that were easier to turn and the handles would stay put. Here’s the second fix I plan to replace in this project:

I also wanted to change out the fresh water low point drain valve. I don’t like to travel with very much fresh water for weight reasons, but the fresh water drain valve is a T handle pull valve which is on the driver’s side. The fresh water tank sits above the axles, and the handle is between the axles. So opening that valve involves crawling under the kitchen slide (if it’s out) and under the front axles, and pulling the valve. It’s a 1 1/2″ drain, which is awesome because it drains really fast.

Gotta crawl under here and back between the axles in order to get drenched.
On the down side, I am directly in the path when that water comes rushing out, so it’s impossible to do without getting soaked. And then crawling back under to close the valve involves getting into the water which has drained, unless I pull the rig forward. About a year ago I put on a handle extension rod which allowed me to NOT crawl under the front axle, but that really wasn’t a good solution.

This is after I put on the extension. A little better, but not much. This picture was with the belly pan removed.
And finally, I wanted to install a See Level tank monitor system that I bought almost a year ago. The tank monitors that come with a rig are terrible. The See Level gives you an accurate reading from outside the tank, so they don’t get fouled or clogged with material. The readout is a percentage of full, which is great for waste and gray tanks, and also for filling fresh water tanks. Much better than “EMPTY 1/3 2/3 FULL” With that measurement, and an 85 gallon tank, there’s a 25 gallon variance. Not useful.

So with all of these things piled up together, lots of time on my hands, really good weather, and a Home Depot and a Camping World within half an hour of where we were staying, I decided it was time to tackle it all.
To start with, I needed to remove the belly pan. For those who don’t know, the belly pan is usually made of 4mm thick Coroplast, which is essentially the same as corrugated cardboard, but is made of plastic instead of paper. Other thicknesses are available, but 4mm is the standard for this application.

Coroplast is really great stuff to be the first line of defense on the bottom of a rig. It’s tough and can withstand the abuse of road debris and rocks and other things thrown up under a rig. In addition, when you use screws to attach it to things, as long as you use a fender washer, it won’t tear. It plays nice with expanding foam and silicone sealant. It’s easy to work with because it flexes, and is easily cut with a razor knife. And it’s water proof. It’s the same stuff that “Custom Signs Today” type places use for signs. It’s also available in lots of colors, although lighter colors are cheaper and easier to get.

In just about any large community you can do a Google search for plastic suppliers and find a source for this stuff at very reasonable prices. The largest standard sheet is 4′ x 8′, which is nice because the frames of most rigs are generally under 8′ wide. If you can’t find a plastics supplier, you can get them from sign makers, but they generally don’t have more than a sheet or two in stock. Everyone I talked to could get me more within a day or two.
When our rig was built, the belly pan was put on as a single sheet that was cut to fit perfectly around everything on the bottom of the rig. It was attached with a mixture of self drilling scews and what looked like nails driven in with an air gun. Taking those off was not a big deal, although a few broke off and I needed to grind them down. I also did not need to remove the entire belly pan, just the back half, because the front half had nothing I needed access to, and it was in great shape as well. So that saved me some time and money. I ended up buying 3 4’x8′ sheets for $12 per sheet. I also bought a box of #10 3/4″ self tapping sheet metal screws and a box of 1 1/2″ #10 fender washers.
Laying on top of the belly pan as I removed it was a thick sheet of paper foil, which is a vapor barrier/insulation, but was pretty torn up from various access holes being cut over the years. My removal scheme consisted of cutting the pan in 2′ sheets to make it easier to deal with. Laying on my back under the rig and working up, I got a lot dust and debris in the face, so I needed to work with smaller pieces to mitigate that. That foil didn’t survive, but more on what I replaced it with later.
Once the belly pan was off, I was treated to a great view of my electric gray and black valves, which is one of the reasons access panels had been cut. (There’s no post about those, but you can read about them on the outside mod page. After four years, they are my all time favorite purchase!) I am such a fan that I am going to post a link here to a short video from etrailer showing how they work. They’re amazing.
I was also able to see the actual gray tank and black tank, which I had never seen before. It’s nice to now know exactly where they are, and where the outlets are. The black tank is on the passenger side, and the gray tank is on the driver side. The outlets for both are in the rear, so if I ever want to completely drain them, I just need to lift the nose a little. Here you can see the wiring and through-tank connectors for the existing horrible “sensor” system along with a small piece of wood supporting the electric valve on the black tank.

And here’s the wiring and connectors for the gray tank sensors. The great thing about the See Level system is that it uses existing wiring, so there’s no need to run any wires at all.

I was also able to get a much better view of the fresh water drain valve, and started to work out a plan on how to extend and relocate the drain, and a possible solution to the valve problem.
But then I looked at the actual fresh water tank, and saw this….
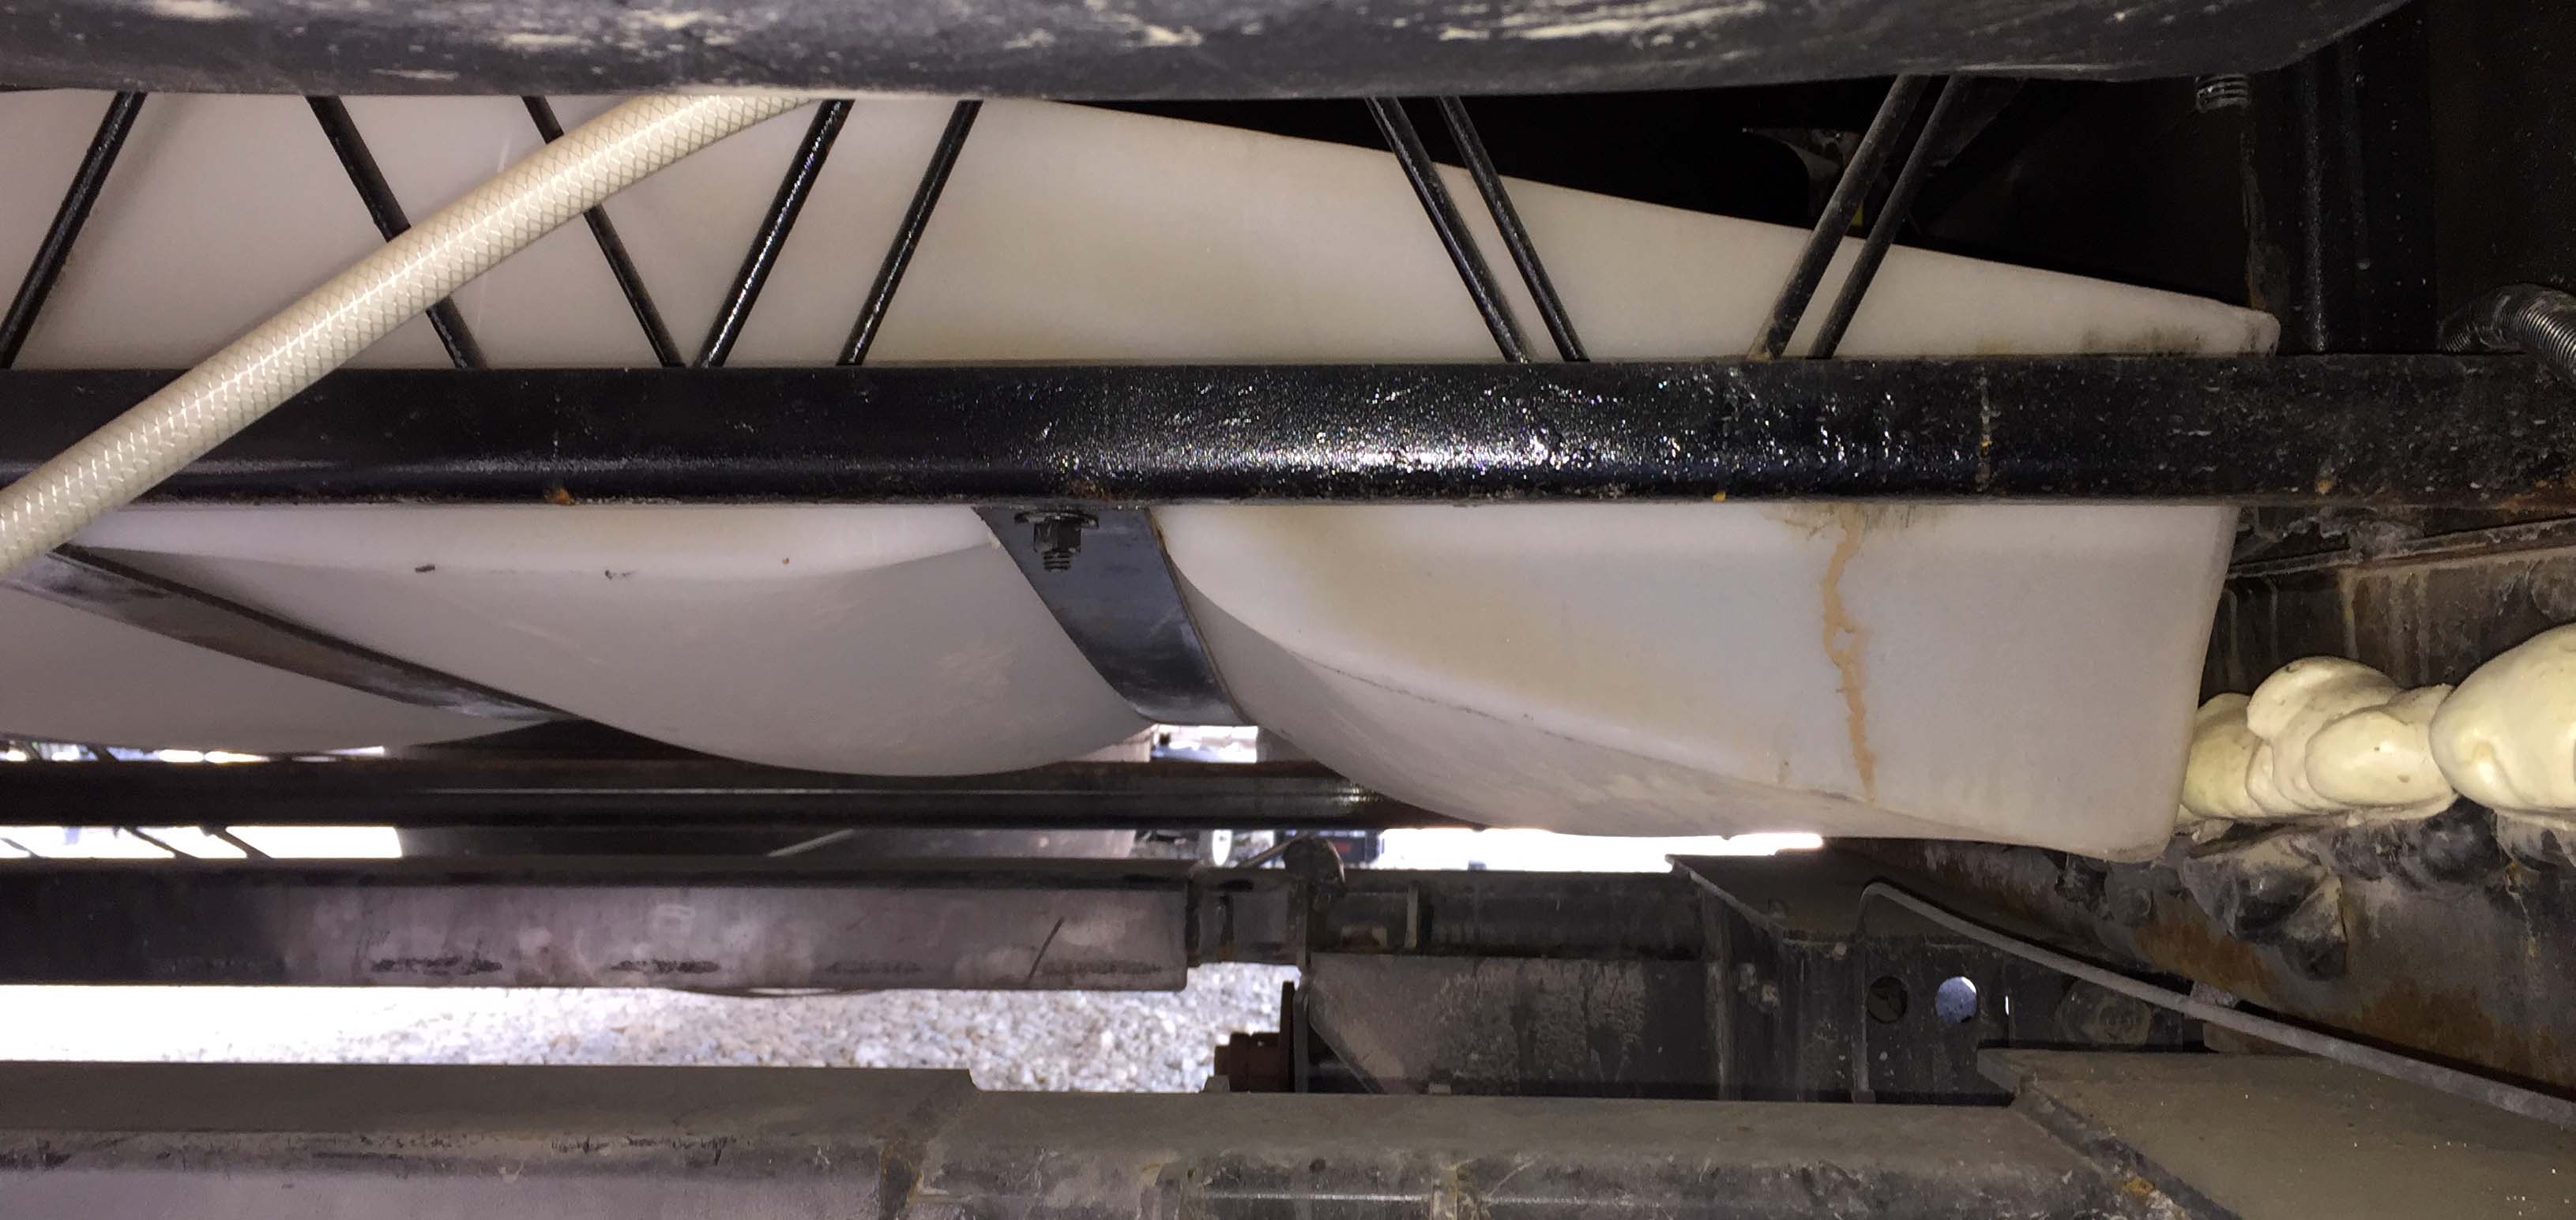
As you can see, the fresh water tank is hanging from 2″ wide steel straps, and rather than put a strap all the way at the end to support the passenger side edge of the tank, they just didn’t. That’s an 85 gallon tank, and there are 4 straps. So each one of those straps is supporting a point load of about 150 lbs. The tank is made of polyethylene, and is a very pliable material. With all that weight on such a small area, it’s not at all surprising that the tank is bowing and sagging between the straps, and on the end with no strap, it’s completely failing. On the other side, where the drain valve is, there is a strap. I just don’t understand why the manufacturer decided not to put a strap on the other end. There is over a foot of unsupported tank, about 140 lbs of water, on the far side of that strap. I’m actually surprised it didn’t fail completely. Here’s a closeup of the “wrinkle” in the plastic where it was folding over the strap. The plastic actually had already started to settle back to it’s normal shape once the pressure was off, but you can see where the strap was, and how close it came to cracking the plastic.

Oh, and it gets better. While I was taking off that section of belly pan, I got hit in the face with a nut and a washer. Once I got everything clear, I could see where it came from…

Yup. One of the straps wasn’t even attached on one side. (You can also see where I cut the belly pan to remove it, and parts of the insulation/vapor barrier foil)
Here are a few other pics of the fresh tank from various angles. Try not get as mad as I did, but consider taking a peek at your own to make sure you don’t leave it on the highway one day. We actually know a couple who lost their fresh water tank while they were driving one day and didn’t even know it was gone until they stopped for the night. True story. – Trace

In the upper left of this picture is the hose that comes from the hookup center and runs to the black tank to rinse out the black tank. I’ve always wondered where that water comes in to the tank, now I know it’s at the front of the tank, directly opposite the drain, so the rinse water travels all the way across the tank.

This is the left or driver side of the fresh tank, you can see where the first strap is right at the drain valve.

This shows how much sagging there is in the tank, and how much bowing there is of the straps. This view is actually what helped me decide how to fix this!
With this discovery, the project got a little more complicated, but luckily I had time, stores nearby, and plenty of motivation to get it done. Before I tackled the fresh water tank, I starting working on the inlet/outlet fitting for the fresh tank, which was my original problem. I didn’t get a picture of the fitting before I took it off because I was pretty preoccupied thinking about how to fix the strap problem. Once I finally decided to cut the Pex line and turn out the fitting I did get a picture of it. That was a very tough decision because the fitting is for both filling the tank and the pump to pull the water out. I couldn’t see if it was a standard fitting that screws in, or if it was a spin weld. If I removed it and was unable to get a new fitting, I would be unable to use the fresh water tank. Since we were waiting to hear about a gate, I could get a call any minute, so I was nervous to commit to something that I might not be able to finish if I had to wait for a part. Finally, with Greg and Bill both assuring me they thought it would be a standard fitting, and even if not I could always get one next day. Since I wasn’t 100% sure it wasn’t a spin weld, I decided to cut the Pex line a good 8″ away from the fitting so if it was a spin weld I could just use a coupler fitting and go back to the way things were until I could get it into a place that could deal with a spin weld.
Luckily, it was just a threaded fitting, so it came out easily. Here’s the culprit. The leak was in the crimp, which are a terrible way to connect Pex. Hose clamps or Sharkbite or other push fittings are much better than these junky crimps. I’ve had several of these fail already.
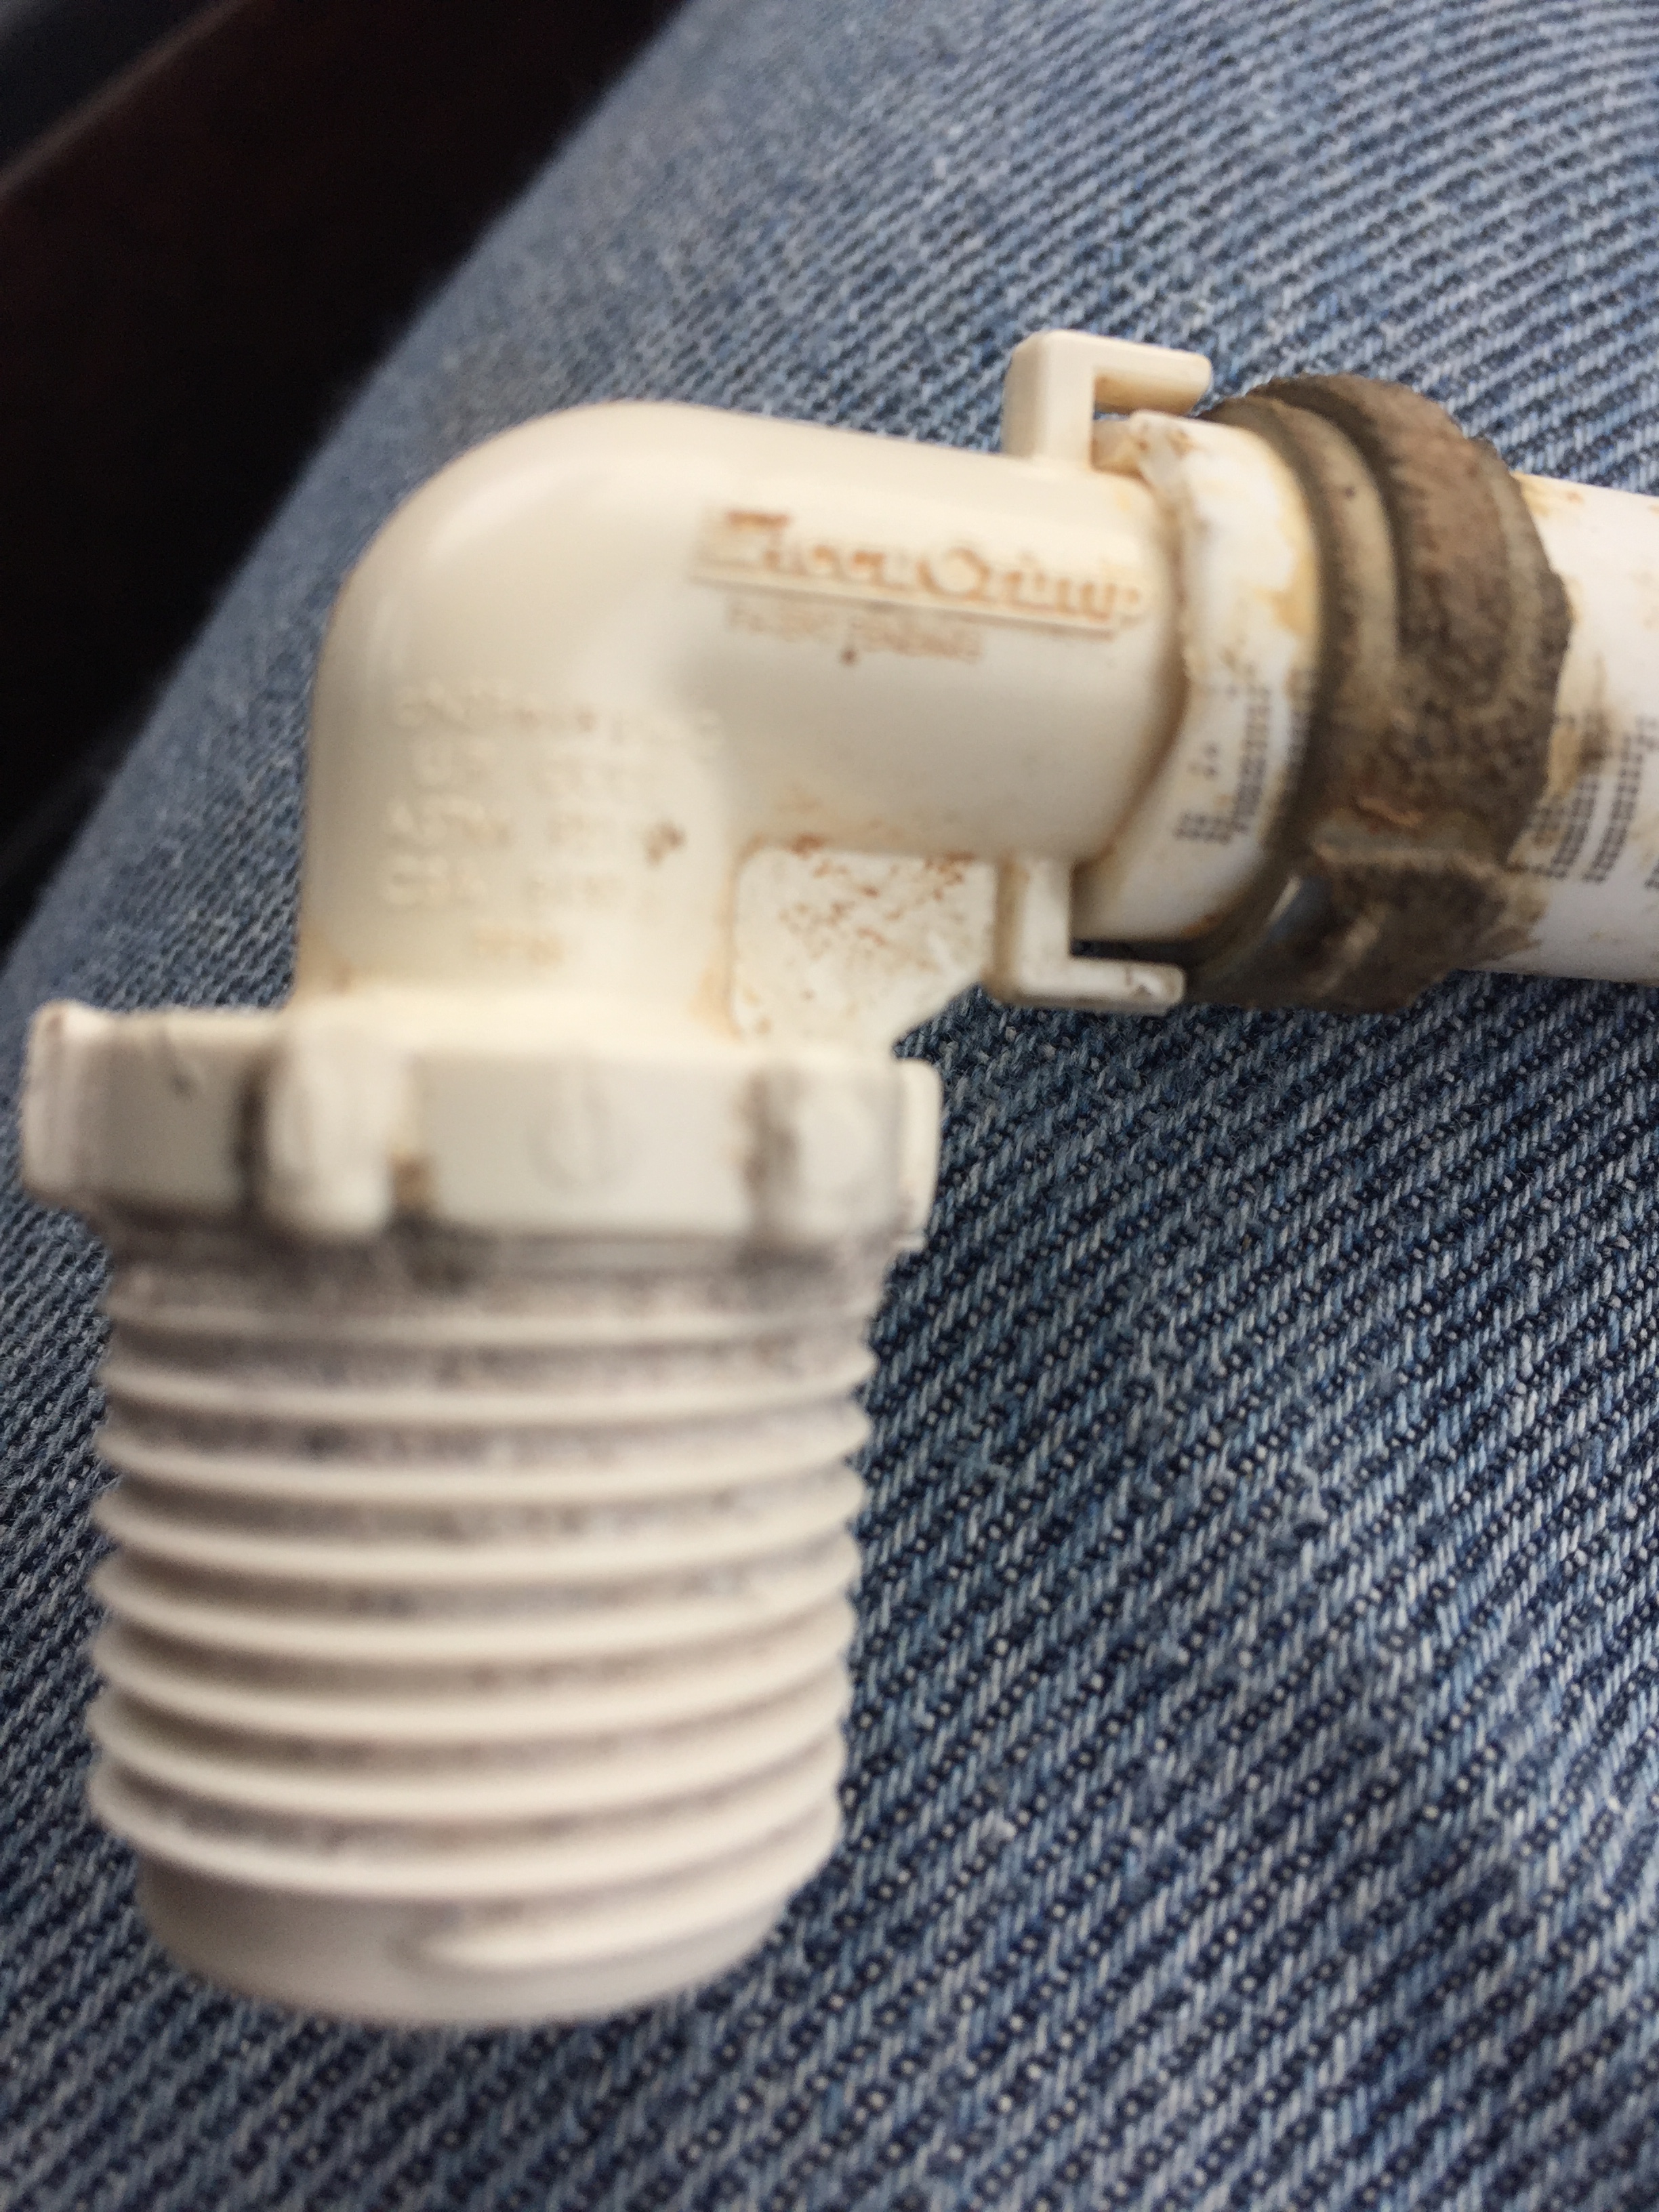
It tuned out to be a part I could get at Home Depot, although it was only available in copper, so a little plumbers tape and the first repair was complete.

I had to add some Pex because I cut it so far from the fitting, and I decided to add some more to move the coupler away from where the See Level sensor would be mounted. They don’t work well if there’s metal within 4″ or so of them.

And again I used copper Sharkbite fittings, because Greg told me to. He’s pretty smart, so I listened to him.
Having replaced that, I needed to leak test it by putting some water in, and then I would need to drain the water to fix the fresh water tank straps. I didn’t want to fix the tank straps and then find out I needed to redo the fitting, because the tank strap fix would make getting to the fitting difficult. It would also make it difficult to install the See Level sensors, so as much as I hated to start mixing up projects, I decided to install the See Level sensors and go from there. Which was fine, because that was one of the fun things involved in this project.
So coming up next, installing and testing the See Level system!
Camper Chronicles is a participant in the Amazon Services LLC Associates Program, a program designed to provide a means for sites to earn advertising fees by advertising and linking to amazon.com. We very much appreciate any purchase you make via our website links. There is no additional cost to you and helps support our blog. Search Amazon.com here

Or you can check out our recipe book filled with 80 real recipes we have cooked in our RV and taste tested by Lee himself. The cookbook specializes in recipes that have a limited number of ingredients, without sacrificing flavor and is organized into categories that matter to full time RVers such as Happy Hours, Travel Days, and Pot Lucks You can preview the kindle version on Amazon


yikes, hate seeing things built like that when trying to do asimple fix…
Can I ask where you purchased the belly material?
Allied Plastic Supply, 4903 Center Park Blvd, San Antonio, TX 78218, (210) 655-2415
So glad you found all that before you left your tank on the road! I just said to Bill – maybe he should check ours! I had no idea you had all that going on!
Yeah it was crazy. He kept telling me but honestly until I read it I don’t think I got it either. Except for the bulging water tank. That I definitely saw.
Proof that you can’t take anything for granted on a home on wheels. Especially the stuff you can’t see without digging around. Great report.
Great stuff, Lee. Not sure why the manufacturer didn’t use downward facing angle iron, instead of straps. Wait…yes I do: cost.
😄