
Written by Lee
For those of us who aren’t fortunate enough to be somewhere with a reasonable temperature and a comfortable humidity, an AC or two (or in some cases even three!) are a blessing. I know that for me they are an absolute requirement. They are also NOISY. I love the fact that the one in our bedroom is loud, because it makes excellent white noise which helps both of us sleep. In our rig, the bedroom is in the back and the AC is only 44″ from the bed, and when we run it with the AC blower set to “high”, which is always, the dB level is a whopping 68 dB. For reference, that’s about the equivalent of a food mixer. By comparison, when it’s NOT running, the room measures around 35, which is the same as a quiet library.
Our other AC is in the kitchen, but all the way at the end, so it’s right next to the living room. That puts it just a little off to the side of the chair I sit in to watch TV and movies, and it’s also pretty loud. It’s much higher, at 98″, and it measures at 68 dB as well. With the temperatures being 100° more or less every day in the San Antonio area for the the past month or so, I decided to do some poking around to see what I could do to help reduce the noise.

There are a variety of things that can contribute to why an AC is louder than it needs to be. Here are some things to check first:
Is it loose?
If the AC is not secured well, it can vibrate, and that can really make the noise louder. Check the mounting bolts to make sure they’re tight.
Are the seals/gaskets bad?
If it’s a much older unit, the rubber seal between your rig and the AC might be bad, and the rubber could have hardened, again causing vibration.
Is the fan out-of-balance?
An out-of-balance fan can make a ton of noise.
Is the airflow restricted?
Take off the inside cover and filter and look around inside the chamber. Anything that is in the way of the air flow can add noise as the air rushes past it. Try using zip ties to bundle wires together and secure them off to the side away from the air flow. You can also use furnace tape to secure anything and create a smooth surface for air to flow over.
If you’ve done all the inspecting and everything you can to make sure that it’s not making more noise than it’s supposed to, and you still want to it to be quieter, you can either buy an AC “silencer kit” or make one yourself. I took a look at the pre-made kit and decided that it was way too much money for a big piece of plastic, and decided to try making my own. For those with money to burn, who don’t want to, or can’t make one, here’s a link to the manufacturer:
Before we go any further, I want to point out that both the commercial product above, and my version are designed to work with AC units that have the “standard” interior ceiling cover that consists of a grill that has holes or slots for air intake, and in some cases a “dump” valve. A dump valve allows you to “dump” all of the cold air directly from the AC unit straight down and out into the room, as opposed to directing that cold air throughout your rig via ductwork. I also want to mention that the “Wacko Products” version removes the option of using the dump valve, but my mod does not. You can still use the dump valve with my version.
The commercial version essentially works by offsetting the air intake to the side by about 50%, reducing the open area, and adding some noise dampening material. It seems to look pretty nice and there are plenty of people out there who have made videos and reviewed it. I have not owned one or tested it, so I cannot endorse it. You should thoroughly research it before you spend the money. Do some Google searches and watch some videos and definitely read reviews. It’s a pretty good chunk of money to spend to not be happy with the end result.
(We started with the idea of buying one and when Lee showed me the video I personally didn’t think the noise reduction in the video was worth $189. Of course I don’t sit in that particular seat and the AC noise is much less of a problem where I do sit. If Lee really wanted it of course we would have tried it, but I love when he puts his MacGyver skills in action. – Trace)
If you’re comfortable tinkering and want to try making one of your own, here’s my frugal version. It really not at all complicated, and also relatively inexpensive.
Here’s a material list. I measured the interior AC cover and added an inch or so on each side for the dimensions.
$ 14.88 – 8′ primed 1″x 4″
$ 9.41 – 2′ x 4′ luan
$ 21.56 – 4′ x 8′ white polywall panel (in the paneling section, and matches most ceilings in rigs. It’s the most expensive part of the project, so you could just use the luan and paint or stain it)
$ 4.69 – 2 2″ hinges
$ 1.79 – magnetic catch
$ 7.88 – furnace tape
$ 8.98 – white gorilla tape (if you don’t have gaff tape. Why don’t you have gaff tape? I have been telling you to get some for years.)
$ 13.56 – 1″ x 1″ poly outside corner molding
$ 11.94 – 4′ x 8′ x 1/2″ foam insulation board (I used some leftover carpet padding, you can use almost any sound dampening material)
If you don’t have any of the materials, and you have to buy everything it will cost $95. If you want to be more frugal, you can skip the metal tape/gorilla tape and use duct tape. You can also skip the poly wall sheet and use some old rolled up t-shirts or other fabric as the sound insulation. Those changes will lower the cost to less than $50.
I chose these materials after making a “proof of concept version” with what was lying around, and decided that instead of something that would need to be stained or painted and color match I would just go with white and hope that it would blend in.
(The “proof of concept” was heavy, clunky and pretty ugly. As much as I appreciated the initiative, I really didn’t like the way it looked. Lee quickly reassured me that the final version would be lighter and prettier which it was. – Trace)
The construction is very simple, it’s just three sides of the 1″ x 4″ assembled with finish nails and then I added a 1″ x 1 1/2″ piece which as you can see leaves an opening for air to enter.

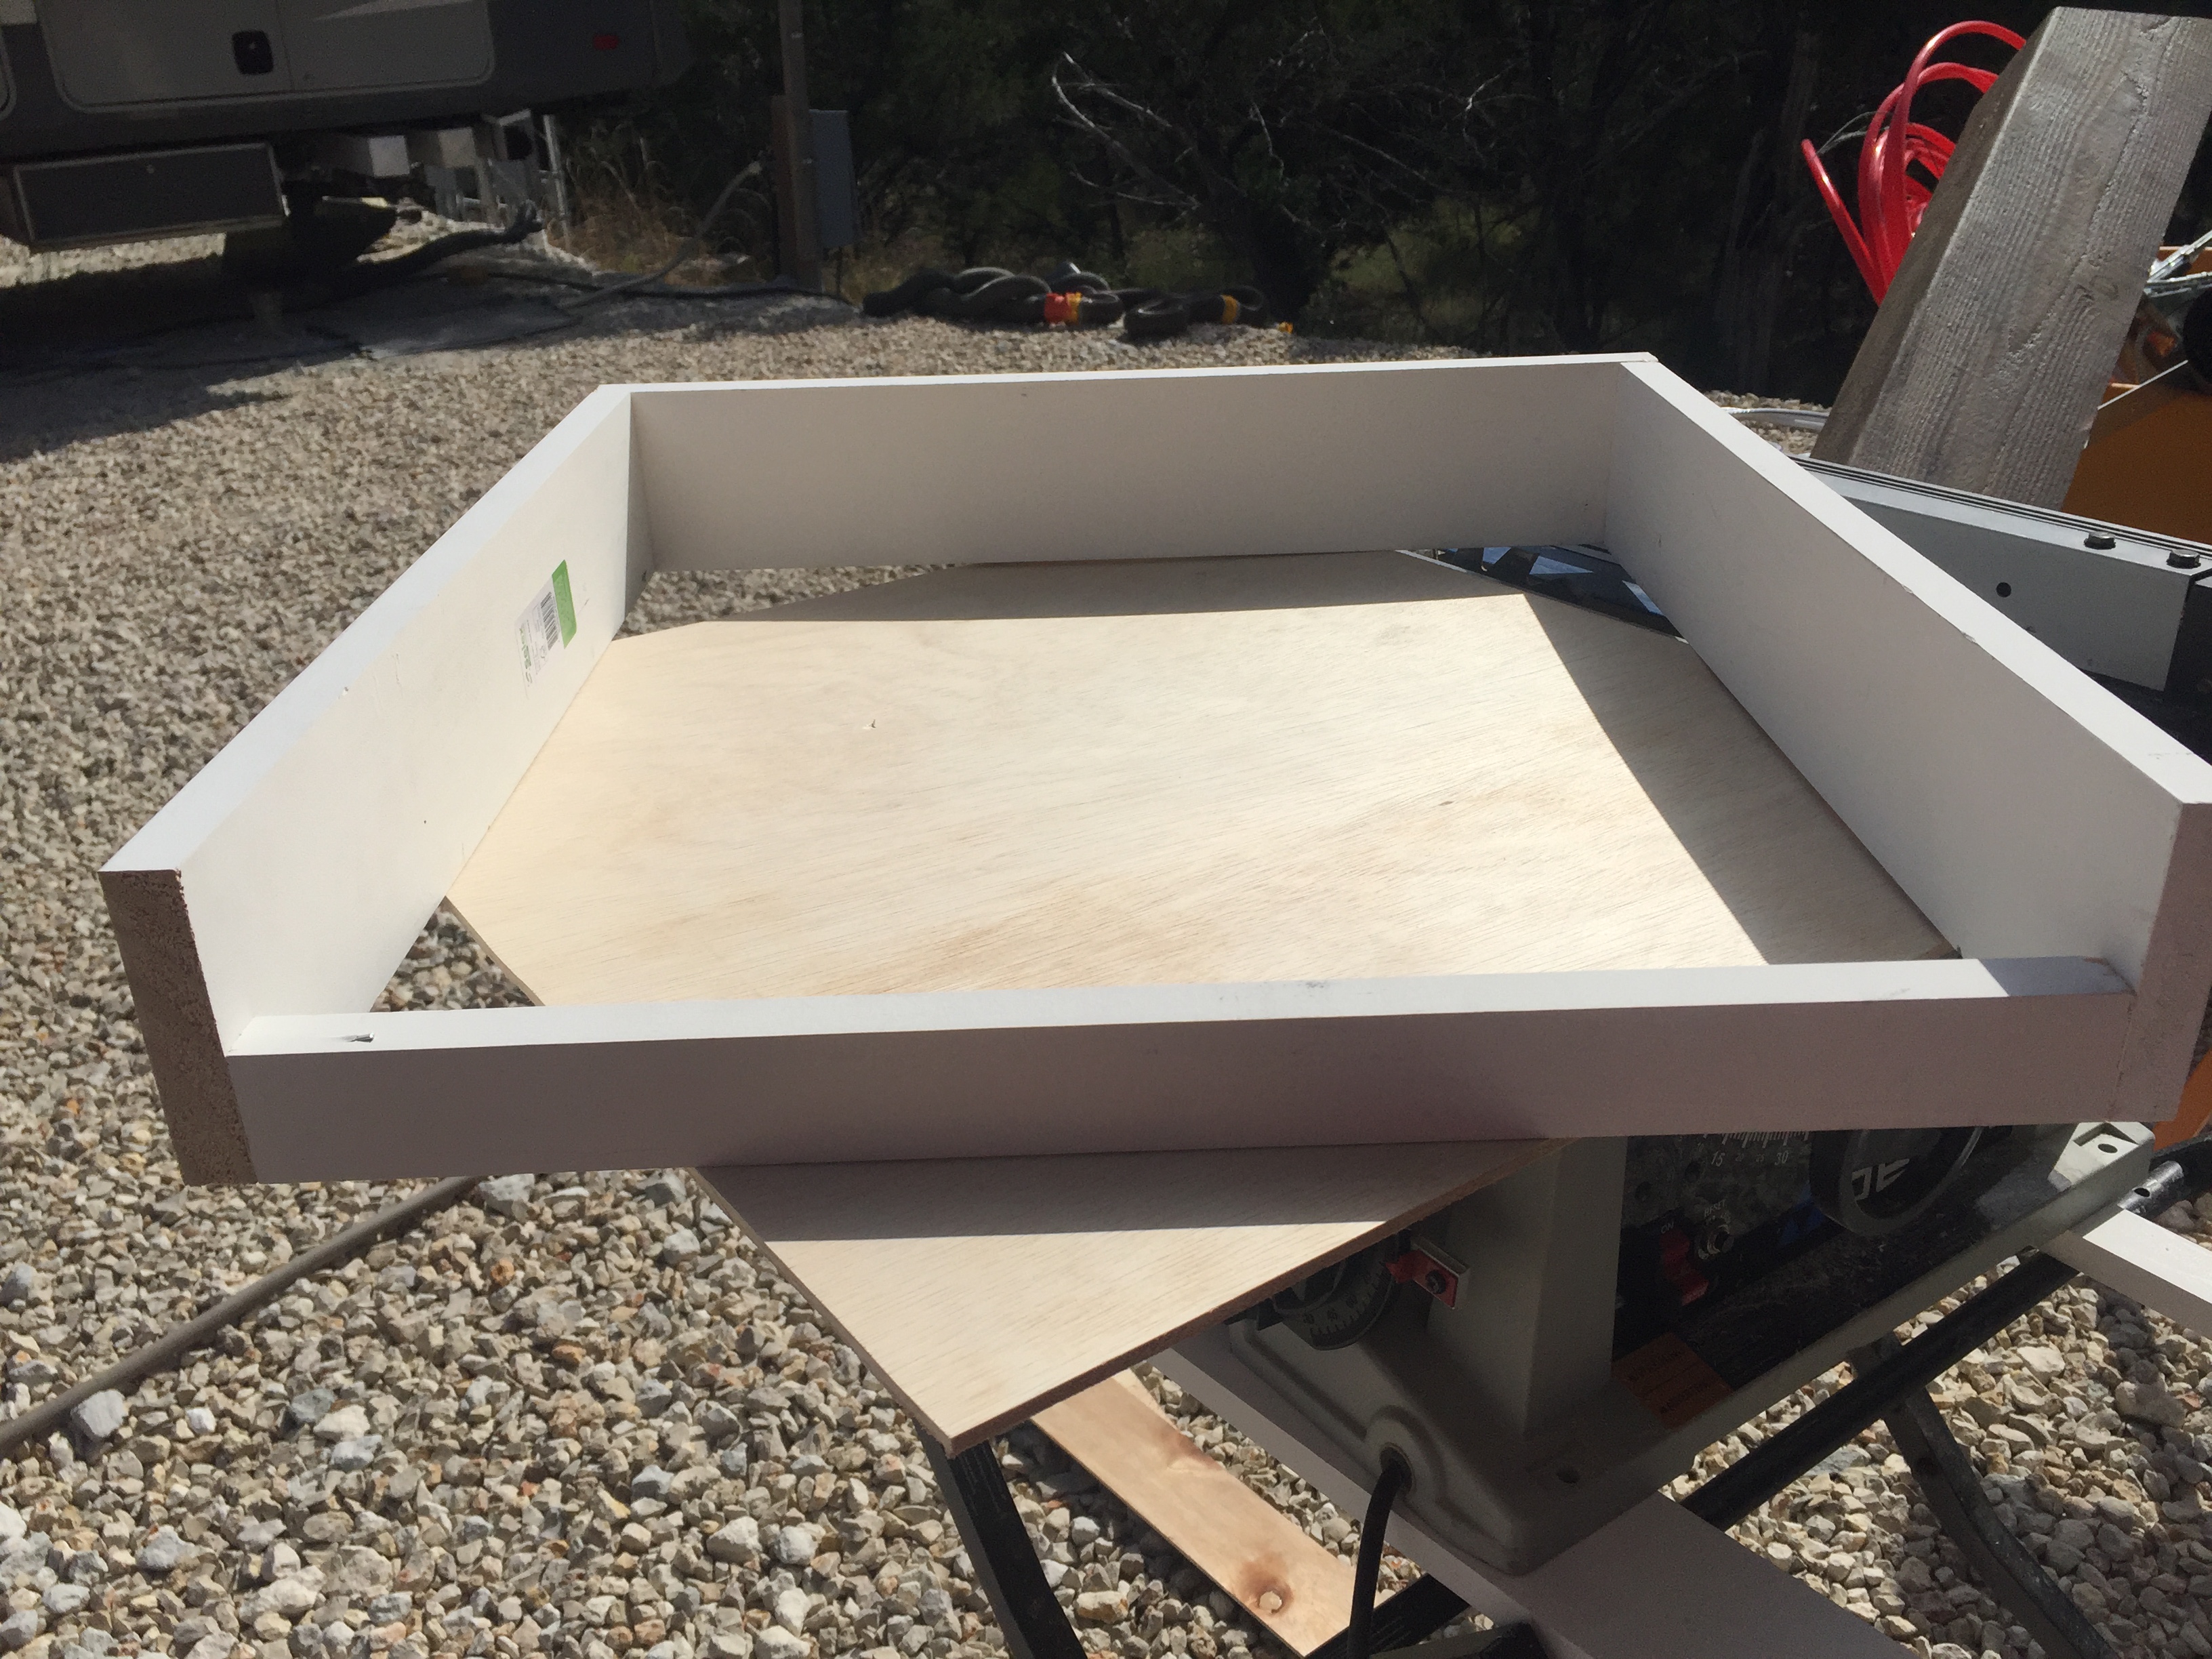
Then I attached the sheet of luan, added the layer of textured plastic sheeting and miter cut the corner trim.

I flipped it over and added three layers of 1/2″ carpet padding. The white area you see at the bottom is the white Gaff tape. I wanted to use that instead of the metal furnace tape at the entrance because I wanted to see if the rough texture of the gaff will “catch” any airborne particles before they hit the grill and filter. I thought maybe the smoother furnace tape wouldn’t catch them. I don’t think it matters what you use, as long as it holds the material in place. You could also use pretty much any sound dampening material inside. I used carpet padding because I already had it, but you could use foam, towels, blankets, insulation, anything that will absorb and dampen sound. You can also see the metal magnetic catch in the lower right corner.
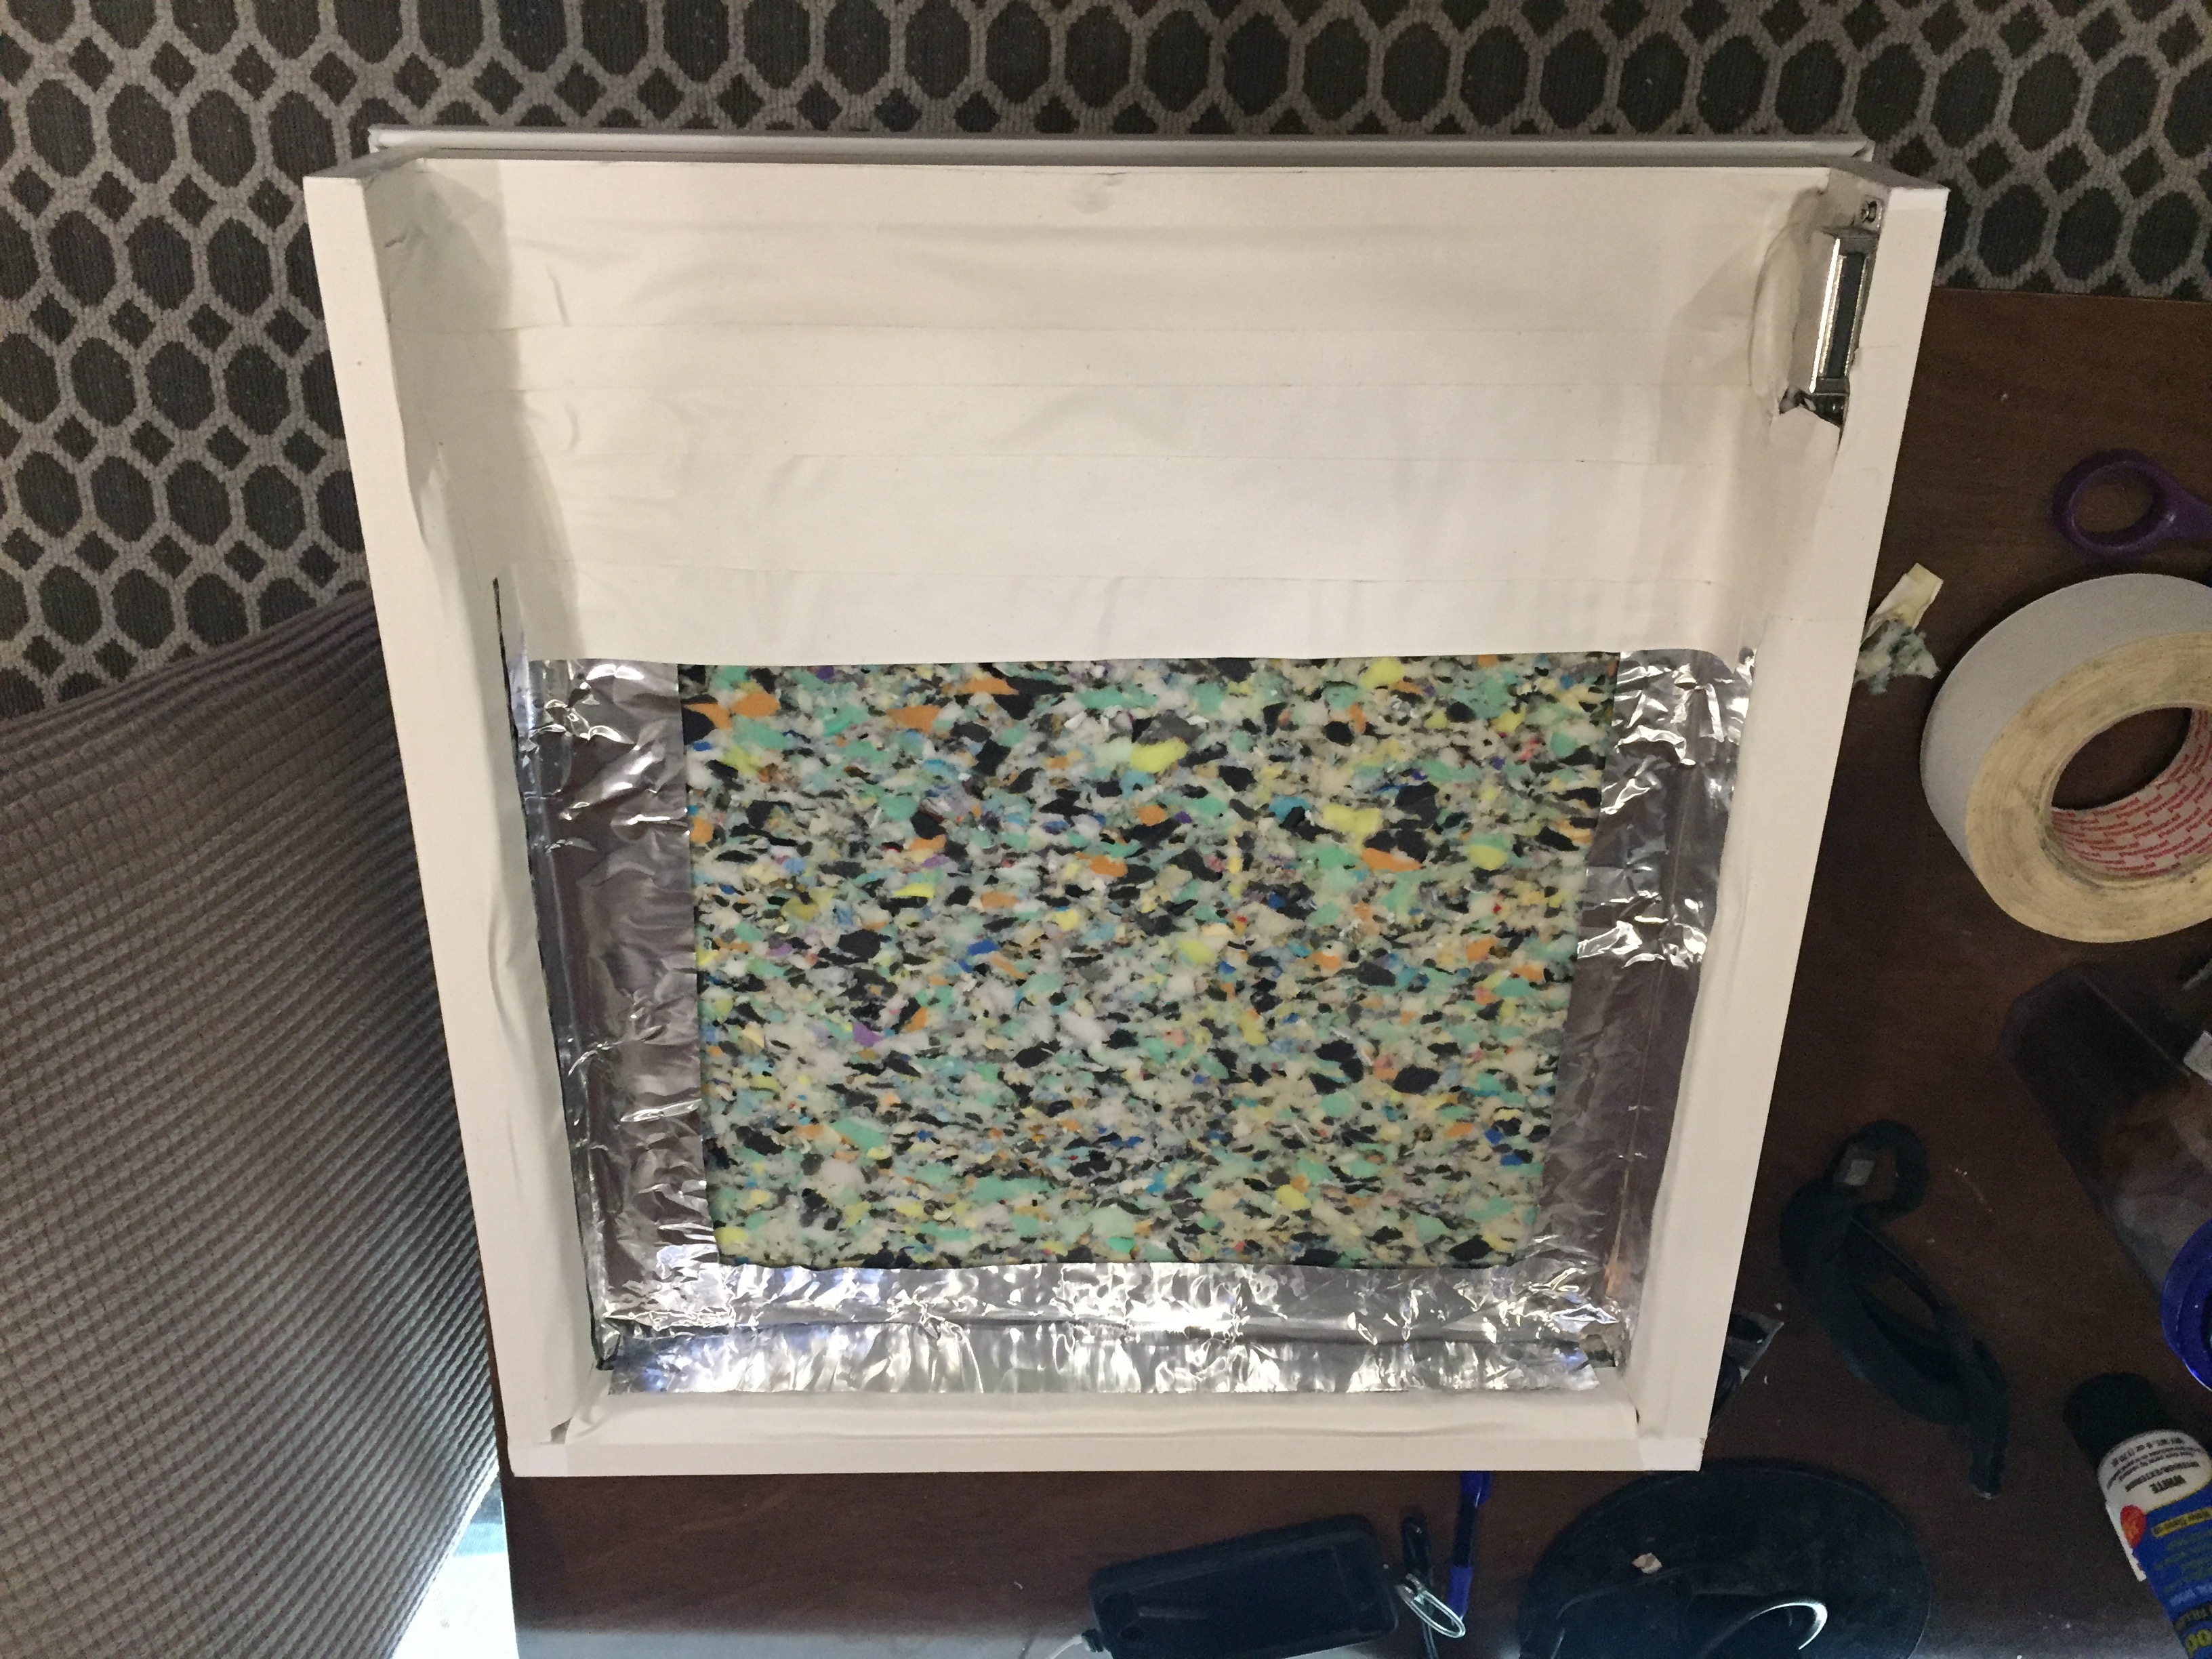
Once it was all set I added the hinges.


Then I hung it up. Most rigs will have some wood framing around the AC hole in the ceiling, but check to be sure, otherwise the screws will just fall out of the thin paneling of the ceiling. Also be sure to avoid hitting any wiring with the screws. Use the shortest screws you can, and make sure you’re going into wood and that will keep you out of trouble with the wiring.
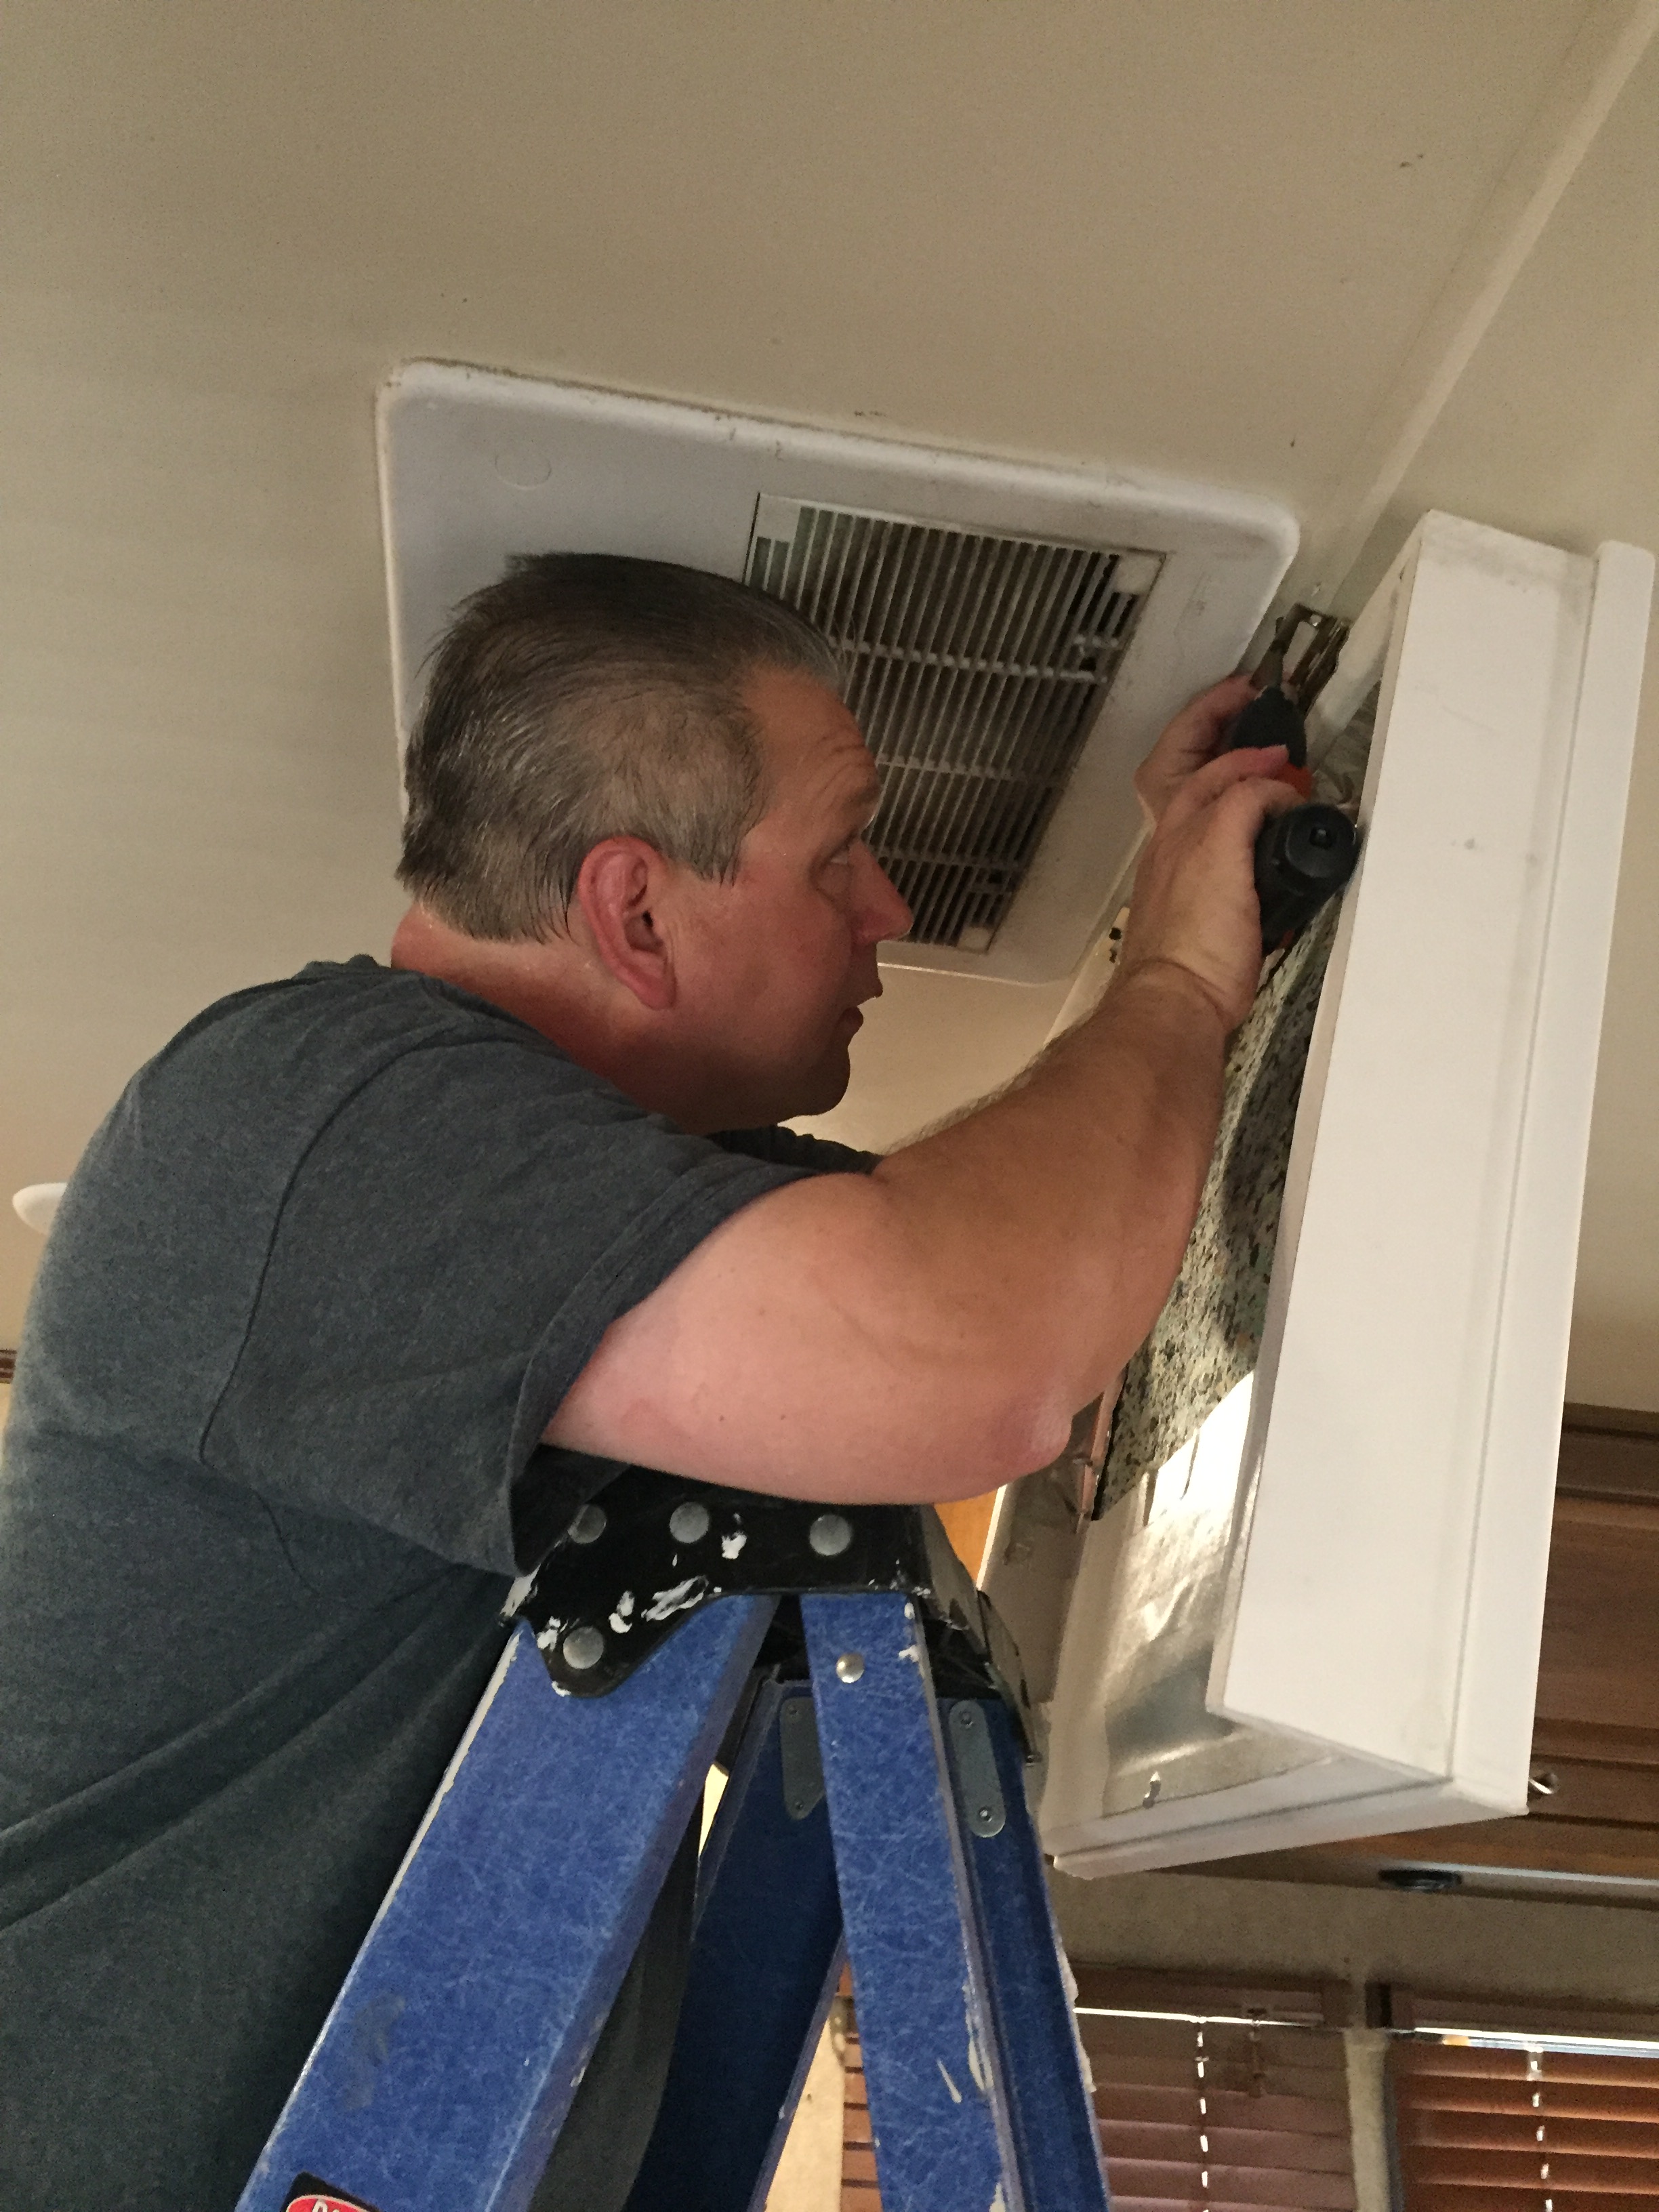

Finally it was just a matter of attaching the metal plate to the ceiling for the magnetic catch, and swinging the box up on the hinges and letting the magnet hold it in place.
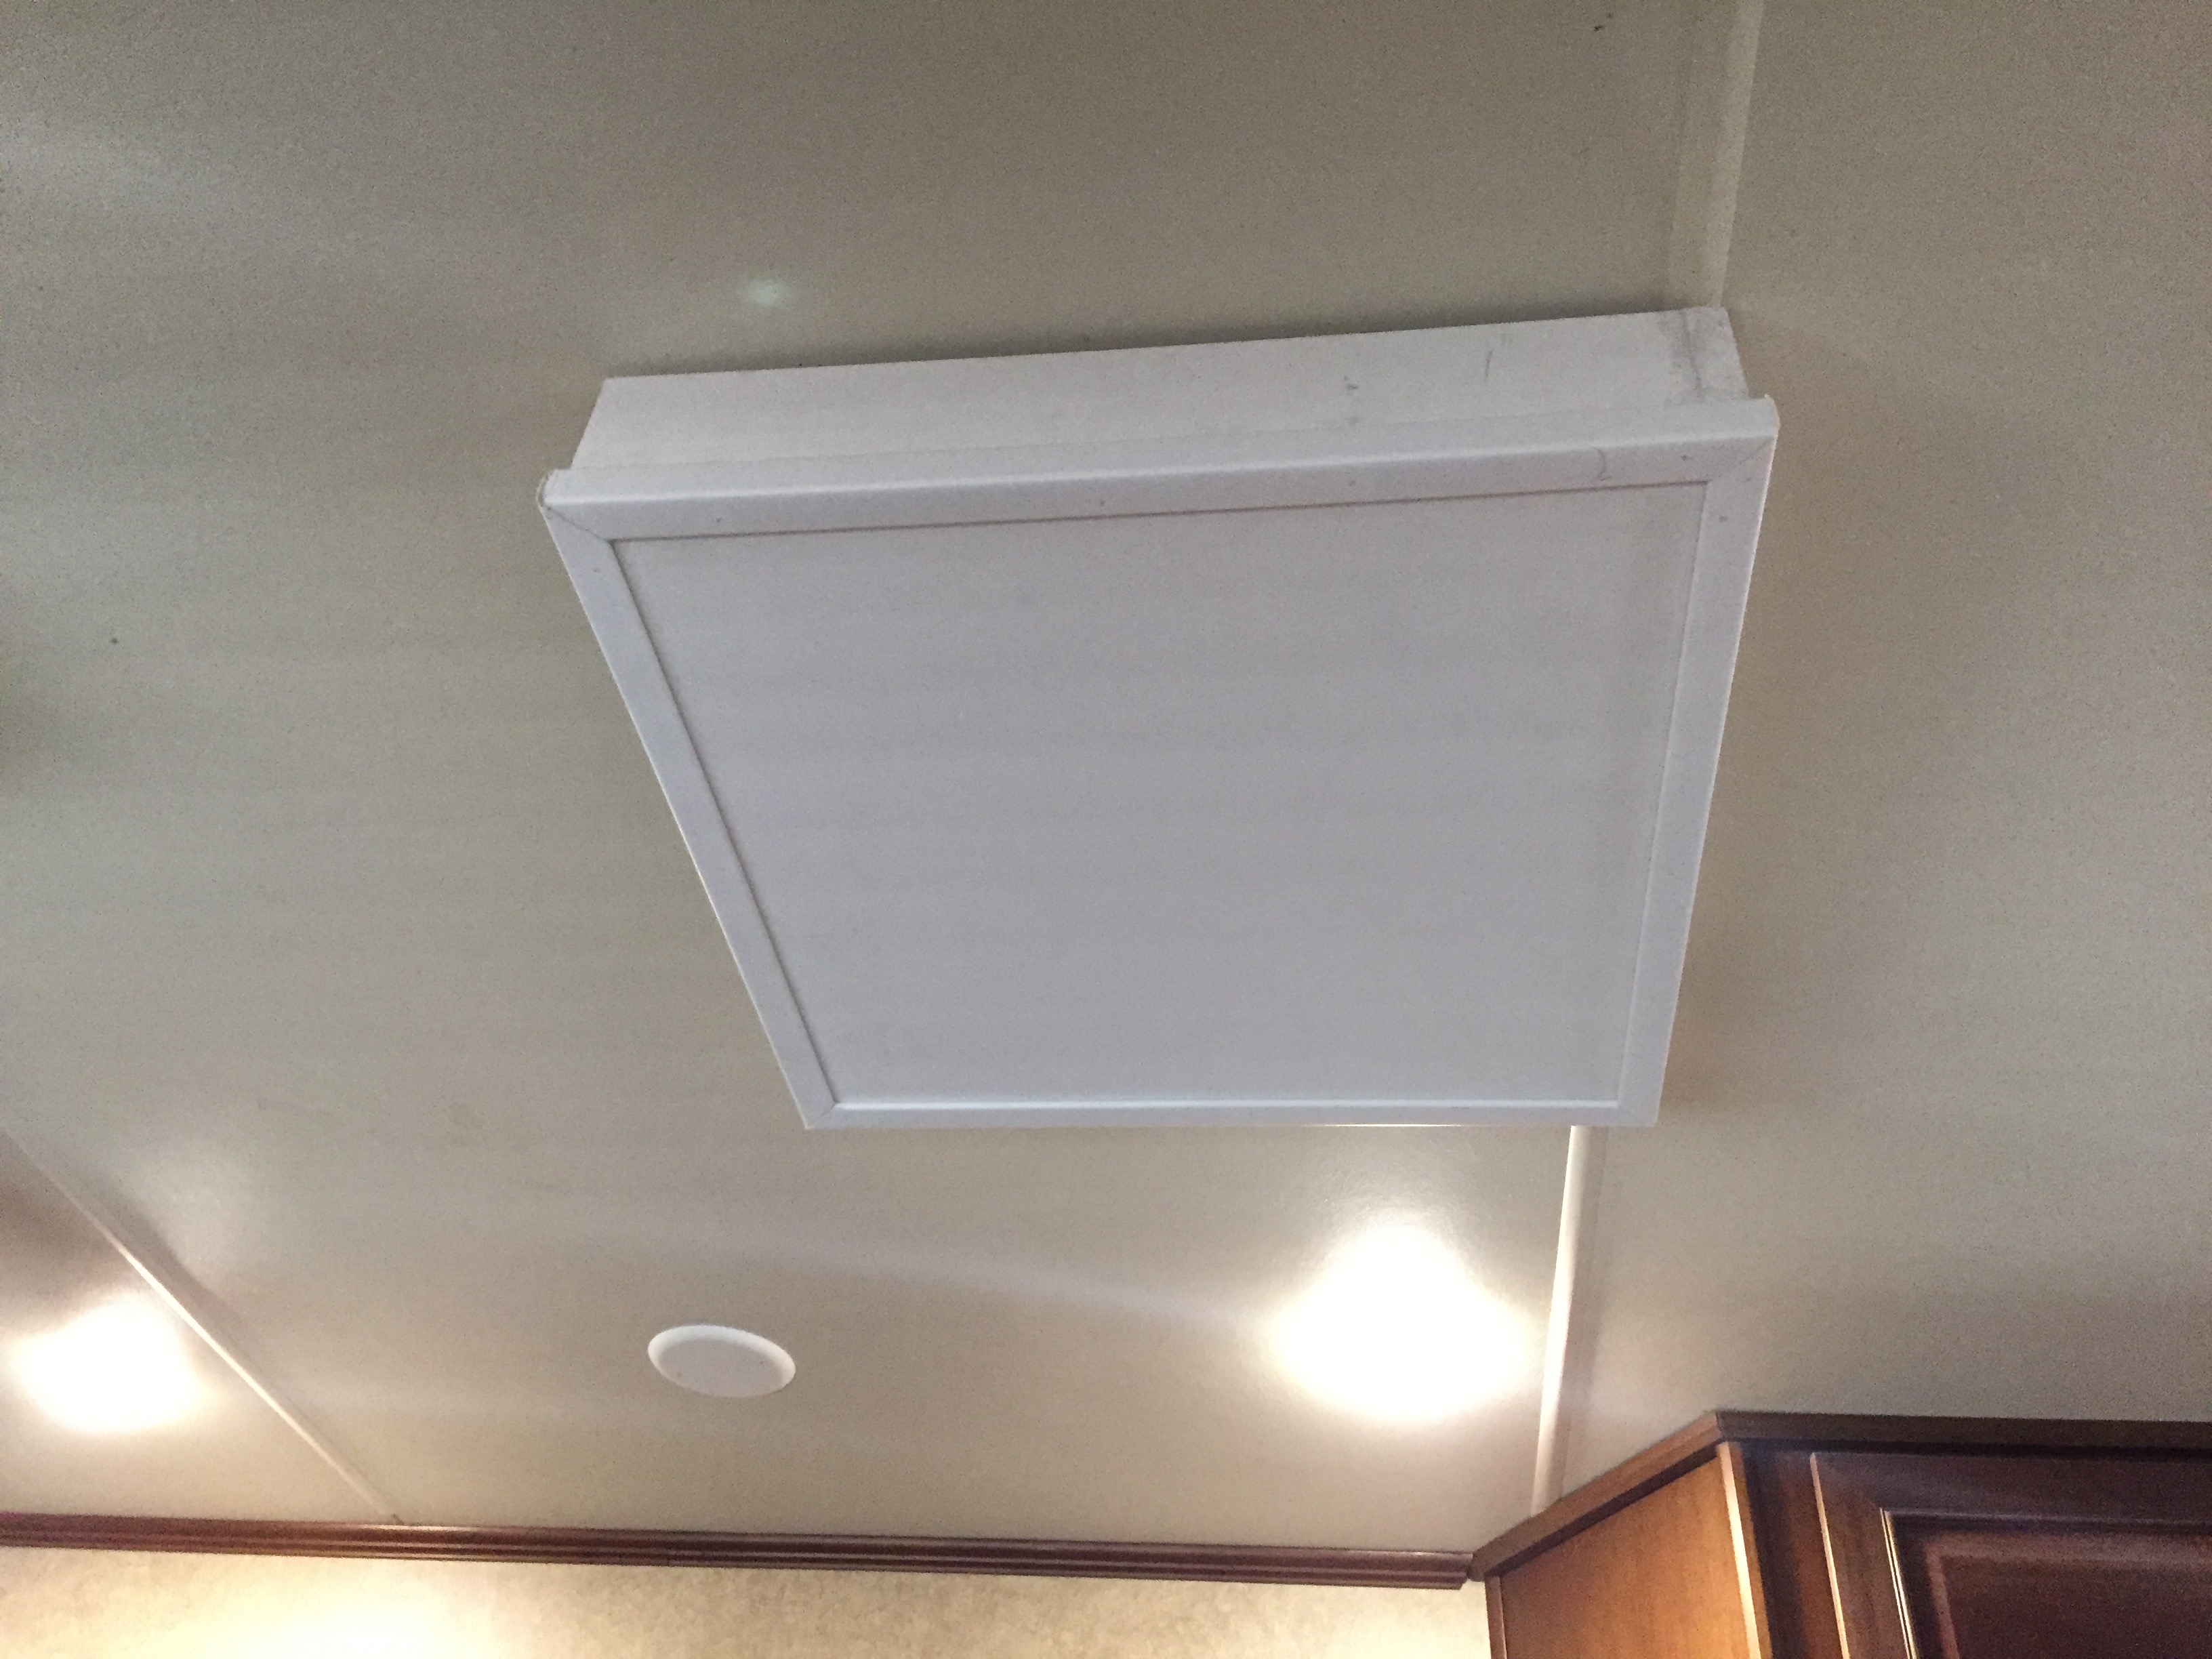
See pretty 🙂 – Trace

Although we drove 1200 miles with this in place, the magnet never pulled away from the metal plate. But even if it had, it would just swing harmlessly down. When it’s “closed” the bottom of the box is 92″ from the floor, which is plenty of clearance. In our rig, when it’s “open” it’s still 75″ from the ground. And because it can be opened, the “dump” valve is still available to us, which is nice.

Lee grabbed me last minute to do the demo. I am a bit of a mess 🙂 – Trace
After installation, it was time to check the sound level! From the same position as before, with all other factors being equal, the meter gave us a reading of 62 dB, for a net reduction of 6 dB!!! This might not seem like a lot, but it is a massive amount. The decibel scale is logarithmic, not linear. This simply means that for every 3 decibels you move up or down the scale from 0-194, you are adding or dropping 50% of your remaining sound pressure levels to your exposure. By dropping 6 decibels, for instance, you first move 3 dB, and then another 3 dB. For each 3 dB you drop, your sound pressure levels will drop another 50% of the remaining sound pressure. The following table will help illustrate the order of magnitude associated with dB:
dB-Drop Survival Rate
1 dB Drop 79% of your noise has survived
3 dB-Drop 50% of your noise has survived
6 dB-Drop 25% of your noise has survived
9 dB-Drop 12.5% of your noise has survived
10 dB-Drop 10% of your noise has survived
20 dB-Drop 1% of your noise has survived
30 dB-Drop .01% of your noise has survived
So for our purposes here, we reduced the sound level 75%! That is a significant amount of improvement, especially considering I spent about two hours and $ 100 on it, and now I can watch TV without sitting in a pool of my own sweat and turning up the volume to absurd levels.

(For those non-techy, non-math geeks like me, essentially it was quieter when you stood directly beneath it. In other areas of the room, it didn’t seem to make a huge difference but directly underneath absolutely. Since the chair is almost directly underneath it, it will certainly make Lee’s life more pleasant. From my perspective it was relatively cheap, Lee had lots of fun making it, and it looks like it came with the RV. Those are my criteria for a good RV Mod! -Trace)
Supporting our Blog
We very much appreciate your support of our blog.

Very innovative indeed…obviously it helps with the sound, but I’m curious if it affects to the cooling ability of the AC?
It has no effect whatsoever. Same airflow as before. -Lee
Very awesome that Lee’s so handy! Great Job! I would have never guessed they could be so loud, our portable 4500 watt generator is only 52db at full load. And couldn’t imagine running that inside the rig, even though it is quite as generators go, it still seems load. I never knew the AC units were that loud. We have the whisper models, and they’re ducted in the roof, with all the noise outside. But even outside they seem pretty quite. But it sounds great what Lee built, that noise dampening makes a big difference! Hope you guys are still doing well, stay safe!
That’s interesting I thought everyone was dealing with this
From what I have seen many 5th wheel models now use a ducted in AC unit. This keeps the noise outside on the roof. I think they call it the whisper quiet system. But I know exactly what you’re talking about as we’ve been in rigs where the AC was so loud you couldn’t hear the TV or even talk. The ducted system doesn’t have the AC unit poking through the ceiling, the vents and return ducts are all that are inside. Much like a home AC unit.
I’m impressed~nice job, Lee!
Just a note that your ceiling is flat and many RV ceilings now have a gentle arch so the 1x4s on the short sides would need to be arched also, which is a little trickier but do-able.
Possibly, but keep in mind that it goes over top of the existing AC interior cover, and those don’t have any curve to them. I think most 5th wheels have enough “flat” section and that’s where the AC is usually placed.
Great point Ted thanks
Dumb question, do you carry around a table saw? As for the sound damper… great job. Clean install.
We don’t have a table saw. Lee borrowed one from some friends we were staying with. We have had access to power tools more frequently than I would have thought though. Several of our work camping jobs have had them or friends we stay with or meet in our travels
As future RV’rs/Workampers, we really appreciate all your posts, from day to day life to modifications. Thank you!
Pingback: Sixth Year – By The Numbers – Camper Chronicles